Information how to install EJBCA can be found in the Installation guide.
This Administrator Guide is a reference guide to the concepts, configurations and options available in EJBCA.
The guide is targeted for administrators who are responsible for installing, configuring and maintaining EJBCA installations.
More detailed hands on instructions for various day to day administrative tasks can be found in the User Guide.
This guide covers detailed information about using various protocols, hardware security modules etc of EJBCA. These details covers both configuration and usage.
Concepts
Before using this guide you should be familiar with the various concepts, such as certificate and end entity profiles, used in EJBCA.
There is a separate document explaining the different concepts.
Export and import profiles
Certificate and End Entity profiles can be exported as XML files and imported in another instance of EJBCA,
or in the same instance after removal of the old ones.
When exporting profiles (bin/ejbca.sh ca exportprofiles), all profiles will be exported to the specified directory. The
exported files will be given unique names containing profile name and profile id.
When importing profiles the profile name and id will be read from the filename. All profiles present in the specified
directory will be imported.
Fixed profiles will not be exported or imported. If a profiles with the same name as the one being imported already
exist, the profiles will not be imported. References to publishers with unknown id will be dropped.
Import of profiles try to keep the same profile id. If it already exist a profile with the same id in the database,
it will try to choose another and change any (end entity profile to certificate profile) reference during later imports.
The reason the id is kept is that there are references to the profile id from users belonging to the profile.
During import on a new EJBCA instance where CAs that are referenced from the profiles don't exist, a default CA has to be
specified on command line. Two CAs are considered identical in this context if they have the same subject DN.
It is also possible to import and export profiles in the AdminGUI in the 'End Entity Profiles' page and the 'Certificate
Profiles' page. The same limitations above apply even when exporting/importing through the GUI, but the profiles will be
imported from and exported into a zip file.
Managing CAs
Export and import CAs
Under certain circumstances, it can be wise to backup the CA's signature and encryption keys. Remember to protect the backup in the same way
as the CA itself.
Soft token CAs can be exported and backed up. CAs with the keys on a HSM can naturally not be exported through EJBCA. Use the HSMs methods to back up such keys.
Soft token CAs can be imported using both the CLI and Admin GUI, while HSM CAs can only be imported using the CLI.
*** Using command line interface ***
To export a CA named "TestCA" to the PKCS#12-file "/path/TestCA.p12" with password "foo123" enter the following
from the $EJBCA_HOME directory:
$ bin/ejbca.sh ca exportca TestCA ./TestCA.p12
Using JBoss JNDI provider...
Enter keystore password: foo123
$
To import the backup keys for "TestCA" later, enter the following from the $EJBCA_HOME directory:
$ bin/ejbca.sh ca importca TestCA /path/TestCA.p12 SignatureKeyAlias EncryptionKeyAlias
Using JBoss JNDI provider...
Enter keystore password: foo123
$
Enter the command:
$ bin/ejbca.sh ca importca --help
to get usage instructions how to import HSM CAs.
*** Using admin-GUI ***
To be able to export and import the CA's keys using the Admin GUI, you have to have superadministrator access.
Make sure that .p12 files are not automatically saved to an unsuitable place by your browser.
before you do an export.
To export a the CA's keys, do the following:
Select "Certificate Authorities" from the administrator menu.
Select the CA you want to export and press the "Edit"-button.
Go to the line where the help-text say "CA export requires the keystore password".
Enter the keystore password in the box to the right of the help-text.
Press the "Export CA keystore.."-button.
The PKCS#12-file will be downloaded by your browser to the location you select.
To import a CA's keys, do the following:
Select "Certificate Authorities" from the administrator menu.
Press the "Import CA keystore.."-button.
Fill out the form with the CA's name, full pathname to the PKCS#12-file and keystore password.
Keep the two "Alias.."-fields to the default value, if you used EJBCA to export the CA's keys.
Press the "Import CA keystore"-button.
Remove and restore CA soft keystore
Soft token CAs can have their keystore removed from the database. When the keystore is removed the
CA can not issue certificates and its CA token status is set to 'offline'.
Warning: Before removing the keystore make sure you have exported it if you would like to be able to
restore it later. See the section 'Export and import CAs'
To remove the catoken keys for "TestCA", enter the following from the $EJBCA_HOME directory:
$ bin/ejbca.sh ca removekeystore TestCA
Using JBoss JNDI provider...
$
To restore the catoken keys again for "TestCA" with the keystore exported as "TestCA-exported.p12", enter
the following from the $EJBCA_HOME directory:
$ bin/ejbca.sh ca restorekeystore TestCA /path/TestCA-exported.p12 -s SignatureKeyAlias -e EncryptionKeyAlias
Using JBoss JNDI provider...
Enter keystore password: foo123
$
Renew CAs
You can renew CAs in different ways:
Renew only CA certificate, using the same keys.
Renew CA keys and certificate.
To renew only the CA certificate using the same keys you simply press the button "Renew CA". Your CA have to be on-line for this to work, so it can sign the new certificate if it's a self signed CA or the certificate request if it is a sub CA.
Also if it is a subCA with the rootCA in the same EJBCA instance the root CA must also be on-line.
To renew the CA keys, set 'Next CA key' to '- Generate new key using KeySequence -'. After this you simply press "Renew CA".
Renewing the keys will not always work if you are using an HSM. It may work with some HSMs and not work with others.
You can report success and failures to us.
When using an HSM you can also make the renewal of keys manually. Simply generate new keys on the HSM with whatever
tools you used the first time (preferably the EJBCA cli tools) and select the newly generated keys as the 'Next CA key'.
Press 'Renew CA' to generate your new CA certificate.
Revoke CAs
If you want to revoke a CA you can do so by going to "Certificate Authorities" in the admin GUI. There is a button "Revoke CA".
If you revoke a Root CA it will revoke all certificates in the database issued by the root CA, and create a CRL.
If you revoke a Sub CA it will revoke all certificates in the database issued by the sub CA, and to the sub CA, and create a CRL.
This works automatically if the sub CA and root CA is handled by the same EJBCA instance. If the Sub CA is signed by an external CA, the sub CA's certificate must be revoked by the external CA.
If you revoke an external CA /sub CA to a CA in EJBCA) the external CAs certificate will be revoked and put on the CRL of the issuing CA in EJBCA.
Importing Certificates
EJBCA supports importing certificates into the existing database. This can be used for migrating data from other systems, or for importing the external administration certificates into EJBCA. Certificates can be imported induvidually or in bulk.
Importing a Single Certificate
In order to import a single certificate, use the command:
username - Username of the end entity which should be owner of the certificate. If the end entity does not exist, it will be created automatically. If the end entity already exists, the imported certificate will be associated with it, and the end entity properties (subject, subject alternative names) will be updated.
password - Password that will be set for the end entity (often called "enrollment code" in the public web).
caname - The name of the CA which has issued the certificate. The certificate's issuer signature will be verified against this CA. If the signature does not match, the certificate will not be imported. The CA certificate must be present in the database (at least as an external CA).
status - Status that should be set for the imported certificate. Supported values are ACTIVE (for valid certificate), and REVOKED (for revoked certificate). The revocation reason for REVOKED certificate will be set to Unspecified.
email - E-mail that will be used for the end entity. If the e-mail is set to string null, it will be taken from the certificate itself.
certificate file - Path to BASE64-encoded PEM file containing the end entity certificate.
endentityprofile - End entity profile used for the certificate. The certificate will be verified against the constraints set forth by this end entity profile. If the constraints are violated by the certificate, it will not be imported. If no end entity profile is supplied, the default EMPTY profile will be used.
certificateprofile - Certificate profile used for the certificate. Once the certificate is imported, it will be marked as belonging to the specified certificate profile. If the certificate profile is not specified, the fixed ENDUSER certificate profile will be used instead.
revocation reason - Allows a revoked certificate to be imported with a specific revocation reason. Use the --help switch to see a list of valid revocation reasons. Will be set to UNSPECIFIED if not specified.
revocation time - Allows a revoked certificate to be imported with a specific revocation time in the format yyyy.MM.dd-HH:mm. Will be set to the current time if not supplied.
Running the command without any parameters will display basic usage help, and a list of acceptable parameter values (for caname, status, endentityprofile, and certificateprofile).
Here's an example usage of the importcert command:
bin/ejbca.sh ca importcert myuser mypassword SomeCAName ACTIVE --email mymail@example.com mycertificate.pem --eeprofile EMPTY --certprofile ENDUSER
This command would create a new end entity (or use the existing one) in EJBCA called myuser with the supplied password, and add a new active (non-revoked) certificate for this user under the end entity profile EMPTY, using the certificate profile ENDUSER.
Importing Certificates in Bulk
In order to import certificates in bulk, use the commnad:
username-source - Specifies how to derive the username of the end entity that will own the certificate. Supported values are CN, DN, and FILE. If set to CN, the username will be equal to the common name attribute present in the certificate subject. If set to DN, the username will be equal to the entire distinguished name (subject) of the certificate. If set to FILE, the username will be the same as the name of the file (extension included). If set to CN, and CN is not present in the subject, the import will first fall back to using DN, or if that is not available as well, to file name. If set to DN, and the subject is not present in the certificate, the import will fall back to using the file name as the username. The end entity will be automatically created if it does not exist already. If the end entity already exists, the imported certificate will be associated with it, and end entity properties will be updated.
caname - The name of the CA which has issued the certificates. The certificate issuer signature will be verified against this CA. If the signature does not match, the certificate will not be imported. The CA certificate must be present in the database (at least as an external CA).
status - Status that should be set for the imported certificates. Supported values are ACTIVE (for valid certificates), and REVOKED (for revoked certificates). The revocation reason for REVOKED certificates will be set to Unspecified.
certificate dir - Path to the directory containing the certificate files. Each file should contain a single certificate. The directory should not contain subdirectories, or non-certificates. The file extension does not matter - all the files will be processed.
endentityprofile - End entity profile used for the certificates. The certificates will be verified against the constraints set forth by the end entity profile. If the constraints are violated by the certificate, it will not be imported.
certificateprofile - Certificate profile used for the certificates. Once the certificate is imported, it will be marked as belonging to the specified certificate profile.
-resumeonerror - This optional switch can be used in order to force the import to proceed even if more serious errors are encountered. By default this option is not enabled. The errors that are covered by this switch, amongst others, are end entity profile constraint violations, problems with reading/parsing of certificate files etc.
revocation reason - Allows a revoked certificate to be imported with a specific revocation reason. Use the --help switch to see a list of valid revocation reasons. Will be set to UNSPECIFIED if not specified.
revocation time - Allows a revoked certificate to be imported with a specific revocation time in the format yyyy.MM.dd-HH:mm. Will be set to the current time if not supplied.
Running the command without any parameters will display basic usage help, and a list of acceptable parameter values (for username-source, status, endentityprofile, and certificateprofile).
Certificates that are already present in the database will be skipped during the import. Certificates that belong to a different CA than the one specified will be skipped as well. Any other discrepancy (like invalid file format, subdirectory, or violated end entity constraints) will stop the import operation, unless the -resumeonerror switch has been enabled. Certificates that have been imported up until the discrepancy will still remain in the database. For each certificate that has been skipped, the command will output its serial number and name of the file. The same information will be displayed for errors.
Once the import has finished, a short summary is displayed about the number of imported certificates, number of redundant (already present) certificates, and number of rejected certificates (that were not signed by the requested CA). No summary will be displayed if abnormal errors are encountered (i.e. anything besides the already present certificate or mismatched CA), unless the -resumeonerror switch has been enabled.
If the -resumeonerror switch has been enabled, the import will continue until all of the entries from the directory are processed. Errors will still be printed-out, and the summary will contain the following additional information:
Number of certificates that could not be read (because of malformed format or because they're directories).
Number of certificates that have violated the end entity constraints (invalid number of subject/subject alternative name fields, wrong values for non-modifiable fields etc).
Number of certificates that could not be read because of other errors.
CRL generation
A new CA should always issue an (empty) CRL. This is done when the ca is created.
CRLs can be generated using 'Basic functions' in the Admin GUI, or using the CLI by running:
bin/ejbca.sh ca createcrl <CA name>
See also the User Guide for details how to configure CRL periods, CRL Distribution Points and CRL Issuers.
There are, at least, two ways to have EJBCA automatically create updated CRLs.
CRL Update service worker
In the Admin GUI you can go to 'Edit Services' and add a new service. Edit the service and select the 'CRL Updater'
worker and the interval you want to use. Don't forget to set the service to 'Active'.
This service will check, at the selected interval, if it is required to regenerate the current CRL (due to being expired or within the expiration threshold), and will generate a new one if needed.
Cron job
Yet another way to generate CRLs way is to have a cron job or equivalent call 'bin/ejbca.sh ca createcrl'.
The 'createcrl' command will then check all active CAs if it is a need to update their CRLs,
otherwise nothing is done.
If you want to force CRL generation for a CA, use 'bin/ejbca.sh ca createcrl caname'
Example crontab entry:
PATH=$PATH:/usr/java/jdk1.6.0_24/bin
@daily cd /home/ejbca;/home/ejbca/bin/ejbca.sh ca createcrl;
where '/usr/java/jdk1.6.0_24/bin' is the path to where 'java' can be found.
'/home/ejbca' is where ejbca is installed.
Sample crontab to be installed with 'crontab -e':
SHELL=/bin/sh
PATH=/usr/local/sbin:/usr/local/bin:/sbin:/bin:/usr/sbin:/usr/bin
CLASSPATH=$CLASSPATH:/root/ejbca
APPSRV_HOME=/usr/local/jboss
# m h dom mon dow command
00 0    * * *   cd /root/ejbca;./bin/ejbca.sh ca createcrl
Delta CRLs
EJBCA can issue delta CRLs.
In the CA configuration, set 'Delta CRL Period' to the amount of time your delta CRLs will be valid if delta CRLs are issued.
Command line interface and CRL Update service will generate delta CRLs if 'Delta CRL Period' is larger than 0.
Retrieving CRLs
EJBCA will store all generated CRLs unless you manually remove them from the database.
You can retrieve CRLs using the command line interface or Web UIs, either the latest CRL or a CRL with a specific CRL number.
Command line interface: bin/ejbca.sh ca getcrl --help
Public Web->Fetch CA CRLs, with additional 'crlnumber=<crl number>' parameter
RA Web->CA Certificates and CRLs, with additional 'crlnumber=<crl number>' parameter
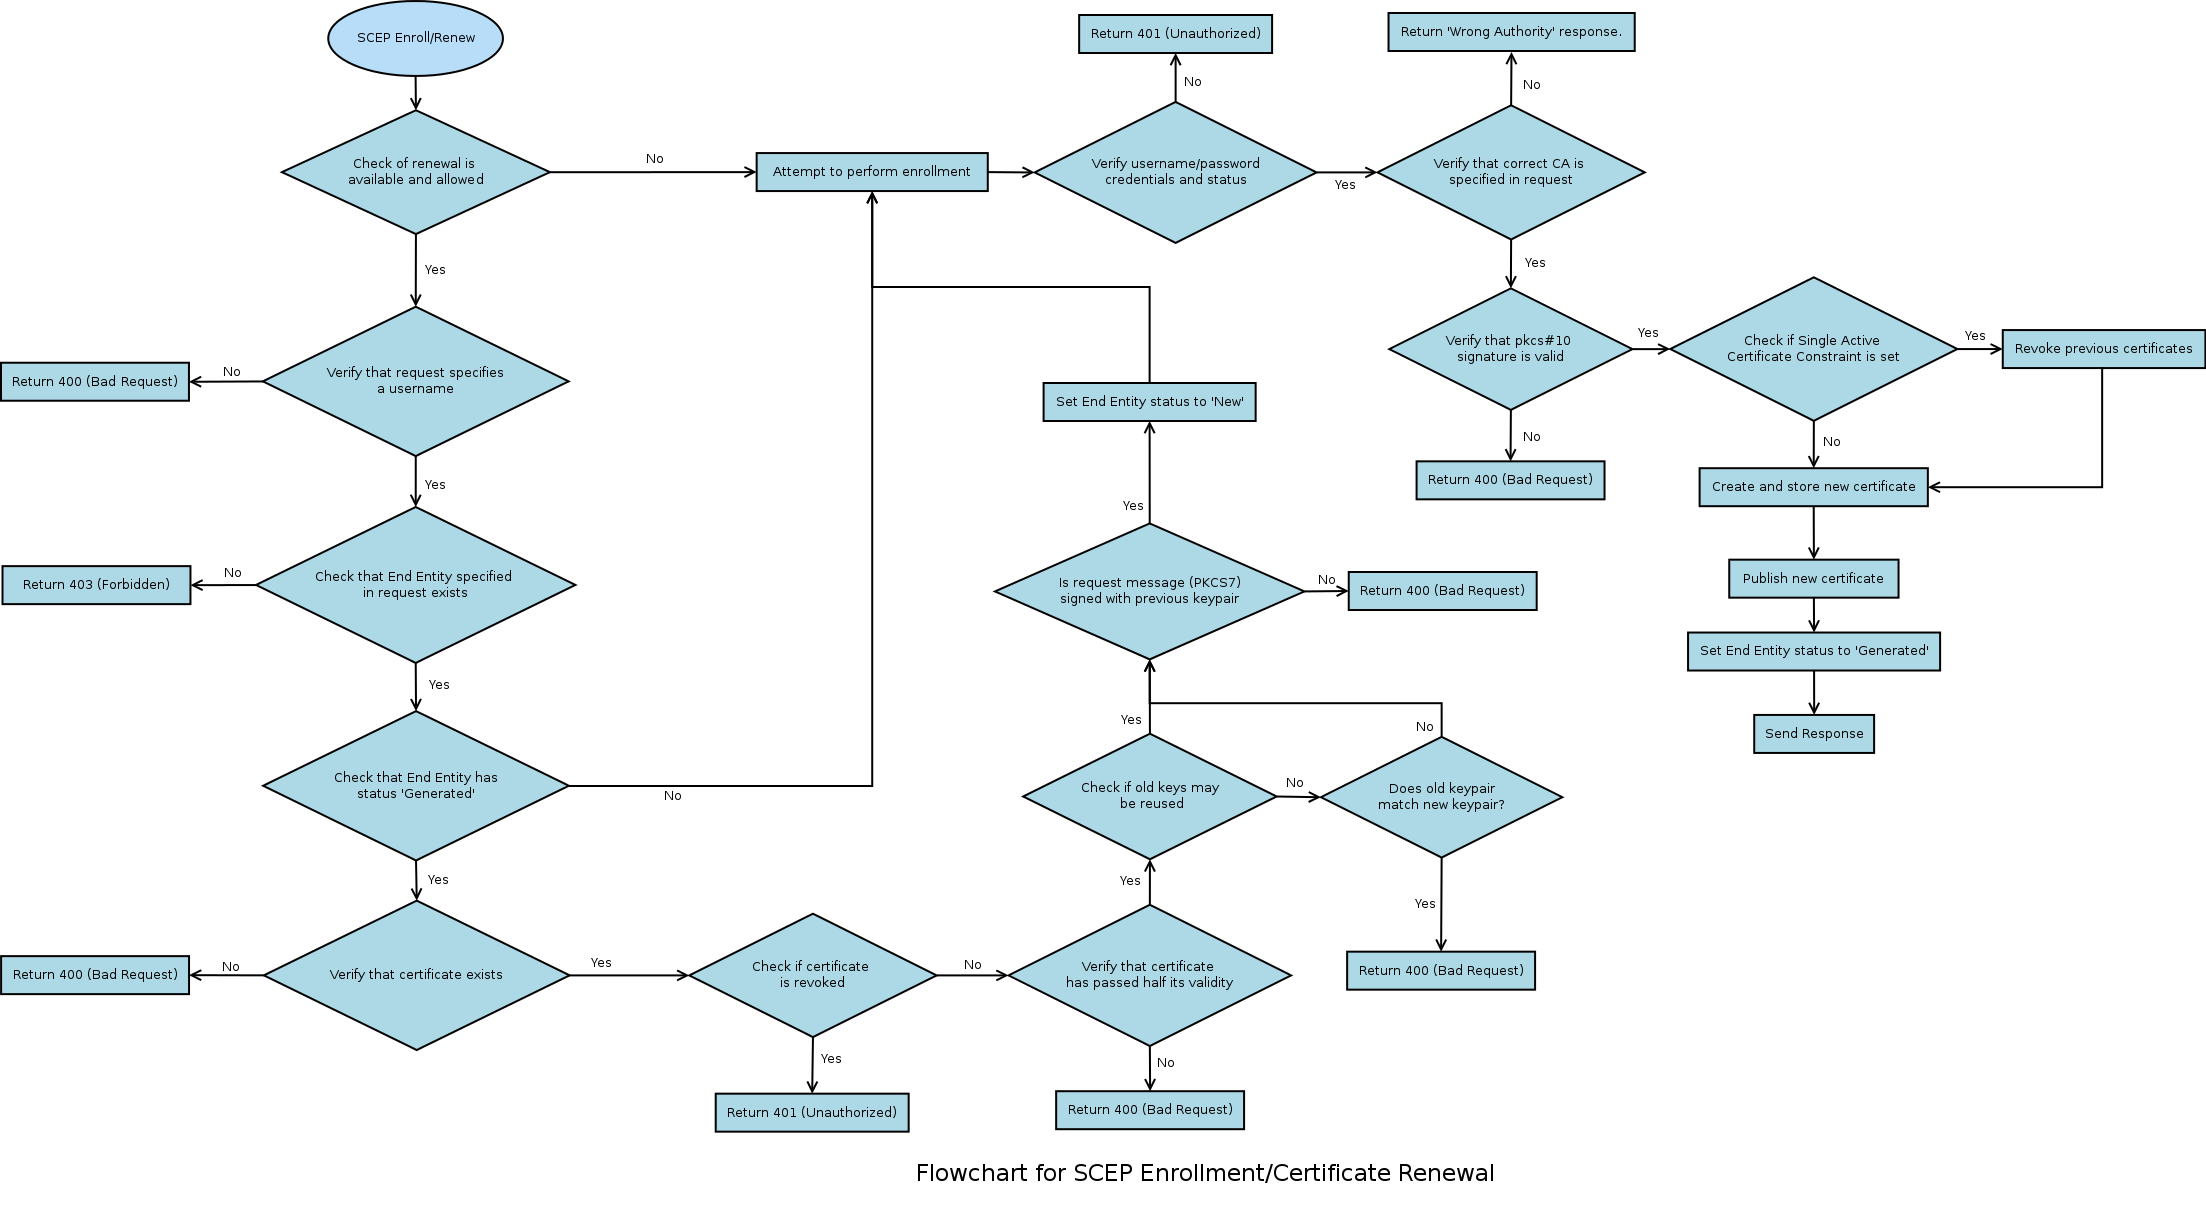
SCEP
SCEP is a protocol commonly used by network equipment to enroll for certificates. It is also used by MdM and EMM solutions to enroll certificates on
behalf of devices such as mobiles. SCEP is specified in a draft by IEFT.
There are some compatibility issues with SCEP, one being whether the CA certificate should be returned in an SCEP enrollment
response or not. The CA certificate is optional, but some clients such as the Cisco VPN client to require it while others, such as Juniper's,
prohibit it. EJBCA has this option configurable.
The URL contains a reference to a configuration alias 'ALIAS'. 'ALIAS' is an alphanumeric string that refers to
the set of SCEP configurations that should be used when handling the SCEP reqest coming through this URL. It is possible
to configure as many configuration aliases as desired through the command line or the AdminGUI. Documentation on how to
create and configure the SCEP aliases in the command line are available when executing the following command from EJBCA home directory:
Creating a SCEP alias with the name 'scep' makes it available using the default URL (same URL as in previous versions), http://HOST:PORT/ejbca/publicweb/apply/scep/pkiclient.exe
./bin/ejbca.sh config scep
To manage SCEP aliases in the AdminGUI, go to System Functions -> SCEP Configuration
Level of SCEP support
EJBCA implements features from (at least) draft 11 of the SCEP specification. We implement the following SCEP messages:
PKCSReq including Client Certificate Renewal
GetCRL
GetCACert
GetCACertChain
GetCACaps
GetNextCACert
Using the External RA(Enterprise Edition Only) API the following SCEP message is also supported for polling mode:
EJBCA will not send back proper SCEP error messages in all cases of failure. The error messages are not completely implemented, although most of them are implemented.
Configuration
Configuring SCEP is done in the Admin GUI, under 'SCEP Configuration'. To be able to edit SCEP configuration, you have to have the '/edit_systemconfiguration' access.
*** Operation Mode ***
SCEP can be run in one of the following three modes:
In CA mode EJBCA receives a SCEP 'PKCSReq' requests and sends back the certifificate/CRL immediately in a proper SCEP reply message.
The SCEP client will send messages directly to the CA, encrypted with the CAs certificate and the CA will authenticate/authorize the
request based on username and enrollment code of an end entity pre-created in EJBCA.
This mode does not support the 'polling' model, EJBCA uses the direct CA method, where a request is granted or denied immediately.
The CN part of the DN in the PKCS#10 request, which is part of the SCEP request, will be used as the 'username' when
authenticating the request in EJBCA. Create the SCEP request with a CN matching the username registered in EJBCA.
The challengePassword in the PKCS#10 request, which is part of the SCEP request, will be used as the 'password' when
authenticating the request in EJBCA. Create the SCEP request with a challengePassword matching the password registered in EJBCA.
The most common errors should be wrong username/password or wrong status (not NEW) on the user in EJBCA.
In RA Mode (Enterprise Edition only) EJBCA recieves SCEP 'PKCSReq' requests when a user is to be created (or edited). A certificate is returned immediately in
a proper SCEP reply message. The RA is authenticated/authorized based on configuration.
For this mode to work, the property 'ALIAS.operationmode' in the command line or 'Operational mode' in the AdminGUI has to be set to 'ra'.
All the parameters needed to create the new end entity should be set through the command line or the AdminGUI. Documentation on how to set
the different parameters through the command line is available when executing the following command from EJBCA home directory:
./bin/ejbca.sh config scep updatealias --help
*** Include CA certificate in response ***
Setting this value to true will cause the CA certificate to be included in the response, if applicable
This setting activates Client Certificate Renewal, as defined in Appendix D of the SCEP draft. In short, this
mode allows the server to interpret enrollment requests as certificate renewal requests, only if the latest issued certificate for the end entity has passed half its validity. To be
valid, the PKCS#7 wrapping the CSR must be signed by the old certificate's keypair.
*** Allow Client Certificate Renewal using old key (Enterprise Edition only) ***
The SCEP draft doesn't mandate if old keys may be reused for Client Certificate Renewal or not, so EJBCA includes this as a setting.
*** CA Certificate Rollover ***
EJBCA supports creating a rollover certificate for a CA, and issuing certificates via SCEP with this new CA certificate. This is useful when changing the CA key during renewal. It is described in
Appendix E of the SCEP draft.
External RA SCEP Server (Enterprise Edition Only)
EJBCA supports the SCEP 'polling' RA model using the External RA API.
Using this, a SCEP client can send a request to the External RA, and then wait, polling the RA for updates.
When the request is processed by the CA, which fetches the pkcs10 request from the External RA, the certificate is sent back to the External RA.
When the certificate is complete on the External RA, the RA sends back the SCEP certificate response the next time the SCEP client
polls the RA. This feature is very useful to securely insulate the CA from the SCEP clients throughout the network.
Tested devices
*** Cisco ISE ***
EJBCA SCEP, using RA mode, has been sucesfully integrated with Cisco ISE. Configuring EJBCA as a backend CA in Cisco ISE devices can be enrolled with certificates from EJBCA, through the ISE enrollment interfaces.
*** iPhone/iOS ***
You can enroll certificates for the iOS directly with EJBCA using SCEP. There is a SCEP profile in the iPhone that you can use for this.
PrimeKey has created a detailed howto that is available together with a support subscription.
*** OpenScep ***
OpenScep has does not work with modern OpenSSL implementation (only works with OpenSSL 0.9.6) and also has a bug
that causes it to crash when receiving SCEP responses. There are patches that address these issues though so it can be used.
To use the OpenScep client to request a certificate from this servlet, use the command:
EJBCA has been confirmed to work with MobileIron MDM system.
Mobile Iron always use the CA identifier 'MobileIronSCEP' in all SCEP request.
SCEP request from MobileIron always start with "operation=GetCACaps&message=MobileIronSCEP".
Therefore the CAs name have to be set to 'MobilIronSCEP' to make it work.
Beside that RA and CA mode works perfectly with MobilIronMDM.
To enroll using the Juniper box go to the Web GUI at https://<juniper-ip>/, then click your way to Objects->Certificates.
To create a new certificate request:
New - enter the DN that your box will receive:
Name=netscreen.foo.se
Organization=PrimeKey
Country=SE
IP Address=192.168.1.1
FQSN=netscreen.foo.se
Click generate.
Automatically enroll to -> New CA Server settings. You have to configure if EJBCA should use the direct CA mode or the RA polling mode:
CA IDENT: The CA Name in EJBCA, for example ScepCA.
Challenge: A password for a pre-registered user in CA mode, or a random password used for polling RA mode.
Click OK.
You can now see the request in Objects->Certificates. If you are using polling RA mode, you can click 'Retrieve' after the request
has been approved in the CA and the certificate has been generated.
*** Cryptlib ***
When using Cryptlib, the CA certificate must have
KeyUsage 'Key Encipherment' in addition to the usual key usage flags. This is reasonable, since SCEP requires the CA
to actually encrypt data (which generally is a bad thing, since a special encryption certificate should be used for that).
Key usage for an ScepCA should be: Certificate Sign, CRL Sign, Digital Signature, Key Encipherment
Use the complete path as for the Cisco VPN client below as server name.
*** Cisco VPN client ***
To enroll using the Cisco VPN client use:
CA URL='http://127.0.0.1:8080/ejbca/publicweb/apply/scep/ALIAS/pkiclient.exe'
CA Domain=your CAs name in EJBCA
In the DN screen simply enter the username (as added in EJBCA) as 'Name [CN]'
When using an External RA to enroll with the Cisco VPN client, the RA certificate must have
KeyUsage SigitalSignature and KeyEncipherment for the client to accept the CA certificates.
However, to locate the RA encryption certificate, only KeyEncipherment can be set, which makes things quite complicated.
The conclusion is that RA enrollment does not work with Cisco VPN client.
*** AutoSscep ***
EJBCA has been tested successfully with AutoSscep for enrollment against the CA and the
External RA SCEP service.
Instructions:
Download and build AutoSscep (make).
Create a configuration file, ejbca.conf, as the example below.
Create a user in EJBCA with username (common name) and DN exactly as entered in the configuration file.
run 'autosscep ejbca.conf'.
Sample configuration file, ejbca.conf:
Verbose = "yes"
Debug = "no"

CADir="/home/autosscep/"
CertDir="/home/autosscep/"
KeyDir="/home/autosscep/"

[CA]
DN="C=SE, O=EJBCA Sample, CN=ManagementCA"
URL="http://localhost:8080/ejbca/publicweb/apply/scep/pkiclient.exe"
CertFile="ManagementCA.cacert.pem"
EncCertFile="ManagementCA.cacert.pem"
[/CA]

[Certificate]
CertFile="mycert"
KeyFile="mykey"
CADN="C=SE, O=EJBCA Sample, CN=ManagementCA"

# Create a user with username "router4711" and password "foo123" in EJBCA
# to automatically enroll
# Note you need to add a user with exactly these fields in the DN in EJBCA
Email = "mymail@mydomain"
Country="SE"
State="BS"
Location="Stockholm"
Organization="PrimeKey"
CommonName="router4711"

ChallengePassword="foo123"
[/Certificate]
AutoSscep also handles enrolling against an RA, where the RA first sends a PENDING response which the request is beeing processed.
After processing (by the CA) you simply run the AutoSscep client again to pick up the generated certificate.
In order to enroll against the External RA SCEP Server in EJBCA i only had to change the CA part of the configuration file to
use the SCEP RA servers certificate for signing and encrypting the messages instead of the CAs, and to use the URL to the RA.
The SCEP RA certificate is the end entity certificate issued to the External RA SCEP server (the keystore is usually called scepraserver.p12).
Cisco PIX is working as of EJBCA 3.1.3.
Also Cisco 3000 is reported working well. The description below is for PIX, 3000 probably have less constraints than the PIX.
You must configure JBoss to use port 80 to enroll with PIX, this is done in
APPSRV_HOME/server/default/deploy/jbossweb-tomcat50.sar/service.xml (or similar depending on version). You must run as root to use port 80.
EJBCA supports the 'ca' mode of enrollment for pix, not 'ra'. For 'ra' and polling enrollment you can use the External RA API SCEP module.
The certificate profile used by the SCEP CA must include the key usages KeyEncipherment and DataEncipherment, otherwise PIX will
not be able to verify/decrypt encrypted SCEP messages. This is not in the default certificate profile for CAs. Create a new certificate profile before
creating the Scep CA, you can use ROOTCA as template for the new certificate profile.
When enrolling for certificate using SCEP with for example a Cisco PIX it is a 'ca_nickname'. This nickname
should be the CA-name as defined when creating the CA in EJBCA. For example 'vpnca'.
Only use lower-case names when creating the CA in EJBCA, since PIX will change the CA name VpnCA to vpnca when enrolling.
The username in EJBCA must be the name the PIX identifies itself with name.domain, example pix.primekey.com.
The end-entity DN must include the DN components CN and unstructuredName, ex "CN=pix.primekey.com, unstructuredName=pix.primekey.com".
You can also include O, C etc in the certificate. A normal DN for a PIX is "CN=pix.primekey.com,unstructuredName=pix.primekey.com,O=PrimeKey,C=SE".
Certificates used for PIX MUST include the DN component unstructuredName (fqdn) and could also include unstructuredAddress (ip) being the IP-address of the PIX.
The certificate used on the Cisco PIX MUST have a SubjectAltName field dNSName, matching the DN component unstructuredName. This is needed in order for Cisco VPN clients to connect to the PIX. The DNS Name field is not necessary for the PIX to enroll perfectly with EJBCA, only for the client to be able to connect.
Certificates used for PIX may also use the SubjectAltName iPAddress matching the DN component unstructuredAddress, but it's not necessary.
Cisco does not support use of the 'Domain Component', DC, attribute in DNs, don't use it.
KeyUsage should include Digital Signature and Key Encipherment, the EJBCA defaults work fine.
When the Cisco VPN-client (above) connects to the PIX, the 'ou' part of the clients DN must match a Vpngroup you have specified,
otherwise the connection will fail.
Cisco PIX (older) needs the SCEP response messages to use MD5 as hash algorithm, not SHA1, this is handled by EJBCA automatically.
Please notice this Cisco note:
Be sure that the PIX Firewall clock is set to GMT, month, day, and year before configuring CA.
Otherwise, the CA may reject or allow certificates based on an incorrect timestamp.
Cisco's PKI protocol uses the clock to make sure that a CRL is not expired.
Set timezone first, then set time, then check time with 'show clock'.
The enrollment steps should be something like:
-- Connect with pix and enter admin mode
telnet 10.1.1.1 (default pwd cisco)
enable (default blank pwd)
configure terminal
-- Enable CA logging
debug crypto ca
-- Clear current PKI config
clear ca identity
-- Enter PKI config, i.e location of CA etc. Don't require CRLs, it's easier
ca identity pixca ca-ip:/ejbca/publicweb/apply/scep/pkiclient.exe
ca configure pixca ca 1 0 crloptional
ca authenticate pixca
-- wait --
-- Look at the fetched certificate
show ca certificate
ca save all
wr mem
-- Get a CRL if you really want to (if you did not configure CRL as optional you must)
ca crl request pixca
-- wait --
show ca crl
-- Generate keys and enroll for the certificate (user in ejbca has password foo123)
ca generate rsa key 1024
ca enroll pixca foo123
-- wait, wait, this will take a long time --
-- Look at the fetched certificate, this should now show both the pix cert and the ca cert
show ca certificate

pix(config)# show ca cert
Certificate
  Status: Available
  Certificate Serial Number: 594f643a6916d78d
  Key Usage: General Purpose
  Subject Name:
    C = SE
    O = PrimeKey
    CN = pix.primekey.com
    UNSTRUCTURED NAME = pix.primekey.com
    UNSTRUCTURED IP = 10.1.1.1
  Validity Date:
    start date: 14:42:29 GMT Sep 17 2005
    end   date: 14:52:29 GMT Sep 17 2007

CA Certificate
  Status: Available
  Certificate Serial Number: 7c7cf75236955a51
  Key Usage: General Purpose
    C = SE
    O = PrimeKey
    CN = pixca
  Validity Date:
    start date: 15:59:20 GMT Sep 16 2005
    end   date: 16:09:20 GMT Sep 14 2015
CMP
CMP (RFC4210) is a very complex protocol, which EJBCA does implement some parts of.
The following CMP messages are supported:
Initialization request (ir)
Certification request (cr)
Certification confirm (certConf)
Revocation request (rr)
NestedMessageContent (nested)
Key Update Request (kur)
Certificate requests use the CRMF (RFC4211).
EJBCA can work in two modes with CMP:
Client mode - This is the default mode. Client mode works like any other enrollment in EJBCA. When a request comes in, EJBCA verifies the request (see User authentication below)
and issues a certificate to a user that has been previously registered in EJBCA.
RA mode - RA mode is used when the CMP client will act as an RA to EJBCA (the RA sends a certificate request to EJBCA). No user is pre-registered in EJBCA,
but when authenticated RA CMP messages arrive a user is created in EJBCA and a certificate is issued.
In RA mode, EJBCA supports several CAs and profiles based on the use of configuration alias specified in the URL used (see below).
CMP and 3GPP/4G/LTE configuration guide
PrimeKey has created a detailed CMP configuration guide, with details how to
configure EJBCA for 3GPP/4G/LTE networks using CMP. The guide is available together with a support subscription from PrimeKey.
An example cmpforopenssl command to test Vendor CA authentication with a three level Vendor CA PKI is:
Use Vendor Certificate Mode: Use and add CANevRoot as Vendor CA
Configuration
Configuring CMP is done in the Admin GUI, under 'CMP Configuration'. To be able to edit CMP configuration, you have to have the 'edit_systemconfiguration' access.
CMP over http
By default EJBCA support CMP over the http transport protocol.
The URL for the CMP servlet is:
http://127.0.0.1:8080/ejbca/publicweb/cmp/ALIAS
ALIAS is a configuration alias specifying the set of CMP configurations to be used when handling a request sent through this specific URL. ALIAS can be any alphanumeric
string. You can specify as many aliases as you need in the Admin GUI.
Example:
http://127.0.0.1:8080/ejbca/publicweb/cmp/cmpalias
Any CMP request sent through this URL will use the CMP configurations associated with the alias "cmpalias"
CMP over TCP
You can enable a CMP TCP service by changing the option "cmp.tcp.enabled" in conf/cmptcp.properties (copy conf/cmptcp.properties.sample to conf/cmptcp.properties first).
When re-deploying EJBCA this will start a TCP listener on the default port for CMP over TCP. You must run the application server as root to use the default port, since it is a low port (<1024).
See the documentation in conf/cmp.properties for information about configuration options for TCP. We recommend using a non standard port > 1024.
CMP requests sent over TCP will be using CMP configurations associated with the configuration alias "tcp". Note that a CMP configuration alias with the name "tcp"
does not exist per default. It has to be created (and/or altered) through the Admin GUI before any CMP request arrives through TCP.
Although EJBCA still supports CMP over TCP for now, it will not be supported for much longer. That is why we strongly recommend using CMP over HTTP instead.
CMP Message Authentication
EJBCA supports 4 modules for message authentication. Which modules to use, along with their parameters, can be set in the Admin GUI under 'CMP Configuration'.
The four supported modules are either password extractors or PKIMessage verifiers:
Password extractors (client mode only):
RegTokenPwd: Extracts the password from the CMP request through the means of a regToken control (id-regCtrl-regToken) in the CRMF message. The regToken is a
UTF8String containing the users password as registered in EJBCA. This module requires no parameters
DnPartPwd: Extracts the password from the subjectDN of the user the request concerns. As a parameter, the DN part that contains the password should be
specified. For example, if the subjectDN is "CN=name,C=se,UID=PASSWORD", the parameters should be set to "UID"
PKIMessage verifiers:
HMAC: This module uses a shared secret to authenticate the CMP message:
In RA mode, the shared secret is set as a parameter to this module. If no parameter is specified, EJBCA will use the shared secret specified in the CA
under "CMP RA Authentication Secret"
In client mode, the pre-registered end entity will be looked up in the database, and if there was a clear text password there, this password will be used
to authenticate the message. If there is no clear text password associated with that end entity, the authentication will fail.
EndEntityCertificate: When this module is used, the request sender should attach his certificate in the extraCert field in the PKIMessage and then
sign the message with his private key.
In client mode, a user may only send a CMP request regarding his/her own certificate. Ejbca will then check if the
certificate in extraCert does exist in its database and verifies that it belongs to the sender before verifying the signature. No parameters should be specified for
this module in client mode.
In RA mode, as a parameter, this module expects the name of the CA that that has issued the certificate in the extraCert field. If a parameter is specified,
EJBCA will then check if the certificate in extraCert does exist in the database, that it was issued by the right CA (the CA specified as a parameter) and that it
belongs to a registered administrator in EJBCA with the right authorizations to perform the operations required in the request. If no parameter is specified,
none of the mentioned checks will be performed, however, Ejbca will expect the CMP request to have been previously authenticated by other ways, for example,
by sending the request inside a signed NestedMessageContent
More than one module can be specified by separating them with a ";". In case of more than one module specified, the first module will be used to for
authentication testing. If the first module fails, the second module will be used for authentication testing, and so on until a successful authentication is
done or all alternatives fail.
CMP Response Message
When a CMP request is successfull, EJBCA returns a protected CMP response message. The protection type of the response message can also be configered in the
Admin GUI under "CMP Configuration".
EJBCA supports two types of response message protection: 'pbe' and 'signature'.
If a CMP request fails, EJBCA returns an unprotected, unencrypted CMP error message.
*** pbe ***
This type of protection of the response message can be used only when the request was authenticaed using HMAC authentication module. The parameters used for
the 'pbe' protection are based on the parameters used in the received HMAC authentication.
*** signature ***
The CA used to handle the CMP request signs the CMP response message using the same protection algorithm specified in the CMP request. If a conflict occures
between the protection algorithm in the request and the CA's signature algorithm, the CA's key algorithm will be used in combination with a digest algorithm
based on the protection algorithm in the CMP request. If a conflict occures even on the digest algorithm level, a default digest algorithm will be used.
For example, if the CMP request uses the protection algorithm ECDSA with SHA1 and the CA's signature algorithm is RSA with SHA256, the CMP response will be
signed using RSA with SHA1.
The 'signature' type of response protection can be used regardless of what authentication module was used to authenticate the CMP request.
CMP messages are signed using the CAs signature key. Verification of the signed CMP messages hence typically assumes that overly strict enforcement of Key Usage in CA certificate is not in place (similar to allow signing of OCSP responses under the CRLSign Key Usage).
Client mode for CMP
Client mode is used when the CMP client will act as an End Entity to EJBCA. This means that the End Entity must be pre-registered in EJBCA and that the client request is authenticated
with this pre-registered end entity before a certificate is issued. This is the same authentication model as for regular enrollment, i.e. browser enrollment, using a username/password combination.
The users DN is deducted from the request according to rules configured.
The username in EJBCA must be pre-registered.
The password for the user in EJBCA must be passed in the request (one-time password).
If the Certificate Profile allows it, keyUsage, validity and extensions are also taken from the CertTemplate in the request message.
Signature POPO is used.
After the user has been authenticated in EJBCA, a certificate is generated as usual and sent back to the client.
To use client mode, no particular configuration is needed, since this is the default mode.
*** User look-up ***
Initialization and certification requests uses the CRMF request message (RFC4211).
Users can be looked up from the request in different ways, as configured in the Admin GUI under "CMP Configuration".
By default the subject DN from the certTemplate in the request is used to look up the used in EJBCA.
You can also configure EJBCA to use the CN or the UID from the subject DN as the username in EJBCA.
*** Vendor CA authentication (EJBCA Enterprise only) ***
If the end entity has a Vendor certificate with which it should identify itself for initial enrollment, as specified in 3GPP for example, it can also do that.
In this case the CA issuing the end entity certificate is not the same as the Vendor CA. The vendor CA must be imported in EJBCA as an External CA ('Import CA certificate' in the admin GUI).
This is described in detail in the integration guide for 3GPP available with EJBCA Enterprise.
RA mode for CMP
RA mode is used when the CMP client will act as an RA to EJBCA. When the RA sends a certificate request to EJBCA, no user needs to be pre-registered in EJBCA.
When EJBCA receives the request, the message will be authenticated. After it has been authenticated, a user is created and a certificate is issued.
The users DN is taken from the CertTemplate in the request message send from the RA (i.e. the DN requested by the RA).
The username in EJBCA is generated according to the options configured
The password for the user in EJBCA is random.
If the Certificate Profile allows it, keyUsage, validity and extensions are also taken from the CertTemplate in the request message.
raVerify POPO is used.
Messages are authenticated using one of the configured authentication modules.
After the user has been created in EJBCA, a certificate is generated as usual and sent back to the RA, who will distribute it to the end-user.
If the same username is constructed (for example UID) as an already existing user,
the existing user will be modified with new values for profile etc, and a new certificate will be issued for that user.
*** KeyID ***
Instead of specifying an RA End Entity Profile, RA Certificate Profile and/or RA CA Name explicitly when creating a CMP alias, one can choose the 'KeyID' option.
When this option is selected, the value of the 'senderKID' field in the CMP request is used instead of the corresponding entry in the CMP alias (which is set to KeyID).
The client sending the CMP request must ensure the correctness of the CMP request, e.g. that the CA and Certificate Profile is authorized by the End Entity profile.
Note
KeyID is only visible when the number of available options is at least two.
*** Multiprotection support ***
In RA mode, it is also possible to send a CMP request with multiple signatures. Ejbca implements this feature following the specifications
in RFC4210. In cases where an end entity sends a protected PKI message to an RA, the RA forwards that message to a CA, attaching its own signature for protection.
This is accomplished by nesting the entire message sent by the end entity within a new PKI message.
Sample code for a signature protected NestedMessageContent message:
String subjectDN = "CN=bogusSubjectNested";
final byte[] nonce = "sendernonce".getBytes();
final byte[] transid = "trandis".getBytes();

PKIMessage crmfMsg = createCrmfReq();
//Signing crmfMsg
KeyPair eeKeys = getAdminKeys();
Certificate adminCert = getAdminCertificate();
ByteArrayInputStream    bIn = new ByteArrayInputStream(adminCert.getEncoded());
ASN1InputStream         dIn = new ASN1InputStream(bIn);
ASN1Sequence extraAdminCertSeq = (ASN1Sequence)dIn.readObject();
X509CertificateStructure extraCert = new X509CertificateStructure(ASN1Sequence.getInstance(extraAdminCertSeq));
crmfMsg.addExtraCert(extraCert);

final Signature sig = Signature.getInstance(PKCSObjectIdentifiers.sha256WithRSAEncryption.getId(), BouncyCastleProvider.PROVIDER_NAME);
sig.initSign(eekeys.getPrivate());
sig.update(crmfMsg.getProtectedBytes());
byte[] eeSignature = sig.sign();
crmfMsg.setProtection(new DERBitString(eeSignature));

PKIHeader myPKIHeader = new PKIHeader(new DERInteger(2), new GeneralName(new X509Name(subjectDN)), new GeneralName(new X509Name(((X509Certificate)cacert).getSubjectDN().getName())));
myPKIHeader.setMessageTime(new DERGeneralizedTime(new Date()));
// senderNonce
myPKIHeader.setSenderNonce(new DEROctetString(nonce));
// TransactionId
myPKIHeader.setTransactionID(new DEROctetString(transid));

PKIBody myPKIBody = new PKIBody(crmfMsg, 20); // NestedMessageContent
PKIMessage myPKIMessage = new PKIMessage(myPKIHeader, myPKIBody);
//Signing myPKIMessage
KeyPair raKeys = getRAKeys();
final Signature sig = Signature.getInstance(PKCSObjectIdentifiers.sha256WithRSAEncryption.getId(), BouncyCastleProvider.PROVIDER_NAME);
sig.initSign(rakeys.getPrivate());
sig.update(myPKIMessage.getProtectedBytes());
byte[] eeSignature = sig.sign();
myPKIMessage.setProtection(new DERBitString(eeSignature));

final ByteArrayOutputStream bao = new ByteArrayOutputStream();
final DEROutputStream out = new DEROutputStream(bao);
out.writeObject(myPKIMessage);
final byte[] ba = bao.toByteArray();
// Send request and receive response
final byte[] resp = sendCmpHttp(ba, 200);
*** Sample config ***
A sample config of EJBCA to allow an RA to request certificates for users.
The RA uses password based mac (pbe) protection of CMP messages with password 'password'.
Users will be created using UID from the request DN and with a prefix, so the resulting username will be: cmp<UsersUID>.
End entity profiles names CMP_ENTITY and CMP_CERT is created in EJBCA allowing the request DN.
CMP Operational Mode : RA Mode
Allow RA Verify Proof-of-Possession : check
CMP Response Protection : pbe
CMP Authentication Module : HMAC
CMP Authentication Parameters : password
RA Name Generation Scheme : DN
RA Name Generation Parameters : UID
RA Name Generation Prefix : cmp
RA End Entity Profile : CMP_ENTITY
RA Certificate Profile : CMP_CERT
RA CA Name : ManagementCA
*** Using one authentication secret per CA ***
Edit each CAs that should be used for CMP certificate issuance and enter new CMP RA Authentication Secret.
There should be no parameter specified for the HMAC authentication module, otherwise, this parameter will override the CA specific configuration.
Key Update Request (kur)
Also known as the Certificate Update request. When a key pair is due to expire, the relevant end entity may request a key update. The CMP request is signed
and the sender attaches their certificate in the extraCert field in the CMP message.
*** In Client Mode ***
In client mode, the only end entity that is allowed to send a KeyUpdate request is the end entity that owns the certificate to be renewed. This end entity
should be the one signing the request and attaching its "old" certificate (that has not been expired yet) to the CMP message. The CA will only look into the
certificate in extraCert to find which certificate is to be updated.
*** In RA Mode ***
In RA mode, an administrator is allowed to send a KeyUpdate request on behalf of an end entity. The adminstrator should be the one signing the request and
attaching his own certificate to the CMP message. Either only the subjectDN or both the subjectDN and the issuerDN of the certificate to be updated
are specified in the CertificateTemplate field in the CMP message.
In order for this request to succeed, the administrator sending the update request has to be authorized to perform this operation. Also, EndEntityCertificate
authentication module would have to be set among the configured authentication modules.
Proof of possession
Proof of Possession (POP) is another part where CMP has gazillions of different options.
The following POPs in the CRMF are supported by EJBCA:
raVerify - if "Allow RA Verify Proof-of-Possession" is checked, EJBCA will support the raVerify POP and in that case not do any verification of POP. By default this is false, because the standard does not recommend this option.
signature - where the PublicKey is in the CertTemplate and the signature is calculated over the CertReqMsg.certReq (the standard procedure when the CertTemplate contains the subject and publicKey values).
signature with POPOSigningKeyInput - where the PublicKey and subject DN is in POPOSigningKeyInput, possibly just copied from the CertTemplate. The signature is calculated over the POPOSigningKeyInput (if the values are also in the CertTemplate they must be identical).
Currently these are the POPOs supported by EJBCA, so if you don't use raVerify or signature your request will fail because POPO is not verified.
Server Generated Keys
With CMP it is possible for clients to request server generated keys. The client requests this by one of the following in the CRMF certificate request:
Leaving out the request public key in the CRMF request, as it is an optional field.
Adding a subjectPublicKeyInfo containing an AlgorithmIdentifier followed by a zero-length BIT STRING for the subjectPublicKey (RFC4210 Appendix D.4).
These options of course open up a vast field of options. Adding in that the server want to restrict what type of keys the clients can
request, and certify, there are a number of rather strict rules and business logic used by EJBCA. The below list highlights these choices, and apply only if server generated keys are allowed in the CMP alias configuration.
Note
In order to use server generated keys, this must be allowed in the CMP alias. By default it is not allowed and all requests for server generated keys will be denied.
If the request does not contain a request public key, key generation options are taken from the certificate profile that will be used to issue the certificate:
The certificate profile must contain only one allowed key algorithm and one allowed key specification, for example 'RSA 1024' or 'ECDSA secp256r1'.
If there is not a single distinct choice, the request will be denied and an error returned to the client.
If the certificate profile contains a subjectPublicKeyInfo with the RSA algorithmId (rsaEncryption = 1.2.840.113549.1.1.1) the certificate profile must contain a single choice of key sizes allowed.
If there is not a single distinct choice, the request will be denied
If the certificate profile contains a subjectPublicKeyInfo with the ECDSA algorithmId (id_ecPublicKey = 1.2.840.10045.2.1) the subjectPublicKeyInfo must contain parameters where two choices are allowed:
implicitlyCA - the certificate profile must contain a single choice of curves allowed, otherwise the request will be denied.
namedCurve - with the OID of a supported named curve, which is among the allowed curves in the certificate profile.
These rules allow the CA administrator to control what server generated keys the CA will generate and return to the client, and can be sumarized as:
A distinct choice of a single key algorithm and key size/curve, defined in the certificate profile.
A choice of a single RSA key size and a set of EC curves, defined in the certificate profile and selected by the client in the request.
Only RSA and EC keys are supported at this moment.
Note
In order for server generated keys to be supported the client must include a id_regCtrl_protocolEncrKey in the request, containing a public key that the server will use to encrypt the private key returned in the response.
Server generated keys are returned in the CertifiedKeyPair.privateKey field in the response, as defined in RFC4210 section 5.3.4 and section D.4. The EncryptedValue will contain the private key, encrypted using AES256 with a random symmetric key,
in turn wrapped using the public key in id_regCtrl_protocolEncrKey (RFC4211 Appendix B have more details on the EncryptedValue).
Code example in Java for requesting server generated keys can be found in the test method CrmfRequestTest.test12ServerGeneratedKeys().
Certificate validity
Normally the validity period of issued certificates are controlled by the certificate profile.
If you enable 'Allow validity override' in the certificate profile, and the CMP initialization- or certification request contains a
validity time in the CRMF request template, this validity period will be used.
Certificate Key Usage
Normally the key usage extension of issued certificates are controlled by the certificate profile.
If you enable 'Allow Key Usage Override' in the certificate profile, and the CMP initialization- or certification request contains a
key usage in the CRMF request template, this key usage will be used.
Interoperability
*** EJBCA cmpclient (Enterprise only) ***
EJBCA Enterprise includes a java command line client for CMP. It can be used to request, renew and revoke certificates.
You can build and run the client with:
ant cmpclient
cd dist/cmpclient
java -jar cmpclient.jar
java -jar cmpclient.jar crmf --help
An example work-flow when you have one CMP alias in RA mode (raalias), using password based authentication of the RA, and another CMP alias (clientupdate) in client mode allowing updates using certificate authentication.
CMP has been tested with BlueX from AET Europe. From EJBCA's point of view BlueX functions as an RA with the same configuration
options as for jCert.
*** Aventra ***
CMP has been tested with Aventra card management system. Same configuration as above.
*** BouncyCastle ***
CMP has been tested with BouncyCastle CMP classes, available in BC 1.46 or later. Both client and RA mode should work.
Sample code for a HMAC protected (RA mode) certificate request (initial) message:
// Just preparations
final BigInteger certReqId = BigInteger.valueOf(1);
final byte[] senderNonce = "12345".getBytes();
final byte[] transactionId = "23456".getBytes();
KeyPairGenerator kpi = KeyPairGenerator.getInstance("RSA");
kpi.initialize(1024);
KeyPair keyPair = kpi.generateKeyPair();
// Now on to the CMP
CertificateRequestMessageBuilder msgbuilder = new CertificateRequestMessageBuilder(certReqId);
X500Name issuerDN = new X500Name("CN=ManagementCA");
X500Name subjectDN = new X500Name("CN=user");
msgbuilder.setIssuer(issuerDN);
msgbuilder.setSubject(subjectDN);
final byte[]                  bytes = keyPair.getPublic().getEncoded();
final ByteArrayInputStream    bIn = new ByteArrayInputStream(bytes);
final ASN1InputStream         dIn = new ASN1InputStream(bIn);
final SubjectPublicKeyInfo keyInfo = new SubjectPublicKeyInfo((ASN1Sequence)dIn.readObject());
dIn.close();
msgbuilder.setPublicKey(keyInfo);
GeneralName sender = new GeneralName(subjectDN);
msgbuilder.setAuthInfoSender(sender);
// RAVerified POP
msgbuilder.setProofOfPossessionRaVerified();
CertificateRequestMessage msg = msgbuilder.build();
org.bouncycastle.asn1.crmf.CertReqMessages msgs = new org.bouncycastle.asn1.crmf.CertReqMessages(msg.toASN1Structure());
org.bouncycastle.asn1.cmp.PKIBody pkibody = new org.bouncycastle.asn1.cmp.PKIBody(org.bouncycastle.asn1.cmp.PKIBody.TYPE_INIT_REQ, msgs);
// Message protection and final message
GeneralName recipient = new GeneralName(issuerDN);
ProtectedPKIMessageBuilder pbuilder = new ProtectedPKIMessageBuilder(sender, recipient);
pbuilder.setMessageTime(new Date());
// senderNonce
pbuilder.setSenderNonce(senderNonce);
// TransactionId
pbuilder.setTransactionID(transactionId);
// Key Id used (required) by the recipient to do a lot of stuff
pbuilder.setSenderKID("KeyID".getBytes());
pbuilder.setBody(pkibody);
JcePKMACValuesCalculator jcePkmacCalc = new JcePKMACValuesCalculator();
final AlgorithmIdentifier digAlg = new AlgorithmIdentifier(new ASN1ObjectIdentifier("1.3.14.3.2.26")); // SHA1
final AlgorithmIdentifier macAlg = new AlgorithmIdentifier(new ASN1ObjectIdentifier("1.2.840.113549.2.7")); // HMAC/SHA1
jcePkmacCalc.setup(digAlg, macAlg);
PKMACBuilder macbuilder = new PKMACBuilder(jcePkmacCalc);
MacCalculator macCalculator = macbuilder.build("password".toCharArray());
ProtectedPKIMessage message = pbuilder.build(macCalculator);
Sample code for a HMAC protected (RA mode) revocation request message:
// Just preparations
final byte[] senderNonce = "12345".getBytes();
final byte[] transactionId = "23456".getBytes();
BigInteger serNo = new BigInteger("aabbccdd");
X500Name issuerDN = new X500Name("CN=ManagementCA");
X500Name userDN = new X500Name("CN=user");
// Cert template too tell which cert we want to revoke
CertTemplateBuilder myCertTemplate = new CertTemplateBuilder();
myCertTemplate.setIssuer(issuerDN);
myCertTemplate.setSubject(userDN);
myCertTemplate.setSerialNumber(new ASN1Integer(serNo));
// Extension telling revocation reason
ExtensionsGenerator extgen = new ExtensionsGenerator();
CRLReason crlReason = CRLReason.lookup(CRLReason.cessationOfOperation);
extgen.addExtension(Extension.reasonCode, false, crlReason);
Extensions exts = extgen.generate();
ASN1EncodableVector v = new ASN1EncodableVector();
v.add(myCertTemplate.build());
v.add(exts);
ASN1Sequence seq = new DERSequence(v);
RevDetails myRevDetails = RevDetails.getInstance(seq);
RevReqContent myRevReqContent = new RevReqContent(myRevDetails);
PKIBody myPKIBody = new PKIBody(PKIBody.TYPE_REVOCATION_REQ, myRevReqContent); // revocation request
// Message protection and final message
GeneralName sender = new GeneralName(userDN);
GeneralName recipient = new GeneralName(issuerDN);
ProtectedPKIMessageBuilder pbuilder = new ProtectedPKIMessageBuilder(sender, recipient);
pbuilder.setMessageTime(new Date());
// senderNonce
pbuilder.setSenderNonce(senderNonce);
// TransactionId
pbuilder.setTransactionID(transactionId);
// Key Id used (required) by the recipient to do a lot of stuff
pbuilder.setSenderKID("KeyId".getBytes());
pbuilder.setBody(myPKIBody);
JcePKMACValuesCalculator jcePkmacCalc = new JcePKMACValuesCalculator();
final AlgorithmIdentifier digAlg = new AlgorithmIdentifier(new ASN1ObjectIdentifier("1.3.14.3.2.26")); // SHA1
final AlgorithmIdentifier macAlg = new AlgorithmIdentifier(new ASN1ObjectIdentifier("1.2.840.113549.2.7")); // HMAC/SHA1
jcePkmacCalc.setup(digAlg, macAlg);
PKMACBuilder macbuilder = new PKMACBuilder(jcePkmacCalc);
MacCalculator macCalculator = macbuilder.build("password".toCharArray());
ProtectedPKIMessage message = pbuilder.build(macCalculator);
Sample code for a signature protected (Client mode) message:
CertificateRequestMessageBuilder msgbuilder = new CertificateRequestMessageBuilder(BigInteger.valueOf(certReqId));
X509NameEntryConverter dnconverter = new X509DefaultEntryConverter();
X500Name issuerDN = X500Name.getInstance(new X509Name("CN=ManagementCA").toASN1Object());
X500Name subjectDN = X500Name.getInstance(new X509Name("CN=user", dnconverter).toASN1Object());
msgbuilder.setIssuer(issuerDN);
msgbuilder.setSubject(subjectDN);
final byte[]                  bytes = keyPair.getPublic().getEncoded();
final ByteArrayInputStream    bIn = new ByteArrayInputStream(bytes);
final ASN1InputStream         dIn = new ASN1InputStream(bIn);
final SubjectPublicKeyInfo keyInfo = new SubjectPublicKeyInfo((ASN1Sequence)dIn.readObject());
msgbuilder.setPublicKey(keyInfo);
GeneralName sender = new GeneralName(subjectDN);
msgbuilder.setAuthInfoSender(sender);
Control control = new RegTokenControl("foo123");
msgbuilder.addControl(control);
Provider prov = Security.getProvider(BouncyCastleProvider.PROVIDER_NAME);
ContentSigner popsigner = new JcaContentSignerBuilder("SHA1withRSA").setProvider(prov).build(keyPair.getPrivate());
msgbuilder.setProofOfPossessionSigningKeySigner(popsigner);
CertificateRequestMessage msg = msgbuilder.build();
GeneralName recipient = new GeneralName(issuerDN);
ProtectedPKIMessageBuilder pbuilder = new ProtectedPKIMessageBuilder(sender, recipient);
pbuilder.setMessageTime(new Date());
// senderNonce
pbuilder.setSenderNonce(senderNonce);
// TransactionId
pbuilder.setTransactionID(transactionId);
org.bouncycastle.asn1.crmf.CertReqMessages msgs = new org.bouncycastle.asn1.crmf.CertReqMessages(msg.toASN1Structure());
org.bouncycastle.asn1.cmp.PKIBody pkibody = new org.bouncycastle.asn1.cmp.PKIBody(org.bouncycastle.asn1.cmp.PKIBody.TYPE_INIT_REQ, msgs);
pbuilder.setBody(pkibody);
ContentSigner msgsigner = new JcaContentSignerBuilder("SHA1withRSA").setProvider(prov).build(keyPair.getPrivate());
ProtectedPKIMessage message = pbuilder.build(msgsigner);
Cmpforopenssl works with EJBCA. The current client tool, cmpclient, works with EJBCA CMP in RA mode and client mode.
RA mode
Cmpforopenssl works with with EJBCA in RA mode with the following EJBCA configuration with alias tex. "opensslra" (unmentioned configurations = default):
This requests a certificate, defining the subject DN that will be used. The CA used to sign the certificate is specified in the EJBCA cmp configuration, and can be taken from the keyid.
EJBCA authenticated the request using the HMAC protection with the password, and accepts any request upon correct authentication. See the CMP documentation above for more advanced configuration.
RA mode, Server generated keys
You can request server generated keys by omitting the public key in the certificate request, same request as an ir, but without public key. There is however no cmpclient parameters to leave out key, so cmpclient can not be used for this.
There is example Java code in the test class CrmfRequestTest.test12ServerGeneratedKeys().
Client mode, HMAC password authentication
Cmpforopenssl works with with EJBCA in client mode, with HMAC password authentication, using the following EJBCA configuration with alias tex. "opensslclient" (unmentioned configurations = default):
This requests a certificate, and the requested subject DN must match the registered subject DN.
EJBCA authenticates the request using the HMAC protection with the password of the registered user. See the CMP documentation above for more advanced configuration.
Client mode, client certificate authentication
Cmpforopenssl works with with EJBCA in client mode, with certificate authentication, using the following EJBCA configuration with alias tex. "openssleec" (unmentioned configurations = default):
CMP Authentication Module : EndEntityCertificate
CMP Authentication Parameters : ManagementCA (use the CA that issues your client authentication certificate)
Extract Username Component : CN
You can now issue a certificate using certificate authentication in EJBCA (the end entity needs a certificate before so we re-use user1 from above):
bin/ejbca.sh ra setclearpwd user1 password
bin/ejbca.sh ra setendentitystatus user1 10
This requests a certificate, and the requested subject DN must match the registered subject DN.
EJBCA authenticates the request using the signature protection with the certificate of the registered user. See the CMP documentation above for more advanced configuration.
If the end entity has a Vendor certificate with which it should identify itself for initial enrollment, as specified in 3GPP for example, it can also do that.
In this case the CA issuing the end entity certificate is not the same as the Vendor CA. The vendor CA must be imported in EJBCA as an External CA ('Import CA certificate' in the admin GUI).
To enable vendor certificate authentication add the following to the CMP configuration with alias tex. "3gpp" for client certificate authentication:
Use Vendor Certificate Mode : checked
Vendor CA : 3GPP-CA
With this configuration you can now request an initial certificate with the following command:
In this configuration 'devicecert.pem' and 'devicekey.pem' are the device's private key and the certificate issued by the Vendor CA (3GPP-CA).
ManagementCA.cacert.pem is the CA certificate of the CA in EJBCA issuing the new certificate for the device.
It is possible to specify more than one vendor CA. The vendor CA names should, in this case, be separated by ';'.
An old test program for running CryptLib against EJBCA can be downloaded here.
*** RSA jCert ***
CMP has been tested using RSA jCert toolkit for initialization requests. To run this as an RA you should configure CMP
with:
CMP Operational Mode : RA Mode
Allow RA Verify Proof-of-Possession : check
CMP Response Protection : pbe
CMP Authentication Module : HMAC
CMP Authentication Parameters : your shared password
and other configurations you want for your RA.
Sample CMP workflow
A typical PKI work-flow using CMP involves enroling a device with a certificate and then having the device automatically renew the certificate when it is about to expire.
Generate a key pair
Initial enrollment of client certificate using a one-time enrollment code
Generate a new key pair
Renew with a new certificate for the new key pair, authenticated using the old key pair and certificate
The above steps can be simulated in reality using the openssl and cmpforopenssl client, but also using the EJBCA cmpclient.
This works with a default cmpalias (named cmp) configured with parameters:
2. Initial enrollment:
Before initial enrollment you add a new End Entity in EJBCA, in this example with user name cmptest and subject DN 'CN=cmptest', and enrollment code 'CMP-pwd'.
It is possible to add a custom plug-in class to handle a certificate request.
The class implementing this plug-in must implement the org.ejbca.core.protocol.ExtendedUserDataHandler interface.
The idea is that the implementation uses information from the certificate profile or name and the request itself to manipulate the request before it is
processed the normal way. This is done when 'processRequestMessage' (see source code of the interface) is called. The used certificate profile name is
passed as 'otherData'.
In the Admin GUI under "CMP Configuration", set "Certificate Request Handler Class" to the name of the plug-in class to enable it. You may then add
additional properties that you can use in your implementation.
In EJBCA there is already an implementation included. This implementation writes to the unid-fnr DB (see separate unid document).
To activate this plug-in just set the following configurations:
Certificate Request Handler Class : org.ejbca.core.protocol.unid.UnidFnrHandler
Unid Data Source : java:/UnidDS
Note that you have to set this using the CLI as it is not possible in the Admin GUI:
You also have to create the Unid mapping database, see the separate unid document referenced above.
CMP Error Messages
When an error occurs during CMP processing some different CMP error messages, or HTTP error codes can occur. Depending on at which stage the error is encountered and its type, different error messages are returned.
Below is a exhaustive list of CMP error codes (don't use as definite guide, do you own testing).
Error Description
Error Type
Error Code
The received request did not contain a DER object.
HTTP
400 Bad Request
The DER object contained in request could not be parsed to a CMP message.
Unsigned CMP
BAD_REQUEST (2)
Signature verification on a nested message failed.
Unsigned CMP
BAD_REQUEST (2)
Received CMP message was of an unknown type
Unsigned CMP
BAD_REQUEST (2)
Submitting a request with a URL that does not match an existing CMP alias
HTTP
404 Not Found
Submitting a CMP RA message with a signing certificate which was revoked or expired.
Unsigned CMP
BAD_REQUEST (2)
Submitting a CMP RA message that could not be authenticated.
Unsigned CMP
BAD_MESSAGE_CHECK (1)
Trying to revoke a certificate that was already revoked
Signed CMP
CERT_REVOKED (10)
Trying to revoke a certificate whose revocation is is waiting for approval
Unsigned CMP
BAD_REQUEST (2)
Trying to revoke a certificate from a nonexistant CA.
Unsigned CMP
BAD_REQUEST (2)
Trying to revoke a non existing certificate
Signed CMP
BAD_CERTIFICATE_ID (4)
Trying to revoke a certificate, but serial number or issuer were missing from request.
Signed CMP
BAD_CERTIFICATE_ID (4)
Revocation reason could not be parsed from CMP message
Unsigned CMP
INCORRECT_DATA (7)
Trying to issue or request a certificate from a non existing CA
Unsigned CMP
WRONG_AUTHORITY (6)
Submitting a CMP request with bad POP
Unsigned CMP
BAD_POP (9)
Submitting a CMP client mode enrollment request with invalid certificate extensions specified.
Unsigned CMP
BAD_REQUEST (2)
Submitting a CMP client mode enrollment request with invalid enrollment code.
Unsigned CMP
NOT_AUTHORIZED (23)
Attempting a key update request without the end entity authentication module configured.
Unsigned CMP
BAD_REQUEST (2)
A key update request without could not be authenticated/verified.
Unsigned CMP
BAD_REQUEST (2)
A key update request was submitted without a subject DN
Unsigned CMP
BAD_REQUEST (2)
A key update request for an end entity which wasn't found in the database.
Unsigned CMP
BAD_MESSAGE_CHECK (1)
A key update request was submitted using the same keypair.
Unsigned CMP
BAD_MESSAGE_CHECK (1)
Any other failures that may have occurred during key renewal.
Unsigned CMP
BAD_MESSAGE_CHECK (1)
Submitting a CMP client mode enrollment request with wrong user/enrollment code
Unsigned CMP
NOT_AUTHORIZED (23)
A request for server generated keys when this is not enabled in CMP alias
Unsigned CMP
BAD_REQUEST (2)
A request for server generated keys when the certificate profile does not exist
Unsigned CMP
BAD_REQUEST (2)
A request for server generated keys when the key algorithm, key size (RSA) or curve (ECDSA) is not allowed
Unsigned CMP
BAD_REQUEST (2)
A request for server generated keys with invalid or unsupported key parameters
Unsigned CMP
BAD_REQUEST (2)
Other internal errors
Unsigned CMP
Various
CMP Proxy (EJBCA Enterprise only)
In some installations it may be desirable to terminate the client connection in a DMZ before connecting further to the CA. In this case the client never has a direct
network connection to the CA machine. In such a scenario you can use the CMP proxy module. Clients use the CMP proxy, as it would otherwise use EJBCA.
The proxy in turn connects to EJBCA gets the answer and forwards it back to the client.
The proxy is a stand alone module that runs on another machine than the CA itself.
See EJBCA_HOME/modules/cmpProxy/resources/README for information how to build and use the proxy.
*** Backends ***
The CMP Proxy can use different connection backends to the CA. The most usable are:
Direct HTTP connection. The CMP proxy creates a new HTTP connection to the CA, and return the response to the client, through the client connection, after receiving the response from the CA.
External RA connection. The CMP proxy creates an external RA msg in an external RA database, which the CA polls. When the CA stores a return message in the external RA database, this is picked up by the CMP proxy and returned to the client.
*** CMP Proxy Message Validation ***
The CMP proxy have options for verifying CMP message protection in the proxy, before passing the message to the CA. Password based MAC and Signature protection can be verifies.
These validations can be activated in cmpProxy.properties. CMP message headers only allow one form of protection per message, so activating both modes will allow messages to use
either form. Rejected messages will never pass the CMP Proxy, but will rejected in the same form as if they had been rejected from the CA.
Password based MAC
Password based MAC verification can be activated by setting the following value to true in cmpProxy.properties:
cmp.backend.hmacPasswordValidationRequired=true
In addition to this, KeyId/password pairs need to be defined, where they KeyID is the name of the CA and the password is the CMP RA Authentication Secret for that CA.
This form can be activated by setting the following value:
cmp.backend.signatureRequired=true
In addition to this, the following value needs to be defined:
cmp.backend.issuerchainpath
This value can either be set to a single PEM file or to a directory containing multiple PEM files, representing one or more valid issuers of signing certificates.
*** CMP Proxy Error Messages ***
The CMP Proxy will return error messages, partly as a result of problems inherent to the proxy in itself, and partly due to evaluating CMP requests directly on the proxy before passing them on.
The messages listed here are those returned by the proxy independently of the CA, as listed in the above.
Error Description
Error Type
Error Code
The received request did not contain a DER object.
Unsigned CMP
BAD_REQUEST (2)
Submitting a request with a URL that does not match an existing CMP alias
HTTP
404 Not Found
Sending a response over TCP failed.
HTTP
500 Internal Server Error
Signature/HMAC protection was required in configuration, but no protection was present.
Unsigned CMP
BAD_REQUEST (2)
HMAC/Signature verification failed.
Unsigned CMP
BAD_REQUEST (2)
Message signature was required, but no signing certificate was supplied.
Unsigned CMP
BAD_REQUEST (2)
Message signature was required, but revocation check could not be performed.
Unsigned CMP
SYSTEM_UNAVAILABLE (24)
Message signature was required, if a cache failure occurred during revocation check.
Unsigned CMP
SYSTEM_UNAVAILABLE (24)
Message signature was required, but no certificate chains defined on proxy
Unsigned CMP
SYSTEM_UNAVAILABLE (24)
Message signature was required, but signer certificate was revoked.
Unsigned CMP
BAD_REQUEST (2)
OCSP
OCSP is used by PKI-clients to verify the validity of certificates in real-time.
This is done by sending a request for the status of a specific certificate to an OCSP responder.
The responder may or may not be the same as the CA. The OCSP responder sends a signed reply,
containing the requested status information back to the client.
The client uses this status information to determine whether the certificate is valid for use or revoked.
The OCSP servlet receives OCSP request by http(s) and send back a status response signed by the CA.
The OCSP service receives requests on http://localhost:8080/ejbca/publicweb/status/ocsp. The
servlet can process requests for certificates signed by a CA running in EJBCA, as long as the CAs OCSP
service has not been deactivated.
For a CA to be valid as an OCSP-responder it must have the KeyUsage 'Digital Signature' in the certificate profile used to create the CA.
This KeyUsage must be included if the CA is to sign OCSP-responses.
The default certificate profiles for CAs includes the key usage 'Digital Signature'.
Example to generate an OCSP request using OpenSSL (works with both internal and external OCSP responders):
If Firefox is to request and accept OCSP-responses from a CA not in the default trust store it must be configured to trust this CA:
In 'Advanced->Certificates->View Certificates->Authorities', import and select the CA certificate, and checking the appropriate Trust checkboxes.
If 'Query OCSP responder servers to confirm the current validity of certificates' in 'Advanced->Certificates' is selected,
and certificates include an OCSP Service URL (AIA extension) Firefox will query the OCSP server when for example double-clicking on a certificate in the
certificate manager.
An appropriate URL for validation is: http://hostname:8080/ejbca/publicweb/status/ocsp
In doc/samples it is a sample how to check revocation with OCSP using the new APIs since JDK 1.5.
Stand-alone OCSP responder
You can set up separated OCSP responders in EJBCA. Using this you can isolate the CA from the Internet and still be
able to answer OCSP request. You can set up firewalls so that only outgoing traffic is allowed from the CA, and
nothing to the CA.
Separated OCSP responders is also good when you don't require high-performance clustering for the CA, but you do need
high-performance for the OCSP responders. This is a common setup, if the CA only issues certificates once every year
for one million users, this does not put much pressure on the CA, but the OCSP responders can be put under high load continuously.
See the OCSP Installation document for information how to set up stand-alone, separated OCSP responders.
OCSP User Guide
More information about certain features, such as OCSP extensions, can be found in the OCSP User Guide.
Simple OCSP client
To try out and test your OCSP installation you can use the EJBCA client toolbox, (see below). You can also use the API directly from your
java program.
Adobe Reader
A good example of using OCSP is to check digitally signed PDF documents using Adobe Reader.
To be able to verify certificates in Adobe Reader, you must first add the CA certificate as trusted in Adobe Reader.
You can do that in the menu Document->Trusted Identities. Choose Certificates in the drop-down list and click 'Add contacts',
now you can browse to the CA-certificate that you have downloaded in DER format (for example by choosing download to IE on the public EJBCA pages).
The CA certificate must have been saved with a name ending with '.cer'.
After adding the new contact, you have to click 'Edit trust' and check at least 'Signatures and as trusted root' and 'Certified documents'.
This works the same using both internal and external OCSP responders.
Certificates that have an 'OCSP service locator' will be verified against the OCSP responder.
You can configure this in the certificate profile used to issue certificates.
If you sign PDF documents with embedded OCSP responses those responses must include a nextUpdate field, and the timestamp must be within the thisUpdate and nextUpdate
period of the OCSP response.
Web Service Interface
The JAX-WS 2.0 Web Service Interface is used to access the basic functions remotely over client
authenticated HTTPS. The functionality currently available through the Web Service Interface are documented in the
EJBCA Web Service API Reference.
There is also a CLI that can be used for scripting WS calls remotely. See following section for more information.
Note: All web service calls are not available through the CLI.
Web Services authentication
The Web Services interface requires client certificate authentication from administrators, in the same way as the admin GUI does.
If you have a client certificate that works on the admin GUI you should also be able to use it for the web service interface.
Configuring Web Services behavior
The sample property file conf/jaxws.properties.sample contains more information on how to configure the behavior of
the EJBCA WS. Copy this to conf/jaxws.properties, edit and redeploy.
If the end entity profile informations must be used to define default values when you create a user, the flag "Allow
merge DN Webservices" must be checked in the end entity profile.
If multiple instances of a component exist, the merge is done from end to beginning, and the remaining values of this component type will be placed at the end.
For example, if you want to merge:
Edit dist/ejbca-ws-cli/ejbcawsracli.properties before running the EJBCA WS CLI. This files contains descriptions of
what can be configured. Please note that this directory is recreated each time you build EJBCA, so copy it to a
separate location if you intend to rebuild or redeploy EJBCA and keep the configuration.
Configuration for the Web Services CLI requires a P12 or JKS keystore. You can easily try the WS CLI using the
superadmin.p12 keystore generated during the installation or generate a new JKS using the Admin GUI.
Below is a short description how to create a JKS for a user on the command line, and adding the new user to the superadministrator role.
bin/ejbca.sh ra addendentity <1> <2> "C=..,O=..,CN=<1>" ManagementCA 1 JKS
bin/ejbca.sh ra setclearpwd <1> <2>
bin/ejbca.sh batch <1>
bin/ejbca.sh roles addmember "Temporary Super Administrator Group" ManagementCA WITHCOMMONNAME EQUALCASEINS <1>
To use the client do the following, copy the directory with all included files to
the computer you want to remotely administer from. Then create a JKS or P12 file with
the appropriate access rights (See the Using API section for details) and
finally configure the file ejbcawsracli.properties. In this file you should specify
the hostname of the CA server, the name of the keystore and the password to unlock it.
Documentation for each setting is in the file ejbcacsracli.properties.
Use 'ejbcaClientToolBox.sh EjbcaWsRaCli' for a list of each subcommand and 'ejbcaClientToolBox.sh EjbcaWsRaCli "subcommand"'
for detailed help how to use the cli.
Example usage:
ejbcaClientToolBox.sh EjbcaWsRaCli pkcs12req testuser2 foo123 2048 NONE tmp
You can use the Web Service interface to integrate EJBCA from other applications.
If you are using another language than Java you should start by downloading the WSDL
file at http://hostname:8080/ejbca/ejbcaws/ejbcaws?wsdl. With this you can use your programming language tools to generate client stubs.
When using java you can find the required libs in 'dist/ejbcawscli' and it's 'lib'
subdirectory.
Some programming examples:
To initialize the web service:
  CryptoProviderTools.installBCProvider();
  String urlstr = "https://localhost:8443/ejbca/ejbcaws/ejbcaws?wsdl";

  System.setProperty("javax.net.ssl.trustStore","p12/wstest.jks");
  System.setProperty("javax.net.ssl.trustStorePassword","foo123");

  System.setProperty("javax.net.ssl.keyStore","p12/wstest.jks");
  System.setProperty("javax.net.ssl.keyStorePassword","foo123");

  QName qname = new QName("http://ws.protocol.core.ejbca.org/", "EjbcaWSService");
  EjbcaWSService service = new EjbcaWSService(new URL(urlstr),qname);
  ejbcaraws = service.getEjbcaWSPort();
Example call to find all users having 'Smith' in their subject dn:
  UserMatch usermatch = new UserMatch();
  usermatch.setMatchwith(UserMatch.MATCH_WITH_DN);
  usermatch.setMatchtype(UserMatch.MATCH_TYPE_CONTAINS);
  usermatch.setMatchvalue("Smith");
  List<UserDataVOWS> result = ejbcaraws.findUser(usermatch);
Example generating a certificate from a PKCS10 request:
The SOAP API is compatible with all development languages that can handle SOAP messages. This includes programming languages such as Java, C# and PHP.
The normal approach is to use your programming languages tools to generate client stubs, which are classes to be used in your client program. For Java, such stub classes are already included as part of the clientToolBox WS client we provide.
Client stubs are generated from the WSDL file, which includes all information to use the WS API. The WSDL can be accessed from your installed EJBCA at https://localhost:8443/ejbca/ejbcaws/ejbcaws?wsdl.
In the WSDL all methods and parameters are described, but without detailed documentation. For a simple example lets take the getProfile method. This is described in the WSDL as:
You can see that there are two parameters to the method arg0 that is an integer and arg1 that is a string. From the Javadoc API documentation we provide for the WS API you can find
detailed description of the arguments. The WS API documentation contains detailed descriptions and in particular the
EjbcaWS class is most interesting.
Here you can see for the methods the parameters, return value, privileges needed to use the method (based on the TLS client certificate) and errors that can occur, returned as SOAP error classes.
For the getProfile method there is documented:
Parameters:
    profileId - ID of the profile we want to retrieve.
    profileType - The type of the profile we want to retrieve. 'eep' for End Entity Profiles and 'cp' for Certificate Profiles
Returns:
    a byte array containing the specified profile in XML format
Now you can use your client stubs, in any programming language you want to call the WS SOAP getProfile method with an integer and a string parameter, getting back a profile in XML format.
Sample code
See the file modules/ejbca-ws/src/org/ejbca/core/protocol/ws/common/IEjbcaWS
for more detailed instructions of the API.
Sample code can be taken from:
The JUnit tests for the WS-API: modules/systemtests/src/org/ejbca/core/protocol/ws/EjbcaWSTest.java
The WS-API CLI: modules/ejbca-ws-cli/src/org/ejbca/core/protocol/ws/client/*.java
Accessrules required when using the Web Service API
All the calls requires HTTPS client authentication. The keystore used
must be set up as a regular administrator and access rules according to the following:
Common for all calls (except isAuthorized, existsHardToken, isApproved that only needs a valid trusted certificate):
/ra_functionality/'end entity profile of user'/create_end_entity and/or edit_end_entity
/ca_functionality/create_certificate
revokeCert, revokeToken: These calls support approvals.
/ra_functionality/revoke_end_entity
/ra_functionality/'end entity profile of the user owning the cert'/revoke_end_entity
revokeUser: This call support approvals.
/ra_functionality/revoke_end_entity
/ra_functionality/'end entity profile of the user'/revoke_end_entity
/ra_functionality/delete_end_entity (only if users should be deleted)
/ra_functionality/'end entity profile of the user'/delete_end_entity (only if users should be deleted)
fetchUserData:
It is possible to turn of authorization of this call in the jaxws.properties
/userdatasourcesrules/'user data source'/fetch_userdata
genTokenCertificate:
Important this call also supports approvals, and the default behaviour is when
someone without the '/administrator' access is creating a call then will a GenerateTokenApprovalRequest
be created. This behaviour can be turned off in the jaxws.properties file.
/endentityprofilesrules/'end entity profile of user'/create_end_entity and/or edit_end_entity
/ra_functionality/revoke_end_entity (if overwrite flag is set)
/endentityprofilesrules/'end entity profile of user'/revoke_end_entity (if overwrite flag is set)
/ca_functionality/create_certificate
/ca/'ca of all requested certificates'
hardtoken_functionality/issue_hardtokens
getHardTokenData:
Important this call also supports approvals, and the default behaviour is when
someone without the '/administrator' access is creating a call then will a ViewHardTokenApprovalRequest
be created. This behaviour can be turned off in the jaxws.properties file.
/ra_functionality/view_hardtoken
/endentityprofilesrules/'end entity profile of user'/view_hardtoken
/endentityprofilesrules/'end entity profile of user'/view_hardtoken/puk_data (if viewPUKData = true)
getHardTokenDatas:
/ra_functionality/view_hardtoken
/endentityprofilesrules/'end entity profile of user'/view_hardtoken
/endentityprofilesrules/'end entity profile of user'/view_hardtoken/puk_data (if viewPUKData = true)
republishCertificate:
/ra_functionality/view_end_entity
/endentityprofilesrules/'end entity profile of the user'/view_end_entity
/endentityprofilesrules/'end entity profile of user'/view_hardtoken/puk_data (if viewPUKData = true)
customLog:
No CA access rule is required.
/secureaudit/log_custom_events (must be configured in advanced mode when editing access rules)
deleteUserDataFromSource:
/userdatasourcesrules/'user data source'/remove_userdata (for all the given user data sources)
getCertificate:
no requirement of the '/administrator' flag
/ca_functionality/view_certificate
caCertResponse, caRenewCertRequest:
/ca_functionality/renew_ca
createCryptoToken (Available in Enterprise Edition only):
/cryptotoken/modify
generateCryptoTokenKeys (Available in Enterprise Edition only):
/cryptotoken/keys/generate/'related CryptoToken'
createCA (Available in Enterprise Edition only):
/
addSubjectToRole, removeSubjectFromRole (Available with Enterprise Edition only):
/ca/'related CAs (All the CAs that issued the certificates of every member in the the related role)'
All error codes are described in org.cesecore.ErrorCode.
You can also take a look at src/test/org/ejbca/core/protocol/ws/CommonEjbcaWSTest.java to see how the error code can be used.
WS transaction logging
The logging is done the same way as the logging for the OCSP responder is done.
See OCSP Audit and Account Logging.
But different tags are used:
LOG_TIME : The time the call took place
SESSION_ID : A random 32 Byte long String generated when the OCSP-responder is started.
LOG_ID : An integer identifying that starts from 1 and is increased for every received request.
REPLY_TIME : The time it took to return from the WS method.
METHOD : Name of the called WS method.
ERROR_MESSAGE : An error message with information of the error. If the call returned successfully then 'NO_ERROR'.
ADMIN_DN : Subject DN for the client certificate in the call.
ADMIN_ISSUER_DN : Issuer DN of the client certificate in the call
The configuration is done in conf/jaxws.properties.
In jboss-log4j.xml 'org.ejbca.core.protocol.ws.logger.TransactionLogger' should be used as category name for the appender.
WS message debugging
When integrating it can be good to log the SOAP messages in order to debug and see what is going on behind the scenes.
You can accomplish this by adding the following to JAVA_OPTS:
In JBoss 7/EAP6/WildFly 9 and 10 this can be done by adding the above line to JAVA_OPTS in JBOSS_HOME/bin/standalone.conf.
Certificate Transparency (Enterprise only)
Introduction
EJBCA Enterprise Edition implements Certificate Transparency (CT) as specified in RFC 6962.
The purpose of CT is to create public audit logs of all certificates issued by the public SSL/TLS CAs. The presence of audit records is planned to be required for EV certificates in Google Chrome from February 2015
(and other web browsers and non-EV certificates later on as well). Note that CT is only relevant for CAs issuing public SSL/TLS certificates; other types of CAs should not use CT. More information can be
found on the CT website.
From a CA's point of view, CT works by publishing certificates from the CA to the log servers and retrieving Signed Certificate Timestamps (SCTs) in response (this is a single operation, so requesting an SCT for
a certificate publishes it also). The resulting SCTs can then be sent to end-users in a TLS handshake in three different ways: in a certificate extension, in a stapled OCSP response and/or in a TLS extension.
EJBCA supports all of these, including combinations. The following sections describe how to configure EJBCA in one or more of these modes.
Prerequisites
Your EJBCA installation needs the ct module, which is only present in the enterprise edition (contact PrimeKey for details). Depending on the
CT modes you need, there are some extra preparations.
*** CT in certificates ***
No extra preparations are needed. Just configure the logs and enable CT in the certificate profiles as described in the following sections "Adding CT logs" and "Activating CT".
*** CT in OCSP responses ***
EJBCA supports CT in OCSP responses, both in live OCSP responders and for pre-production of responses. By default, EJBCA will cache up to approximately 100 000 CT response extensions in memory. Excess
cached response extensions that haven't been requested for 10 seconds are randomly evicted from the cache. These parameters may be adjusted in conf/cesecore.properties. In order to use CT OCSP you must
also enable the corresponding extension class in conf/ocsp.properties:
After enabling the extension, please redeploy EJBCA. Then proceed with configuring CT logs and certificate profiles. See the following sections "Adding CT logs" and "Activating CT".
*** CT in a TLS extension ***
In this mode, the certificate holder requests SCTs himself from the logs and includes them in a TLS extension. The CA is not required to do anything, but it is possible to reduce the time it takes until full
(merged) audit log records are available by publishing certificates to the logs as soon as they are issued. See the following section for configuration details.
*** Publishing to logs without using the SCTs ***
EJBCA can asynchronously publish certificates to one or more CT logs, using a Custom Publisher. This feature is intended to be used mainly when using CT in TLS mode or OCSP mode.
To enable this feature, go to CA Functions, Publishers and add a new publisher with the following configuration:
Publisher Type - Custom Publisher
Class Path - org.ejbca.code.model.ca.publisher.CTCustomPublisher
Properties - Leave blank
No direct publishing, only use queue - Yes
Keep successfully published items in database - No
Use queue for CRLs - No
Use queue for certificates - Yes
Click Save. The publisher has to be enabled in the certificate profiles before publishing becomes active. You should also create a service for the publisher, under System Functions, Services:
Worker - Publisher Queue Process Worker
Publishers to check - The publisher created before
Period - The default of 5 minutes is fine, but can be up to several hours.
Active - Yes
Adding CT logs
CT log servers are configured under System Configuration. They do not become active until they are enabled per certificate profile. The following parameters have to be configured in a log:
Log URL : The log URL, e.g. http://something/, for example https://ct.googleapis.com/testtube/.
Public Key : The log's public key, in PEM or DER format. Usually this is an Elliptic Curve key.
Timeout : Connection timeout in milliseconds. Five seconds is the default. Note that certificate issuance and/or OCSP response generation must wait for the log server to respond, so do not set it too high.
Note that zero is not a valid value for the timeout.
Label: Specify which label to place the log under. See "CT log labels" below.
The log server needs to accept certificates issued by your CAs. For local testing you can install your own instance of the sample log server from the
CT open source project, and add your root CA to the list of trusted CAs. For a production system (or testing of one) you must contact the log operator to have your root CA added.
For redundancy, it's recommended to add more logs to each label than the minimum required. That way certificate issuance will not fail if a single log is down. It is also a good idea to specify a short timeout
value and/or enable the "ct.fastfail.enabled" option in conf/cesecore.properties, so a failing log does not slow down all requests.
Regarding performance: EJBCA will connect to every log having one of the labels selected in the certificate profile, in the order they have been added and in parallel. It will keep fetching SCTs until
'Maximum number of SCTs' is reached. EJBCA will fail issuance if it is unable to fetch at least the number of SCTs given by the parameter 'Minimum number of SCTs' specified in the
certificate profile. If the number of retrieved SCTs exceeds the max value, the log(s) last in order will be excluded.
You may change the order in which the logs are contacted by moving them up or down in the 'System Configuration' page.
*** CT log labels ***
It may be a requirement to publish to certain logs and a certain number of logs before issuing a certificate. For example, Google Chrome requires that all EV certificates issued after 1st of
January 2015 must be published to at least one CT log operated by Google, at least one log not operated by Google, and to a certain number of logs in total, where the total amount of logs depends on the lifetime
of the certificate. This is achieved by grouping logs using labels in 'System Configuration' page. All logs with the same label forms a log group. EJBCA will fail issuance unless it receieves at least one SCT from
each log group. Log groups are enabled/disabled by selecting/deselecting labels in the certificate profile.
The parameters 'Minimum number of SCTs' and 'Maximum number of SCTs' can be configured for each certificate profile, either manually or by certificate validity according to CT policy. An example setup complying to
Chrome's CT policy could contain the following:
Two labels, 'Google logs' containing a set of logs operated by Google and 'Unlabeled' containing a set of logs not operated by Google.
A certificate profile with:
The labels "Google logs" and "Unlabeled" selected
The paramater 'Minimum number of SCTs' set to 'By validity' to let EJBCA select a minimum dynamically based on Chrome's CT Policy.
The parameter 'Maximum number of SCTs' set to 'By validity' to only include the number of SCT's required based on Chrome's CT Policy in the certificate.
EJBCA audit logging
The submission of pre-certificates is logged to the EJBCA audit log. When a pre-certificate
has been submitted to the required number of CT log servers, then a SUCCESS is audit logged.
Otherwise a FAILURE is logged. If the generation of the pre-certificate fails, then no CT log submission is performed and nothing is logged.
Activating CT
CT logs must be activated in your certificate profiles. See the user guide.
Redacting DNS labels in SubjectAlternativeName
In the SubjectAlternativeName extension, if part of the DNS should be a secret, that part can be redacted and replaced by the String "(PRIVATE)" in the
precertificate that will be published to the Certificate Transparency Log. See the user guide.
Using an outgoing proxy server to send to CT logs
For security reasons using an outgoing proxy server from the CA to the CT logs is a common request. The CT log function will make use of Java/JBoss proxy configurations.
There are two ways to configure the proxy properties in JBoss:
Both ways works, but don't forget to reconfigure the proxy settings if you upgrade/change the JBoss instance.
Registration Authority
Information on how to use the Registration Authority (RA) UI is available here.
MS Autoenrollment (Enterprise Edition only)
Native Autoenrollment in Active Directory environments is available using a separate Autoenroll proxy component, which is
available as an add-on module to EJBCA Enterprise.
This module provides an environment where Active Directory Domain Users and Computers will seamlessly auto enroll for
certificates issued by EJBCA.
Legacy Script based Autoenrollment
Script based Autoenrollment is a legacy way of doing autoenrollment and uses login scripts and VB scripts to automatically enroll clients.
It is kept for legacy reasons. More information can be found in the Guides.
The Native autoenrollment (above) provides a more seamless experience.
External RA (Enterprise Edition Only)
Information on how to use the (old) External RA using database polling is available here.
Key Recovery
Key Recovery can be used to re-use or restore a users private key.
Key recovery means that server generated keys (and the certificate) of a user is stored, encrypted, in the CAs database.
The purpose of this is to be able to recover an encryption key if the user looses the key. Without possibility of key recovery
encrypted data will be lost forever if the encryption key is lost.
Key recovery should only be used for encryption keys and not authentication or signature keys, where this need for recovery does not exist.
To enable key recovery, use the Admin GUI:
Set 'Enable Key Recovery' in 'System Configuration'.
Create a new End Entity Profile and check 'use' for 'Key Recoverable'.
Add users with this End Entity Profile. Use a keystore type other than 'User Generated', for example P12, and check 'Key Recoverable'.
Enroll the user with 'Create keystore' in Public Web. A private and public key pair is now generated by the CA, encrypted and stored in CA database (KeyRecoveryData table).
Key recovery can not be used with 'user generated' keys. this is because the CA does not have access to the
private key in this case, and can thus not store it.
The following is an example of a sequence of commands that can be used to generate a new certificate for a user using the
same key pair, if the key and certificate was generated key recoverable as descibed above:
# Mark the generated certificate for keyrecovery,
bin/ejbca.sh ra keyrecovernewest <username>
# then set clear text password for Batch session to use
bin/ejbca.sh ra setclearpwd <username> <userpass>
# and finally reissue the certificate.
bin/ejbca.sh batch <username>
The same can be accomplished using a browser:
Admin GUI - List/Edit End Entities - View_Certificates for user - Recover Key, Close.
Admin GUI - List/Edit End Entities - Edit_End_Entity for user - Enter new password for user, Save (user status should now be 'Key Recovery')
Public Web - Create Keystore - Enter username and password - Fetch the keystore.
Local Key Generation
In systems with distributed RA's, using key recovery, it might be desired to store the key pairs used for recovery in a database belonging to another instance than the CA. With local key generation, the keys are stored in the RA's database and are encrypted with a crypto token (e.g. from a HSM) in the RA, so the key material is inaccessible to the operators of the CA (provided that they are restricted from logging in to the RA). The certificates and end-entities, however, remain stored in the CA and can be managed (e.g. revoked) from there.
In order to activate local key generation, the steps below are to be followed (this is performed on the RA which should keep the key recovery data):
Under system configuration, set 'Enable Key Recovery' and 'Force Local Key Generation'
Select the crypto token to be used for encryption of the key pairs (key recovery data).
Select the desired key for encryption
Recovery data entries belonging to certificates enrolled before local key generation was enabled will remain in their initial database. Enabling local key generation doesn't change the way key recovery is performed by an administrator, nor the work flow of approvals, or access rules required. Keep in mind that the role handling the peer connector requires (at least) access to the same set of rules as the administrator of the external RA (e.g. to perform a key recovery).
Technical details
What the operation "bin/ejbca.sh ra keyrecovernewest", or "recover key" in the Admin GUI, or keyRecoverNewest in the WS API actually does is
that it marks the user/certificate for key recovery. This means that the next time you make a call to generate a keystore (p12/jks/pem)
for the user the CA will get the private key, held encrypted in the recovery database, and the existing user certificate or a new certificate, and
create a keystore for the user with this old key pair.
The actual recovery would then happen when you make a call to i.e. pkcs12Req in the WS API, or if keystore type is P12, JKS or PEM in the Admin GUI.
The keys are stored in the database in the table KeyRecoveryData. The data is stored encrypted in a CMS message, as a serialized Java KeyPair.
The certificate is not stored in KeyRecoveryData, but only in CertificateData. The encryption key used for the CMS message encryption
is the issuing CAs 'keyEncryptKey', and can thus be a key on the HSM. The actual CMS data encryption (RFC ??) is performed with AES256_CBC, using a random generated
AES key (for this specific CM message). The AES key is wrapped using the RSA key in 'keyEncryptKey'. This is fully according to the best practices, open, stable, CMS standard.
There are additional columns in the KeyRecoveryData table enabling change of the 'keyEncryptKey' of the issuing CA. The columns cryptoTokenId and keyAlias gives an exact pointer
to the Crypto Token, and specific key, used to encrypt the data. When decrypting data this specific key, with this alias, on the CAs Crypto Token, is first tried, and only if that fails
the CAs 'keyEncryptKey' is tried. In additon the public Key Id (same as exists in CertificateData) of the public key used to encrypt the data is stored in the column publicKeyId.
This means that even if keys changed it is possible to identify the exact public key used to decrypt the data.
Similarly the column serialNumber column of the table KeyRecoveryData matches the column serialNumber in the table CertificateData.
Custom RA Styles
Custom RA Styles allows CA administrators to upload and apply their own logos and style sheets (CSS) for the RA web. In practice this introduces a way to change the appearance of the menus, buttons, background etc. for the RA Web. An uploaded style may be bound to one or many administrator roles. Members of this role will automatically receive applied styles when logging in to the RA Web on any EJBCA instance connected to the CA.
Uploading Modified CSS And Logo
RA Style content is uploaded from the 'System Configuration' menu in the Admin GUI. Go to 'System Configuration -> 'Custom RA Styles'. The page will display a list of previously uploaded styles or an empty list if no content has been added yet.
To upload RA logo: Browse for a single .png or .jpg file to replace the RA logo with.
To upload CSS files: Browse for either a single .css file or a .zip containing multiple .css files. The uploaded files must have the same name as the file they're replacing. Most of the RA appearance can be modified in w_e_styles.css, however, any CSS can be replaced. Below is a list of currently replaceable CSS files:
It is not necessary to upload both logo and CSS. Only upload what you intend to replace. Finally, give the uploaded styles a name and click 'Import'.
In order to upload custom RA Syles, the following access rules are required:
/administrator/
/system_functionality/edit_systemconfiguration/
Applying Styles To Administrator Roles
Once styles are uploaded, it has to be bound to a role to take effect. This is done from the Admin GUI in 'Administrator Roles'. In order to apply a custom style to a role, go to 'Administrator Roles' and select the desired style from the drop down menu under the label 'RA Styles'. The next time members of this role login to the RA Web, their new style will be applied. Keep in mind that images and CSS files are browser cached, hence the changes might not appear until the browser cache is invalidated or cleared manually.
If an administrator belongs to multiple roles with RA Styles applied, the desired style can be changed from the 'Preferences' menu in the RA Web.
ePassport PKI
ICAO Specific Options
ICAO introduces some extensions and modifications to X509 standards. Those features should not be enabled for non-ICAO
CA users since it would be possible to run some non-standardized X509 operations with unwanted results.
*** Enable CA Name Change ***
Activate this checkbox to enable the CA Name Change feature. If enabled, this feature can be used during renewal on "Edit CA" page.
This ICAO feature is intended to be used for Certificate Signing CA (CSCAs). More information can be found in the EJBCA user guide.
EAC CVC PKI (EJBCA Enterprise only)
You can use EJBCA Enterprise for EAC ePassport PKI creating CVCAs, DVs and issuing IS certificates. Usage of EJBCA for a complete PKI for CVC CAs are explained in this document.
Email notifications
Mail settings in JBoss is created when running the 'ant deploy' or 'ant deploy-service' using the values
specified in conf/mail.properties (or default).
It is (automatically) configured in
$APPSRV_HOME/server/default/deploy/ejbca-mail-service.xml for JBoss.
For other containers you must create a mail service with the same JNDI name as specified in
conf/mail.properties.
End entity email notifications
Email notification can be sent when status changes for an end entity, for example when a new user is added (status changes to new).
To configure email notifications in EJBCA:
You must create a new end-entity profile to be able to issue certificates
to end users using email notifications. Under the RA functions, choose "Edit End Entity Profiles"
and add a new profile. Select the profile and go into
'Edit End Entity profile'. In this page you can Enable Send Notifications
and create the notification message. Make sure the checkbox 'Use Send Notification' is checked.
Add a new end entity. You must select the new end entity profile you
created above. Make sure the checkbox 'Send Notification' is checked.
Enter the from-address and subject. Enter a message using the variables defined
for dynamic substitution in the next section. Use ${NL} for newline in the mail message.
The Notification Recipient can have a few different values:
USER: send notification to the email registered for the end entity.
foo@bar.com: send notification to the specified email address. Multiple email addresses can be entered comma separated.
CUSTOM: plug-in mechanism to retrieve addresses your own way. See interface org.ejbca.core.model.ra.raadmin.ICustomNotificationRecipient
for implementation details. Enter a string like "CUSTOM:org.ejbca.MyCustomPluginClass" to use.
You can also use substitution variable in the notification sender and recipie/nt fields. See samples below.
The Notification Events specify which status changes for a user that will trigger a notification.
The default values are suitable to send an email to a user when he/she should go and pick up a
certificate. You can also select for example STATUSGENERATED to send email notifications to an administrator
when the user picks up the certificate.
When STATUSREVOKED is selected, the notification will be triggered either if the entire user is revoked or if an individual certificate is revoked or re-activated
(even though the End Entity's status will not change by the individual certificate revocation or re-activation).
Tip:
If you configure autogenerated password in end entity profile you don't
need to enter one in the adduser page. A generated one will automatically be
sent with the email.
If you want to re-send a notification for a user, reset the status to NEW.
Dynamic Substitution Variables
Parameters that can be used with different usages of email notification. All parameters isn't always set, it depends on the input data.
The following parameters can be set:
${NL} = New Line in message
${DATE} or ${current.DATE} = The current date
Variables used with userdata:
${USERNAME} or ${user.USERNAME} = The user's username.
${PASSWORD} or ${user.PASSWORD} = The user's password, or "enrollment code" as it is called in most pages in the public web.
${UID} or ${user.UID} = The user's unique identifier.
${CN} or ${user.CN} = The common name of the user.
${SN} or ${user.SN} = The serial number (in DN) of the user.
${O} or ${user.O} = The user's organization.
${OU} or ${user.OU} = The user's organizational unit.
${C} or ${user.C} = The user's country.
${user.E} = The user's email address from Subject DN.
${user.EE.EMAIL} = Ther user's email address from the End Entity data.
${user.SAN.EMAIL} = The user's email address from Subject Alternative Name, RFC822Name field.
${user.TIMECREATED} = The time the user was created.
${user.TIMEMODIFIED} = The time the user was modified.
${requestAdmin.CN} = The common name of the requesting administrator.
${requestAdmin.EE.EMAIL} = The email address of the administrator adding the end entity according to the administrator's End Entity data.
${requestAdmin.SAN.EMAIL} = The email address of the administrator adding the end entity according to the administrator's Subject Alternative Name, RFC822Name field.
${approvalAdmin.XX} variables from below can be used to get the administrator who adds an end entity.
Variables used with approvals:
${approvalAdmin.USERNAME} = The last approving administrator's username
${approvalAdmin.CN} = The common name of the last approving administrator.
${approvalAdmin.SN} = The last approving administrator's DN serialNumber.
${approvalAdmin.O} = The last approving administrator's organization
${approvalAdmin.OU} = The last approving administrator's organization unit
${approvalAdmin.C} = The last approving administrator's country
${approvalAdmin.E} = The last approving administrator's email address from Subject DN
${approvalRequestID} = The ID of the approval request that was created
Variables used with expiring certificates:
${expiringCert.CERTSERIAL} = The serial number of the certificate about to expire
${expiringCert.EXPIREDATE} = The date the certificate will expire
${expiringCert.CERTSUBJECTDN} = The certificate subject DN
${expiringCert.CERTISSUERDN} = The certificate issuer DN
Variables used with revocation or re-activation of individual End Entity certificates:
${revokedCertificate.CERTSERIAL} = The serial number of the revoked certificate
${revokedCertificate.EXPIREDATE} = The date the revoked certificate will expire
${revokedCertificate.CERTSUBJECTDN} = The certificate subject DN
${revokedCertificate.CERTISSUERDN} = The certificate issuer DN
${revokedCertificate.REVOCATIONSTATUS} = The new revocation status of the certificate (Active/Revoked)
${revokedCertificate.REVOCATIONREASON} = The new revocation reason of the certificate (unspecified, keyCompromise, ...)
Examples
In certain circumstances, e.g. when you need to comply with PCI
or the lighter levels of FIPS-140/160, it may be required to
configure a 2 step issuance process.
This can by done by using the notifications.
Create 3 email notifications:
To: USER
Email notification to -just- the user with the URL to
pick up the cert and the username. Make clear in
the message that he or she will be contacted by
the approving admin with the password.
To: ${approvalAdmin.E}
Email notification to the apporiving admin with
the password (but not the username) and a message
which makes clear that this password is to be
passed to the user - by phone or f2f (but not
by email).
To: ca-team@foo... **
Email notification of the issuing to the auditor
mailing lists - without above username/password.
An example URL to include in an email can be to directly take the user to the screen to generate a keystore:
https://server:8443/ejbca/enrol/keystore.jsp?action=generatetoken&hidemenu=true&textfieldusername=${USERNAME}&textfieldpassword=${PASSWORD}
Printing of User Data
User data can be sent to a printer whenever an end entity is added or edited. The functionality is
practically the same as for notifications.
This is configured in the end entity profiles by selecting a printer,
the number of copies and uploading a SVG formatted template. There
exists a template in 'src/cli/svgTemplate/Batch PIN envelope print.svg'
that can be used for testing.
A good SVG client can be downloaded from inkscape.org
In order to renew the list of available printers you must restart
the http session since the list is cached for performance reasons.
Approving Actions
It is possible to have other administrators to approve an action in order to make sure the correct data is entered.
Currently are the following actions are enabled for approvals :
Add End Entity
Edit End Entity
Change User Status
Revoke End Entity
Revoke Token (approval for each certificate)
Revoke Certificate
Reactivate Certificate On Hold
In the main menu there is a option 'Approve Actions' that lets the
administrator search for waiting requests and review their data and finally
gives his approval or reject the action.
Configuring Approvals
Approvals are configured for each CA, in the 'Certificate Authorities' page and for each certificate profile in
the 'Certificate Profiles' page.
Just select the actions that needs approval and the approval profile (see bellow) to use and save. The actions 'Add End Entity',
'Change End Entity' and 'Change User Status' are all covered by the setting 'Add/Edit End Entity'. 'Revoke End Entity',
'Revoke Certificate', 'Revoke Token' and 'Reactivate Certificate' are covered by setting 'Revocation'.
Approvals will be required if the CA or the certificate profile enforces it. In case of both the CA and the certificate profile
specify different approval profiles for the same actions, both approval profiles will apply in sequence; first the approval profile
set in the CA, then the approval profile set in the certificate profile.
It is also worth noting that no administrator is allowed to take action regarding the same approval request more than once.
Approval Profiles
There are two types of approval profiles: Accumulative Approval Profile and Partitioned Approval Profile.
*** Accumulative Approval Profile ***
In this profile, only the number of required approvals is set. No requirements are specified for the approving administrators
other than that no administrator is allowed to approve the same request more than once.
*** Partitioned Approval Profile ***
In this slightly more complicated approval profile, several options can be set to specify which administrators can approve
or reject a request. It is also possible to specify additional data that has to be acquired when a request is approved.
A partitioned approval consists of two concepts, Steps and Partitions:
Approval Steps need to be performed sequentially, i.e. step 1 must be approved before step 2 can be acted upon.
Approval Partitions are non sequential parts that can be approved independently of each other, within a step. I.e. when step 1 has to be approved,
Partition 1 and Partition 2 within this step can be approved in any order, independent of each other.
Both types of approval profiles allow for configuring a notification to be send to the end user and/or to the administrator
expected to approve the request (See 'Approval Notification' section below). Both profile types allow also to set expiration
period for the approval and for the request (See 'Explanation of approval status' section below).
Also see the User Guide for detailed information about Approval Profile fields.
Authorizing Approving Administrators
In order to authorize an administrator to review approval requests do one of the following.
Using Basic Rule Sets:
Give a role the role template of SuperAdmin, CAAdmin or RAAdmin with Approve End Entities selected.
The SuperAdmin and CAAdmin gives access to approve rules not associated with any end entity profile
(i.e dual authenticated CA configuration (Not implemented yet)) while the RAAdmin only can approve actions
related to authorized end entity profiles.
Using Advanced Rule Sets:
There are three new access rules:
'/cafunctionality/approve_caaction', a rule that gives access to non end entity profile related actions
like approving CA editing and creation (not implemented yet). An administrator must have either this rule or the
'/rafunctionalty/approve_end_entity' in order to access the 'Approve Actions' web pages.
'/rafunctionalty/approve_end_entity', a rule (along with the corresponding end entity profile rule) that
gives access to end entity profile related access rules, like adding and editing end entities. The administrator must
also have the 'approve_end_entity rule' for at least one of the '/endentityprofilerules/' in order to approve any
actions.
In the system there are basically two different classes of requests. One is requests to do some action, like adding an
end entity, and that is executed directly after the last required administrator has approved the action. This type is
called 'Executable Action Request'. The other type are requests to get hold of some information, like hard token
PUK codes or archived keys. This kind of request is approved when the last administrator gives his consent and is valid
for a defined period of time (set in the approval profile). In this case the requesting administrator is supposed to poll the
approval request if it has been approved or not. These requests are called 'Non-Executable Action Requests'.
Explanation of approval status
Here follows an explanation of what the different approval requests statuses.
Waiting: Means that the action request is waiting to be processed by authorized administrators, request are
valid for the time specified in the approval profile (Request Expiration Period) before it is set to status Expired.
Approved: Means that the action request is approved and is valid for the amount of time specified in the
approval profile (Approval Expiration Period). After this, it is set to Expired. Used by action requests that are
not executable.
Rejected: Means that the action request is rejected and won't be allowed. The rejection lasts the amount of time
specified in the approval profile (Approval Expiration Period). After this it is set to Expired and a new request can
be done. Used by action requests that are not executable.
Expired: Means that the action request isn't valid any more and cannot be processed. The requesting administrator
has to make a new request in order to approve it.
Expired and Notified: Same as 'Expired' but also indicates that the requesting administrator has been notified
about that his request have expired.
Executed: Means that the action request have been executed successfully. Used by action requests that are executable.
Execution Failed: Means that the action request failed for some reason during execution, see log for more information.
Used by action requests that are executable.
Execution Denied: Means that the action request hasn't been approved and will not be executed. The difference with status
'Rejected' is that this status is only used with executable requests and do not have any expire time. This means that the requesting
administrator can apply again directly after the rejection.
Approval Notification
EJBCA approval functionality have been enhanced to send e-mail notifications to administrators affected by the approval workflow and/or
the end user.
Notifications are configured per approval partition.
An approval notification is sent for a partition when the partition:
has been acted upon
becomes approvable due to the previous step being finished
no longer is approvable since a parellel partition has been rejected or the request has expired
Remember to configure mail-server settings in the mail.properties file.
*** Dynamic Substitution Variables for approval notifications ***
Variables used with approval notifications:
${approvalRequest.ID} The approval request identifier.
${approvalRequest.STEP_ID} The approval step that this notification concerns.
${approvalRequest.PARTITION_ID} The ID of the approval partition in the step that this notification concerns.
${approvalRequest.PARTITION_NAME} The name of the approval partition in the step that this notification concerns.
${approvalRequest.TYPE} The type of approval request.
${approvalRequest.WORKFLOWSTATE} The work flow state from the perspective of the one(s) responsible for handling the partition.
${approvalRequest.REQUESTOR} The human readable version of the authentication token that was used to create the request.
${approvalRequest.APPROVALADMIN} The human readable version of the authentication token that was used to last approve the request, if any.
The work flow states are:
APPROVED: The partition has been approved and no longer requires any action.
APPROVED_PARTIALLY: The partition has been approved, but is still pending additional approvals.
REJECTED: The partition has been rejected and no longer requires any action.
REQUIRES_ACTION: The partition requires an action from admin.
EXPIRED: The partition (and also currently the whole approval) has expired and no longer requires any action.
Self Registration
It is possible to allow users of the public web to create approval requests for new end-entities (under 'Request Registration'). The users' choice of end-entity type and DN fields is confined, for instance it could be limited to end-user certificates with only the name and e-mail fields being available. The DN fields can then be verified by an administrator.
Note the following properties of the basic solution:
The approval process verifies end entity account creation.
The approval process does not verify CSR public key binding to a specific end entity.
Possible usages of self registration includes an almost unlimited set of use cases. The default solution is suitable and configurable for a large set of these use cases, and can function as a platform to customize other
more specialized use cases. Customization of self registration work flows is a pretty straight forward process.
Configuration
Setting up self registration consists of three steps: creating end-endity and certificate profiles that should be available, configuring email notifications, and configuring self registration in web.properties.
First, at least one end-entity profile should be created as follows:
The SubjectDN and SubjectAltName fields that should be available must be added. Fields that are marked as modifiable can be modified freely, otherwise only pre-defined values can be selected by the user. See the user guide for further information.
The user's e-mail can be verified by sending an auto-generated password to it (but this is not the only way to verify the user). The email domain field must be enabled with the Use checkbox, and auto-generated passwords must be enabled. Optionally the domain field may be constrained to particular choices, see the user guide section on end-entity profiles.
E-mail validation works by sending the password in a notification message. For this reason, Send Notification must be enabled (check Use and Default), and the other notification fields below it should be filled in. See the section on email notifications.
By the default the user will be prompted to fill in the username, but the username can also be generated from a field in the end-entity profile such as CN (common name), see below.
Note that sending of a password in an email is not the only way to do things. You can for example use multiple notifications where an enrollment link is sent to the user, but the password is sent to an administrator, or an out-of-band delivery service (through local email), or printed on paper. The solutions are highly configurable and adaptable.
E-mail sending must be configured in mail.properties to work. You may also want to enable notifications to the administrators when there are new approval requests, under System Functions / System Configuration.
To make the end-entity profiles available in the user interface, certificate types must be added in web.properties using the web.selfreg.certtypes.<identifier>.* properties (the identifier can be chosen arbitrarily). Each certificate type defines an end-entity profile and a certificate profile, and what name should be displayed in the user interface. If the username should be generated from a field, then this can be configured using the usernamemapping sub-property. Finally, to enable self registration, the property web.selfreg.enabled must be set to true.
Note that the approval requests will be shown in the administration GUI as coming from a Command Line Tool. This is normal, since all actions that aren't initiated by an administrator are shown as coming from the command line.
Framework for External User Data Sources
A basic framework for importing user data from existing databases exists. The intention of this
framework is to be able to import user the user data from an LDAP and AD, but currently no such
implementations exist or any way to use such implementation from the Admin GUI. The rest of this
section is intended for EJBCA developers.
A custom userdatasource have two extra fields of data:
The first one is a set of CA ids that the userdatasource is applicable to.
It can have a constant BaseUserDataSource.ANY_CA.
The second is a set of fields instructing the RA interface GUI which fields that
should be modifyable by the RA and which that should be fixed. Important, there
is not connection between the user data source, isModifyable data and the end entity profile
isModifyable data. The userdata source is only an instruction to the RA gui then when the
userdata is added will it be matched against the end entity profile, and it's the data
in the end entity profile that really counts.
To implement a custom user data source do the following:
Create a class implementing the interface
org.ejbca.core.model.ra.userdatasource.ICustomUserDataSource containing the methods:
init(), fetch() and testConnection(), see org.ejbca.core.model.ra.userdatasource.DummyCustomUserDataSource
for an simple example implementation.
Create a JAR file containing the class and deploy it to the application server.
Make the user data source available to EJBCA by adding a userdata source, choose 'Custom user data source'
as type and enter it's classpath and properties (using the same semantics as a regular java property file).
Now it is possible to fetch userdata from the userdata source from custom implemented webpages using the
UserDataSourceSessionBean.fetch(AuthenticationToken admin, Collection<Integer> userdatasourceids, String searchstring) method.
Services
EJBCA has a framework for timer services, i.e. procedures
that runs on a timely basis. Currently there exists five types of
services:
a 'CRL Updater' that automatically updates the CRL.
a 'Certificate Expiration Checker' that checks if a CA has certificates about to expire and
sends an email notification to the end user and/or the administrator.
a 'User Password Expire Service' that checks if a user hasn't enrolled for a new certificate within a
certain amount of time after been registered, and if so expires that user's possibility to enroll.
a 'Renew CA Service' that checks if CA certificates are about to expire and automatically renews them.
a 'Rollover CA Service' that activates rollover certificates once they become valid.
a 'Publisher queue process service' that retries failed publishing operations.
a 'HSM Keepalive Service' that periodically tests crypto tokens to avoid connection timeouts.
a 'Remote Internal Key Binding Updater' that automatically renews expiring OCSP signing certificates and keys at a connected VA.
It is also possible to easily write plug-ins for customized services.
A service consists of the components, a worker doing the actual work, an interval
determining the time to the next time the service should run and an action (optional)
of what should be done if a certain condition occurs.
Configuration
*** Workers ***
The worker is the class that will be executed when the service runs. Each worker can have different worker specific configuration.
*** Intervals ***
Periodical Interval
Defines in days/hours/minutes/seconds of how often the worker will be run. A worker should never be configured to run more often than the time a single invocation takes.
*** Actions ***
Mail Action
Action that sends an email notification when the service is executed and have the following settings:
Sender Address - The from-address used in the email.
Receiver Address - The to-address of the email of it
isn't specified by the worker.
*** Pin to Specific Node(s) ***
With this option, it is possible to choose on which nodes the service is allowed to execute. By not choosing any nodes in the list the service can be executed on any of the nodes.
On startup of EJBCA each node adds its hostname to the list of nodes. The list can also be manually edited on the System Configuration page.
*** Run on all Nodes ***
By default services will execute on only one node in a cluster, or one of the pinned nodes. There are some services however that we want to run on all nodes, such as the HSM Keepalive Service.
Checking 'Run on all nodes' disables the check if the service has been running on another node and thus executes the service on all nodes.
Note
Careful: This checkbox should normally only be checked for the HSM Keepalive service. Don't check for other services unless you are absolutely sure you know what you are doing.
Multiple services and clustering
A service worker should never run simultaneously on two nodes, or simultaneously on one node.
To avoid running more than one instance on a single node there is a semaphore that inhibits more than one
instance of the worker to run in a single JVM. If a worker starts and another worker is already running
the worker is rescheduled to run on the next planned interval, and immediately terminated.
To avoid running any two services on two nodes simultaneously, the service have a time stamp that is set when it runs, and
schedules the next run before the actual work is started. This time stamp makes it possible for another node to determine of
the service is already running on another node and not start running.
In practice what this leads to is that a service will always run on a single node, the same node every time, but the running node may switch at times.
For most cases you don't have to pin a service to a specific node. Some reasons to pin nodes are:
HSM Keepalive services: This service should have one service running on each node, since it should keep the local PKCS#11 session alive.
External RA service: If having multiple RAs and running very often there may be a race condition with services competing to run.
Pinning services to run on different cluster nodes towards different External RAs can increase performance and enhance simplicity.
Currently Available Services
CRL Update Service
The CRL Updater checks if any of the configured CAs need a new CRL and updates it if necessary. The worker have no
additional settings and only supports the periodical interval and no action.
Certificate Expiration Check Service
A worker that checks if a CA have certificates about to expire and sends an email
notification the the end user and/or administrator.
The worker have the following settings:
CAs to Check - Select here which CAs that should be searched for expiring certificates.
Certificate Profiles to Check - If any certificate profile is selected from this list, the notification service will require that
certificates are issued by the selected CAs AND that they are issued using one of the selected certificate profiles. Leaving this list empty will
cause the service to search for certificates just based on the CA selection.
Time before notification is sent - The number of Days/Hours/Minutes/Seconds that should
remain of the certificates validity before the notification is sent.
Send notification to end user - Check this if a notification should be sent to
the owner of the certificate. Observe that the end user must have an email set in
the user database (not necessarily in the certificate) in order for the service to
send the notification.
Notification Subject to End User - The e-mail subject.
End User Message - Message body of the notification. Substitution
variables can be used here as defined in the 'Email Notifications' section.
Send notification to Administrator - Check this if a notification should be sent
to some defined administrator-mail address. The address of the administrator is
configured in the Mail Action component.
Notification Subject to Administrator - The e-mail subject.
Administrator Message - Message body of the notification. Substitution
variables can be used here as defined in the 'Email Notifications' section.
Note: you may configure multiple certificate expiration services set with different
Time before notification is sent values in order to further alert the user or administrator
that a certificate is about to expire.
User Password Expire Service
A worker that checks if a user has not enrolled for a new certificate within a specified amount of time
after the user was last edited. If the user has not enrolled within this time, the user's status is set to
Generated and the user will not be able to enroll.
The worker have the same basic setting as the 'Certificate Expiration Check Service', except for
'Time before notification is sent' which is replaced by:
Time until user password expire - The number of Days/Hours/Minutes/Seconds that a user should be able to
enroll for a certificate, i.e. the time before the user's password expire.
Renew CA Service
The renew CA service can be used to automatically renew CAs that are about to expire. This might be used for SubCAs that
are valid only short periods of time. The specific settings are:
CAs to Check - which CAs should be checked, and renewed if they are about to expire.
Time before CA expires to renew - the amount of time before the CA actually expires that the service should renew the CA.
For CAs using soft keystores and not using the default password, auto-activation is required.
Publisher Queue Process Service
The publisher queue process service processes the publisher queue. In the publisher queue, entries where publishing failed is collected.
This service will try to re-publish entries from this queue. The specific settings are:
Publishers to check - which publishers should this service check and re-publish for. You can run one service for each publisher or one service for all publishers.
Note
If you run one service for each publisher you should onle configure one publisher in every service. Do not let two services handle the same publisher.
To read on how the algorithm to prevent excessive database load etc is done, the easiest way is to read in the java file for class PublishQueueProcessWorker.
The same algorithm as for the CRL update worker is used to make sure the service only runs in one instance on one node.
HSM Keepalive Service
The service periodically (with configured interval) goes through all available Crypto Tokens and makes a test signature if the following conditions are met:
The crypto token is a PKCS#11 crypto token, i.e. have a PKCS#11 library path configured.
The crypto token is active.
The crypto token have a key with alias 'testKey'.
If these conditions are met, a test signature with the 'testKey' is performed. In addition, if security audit log protection is configured, a test string is protected with the security audit log protection,
also testing this crypto token (which is not available in the crypto tokens in the GUI).
This will ensure that all configured PKCS#11 slots are used regularly, preventing connection timeouts that could lead to service downtime. You only need to enable this service if you encounter HSM timeouts.
The occurance of such timeouts depend on the specific HSM used, neworking equipment etc.
Remote Internal Key Binding Updater
The service periodically (with configured interval) connects to the configured peer system using a Peer Connector and checks expiration of visible, usable and
enabled Internal Key Bindings' certificates.
For renewal to work, the issuing CA has to be usable on the system where this service is running and the same end entity that was used to issue the
previous certificate must still exist.
Time before certificate expires: How long before the current bound certificate expires it should be renewed.
Renew key pair: Option to renew the key pair automatically before issuing a new certificate.
CRL Downloader
The service periodcally download a CRL from provided URL and imports it into EJBCA, including updating any revocation information for the certificates.
Information on how to use this on a Validation Authority can be found in the OCSP User Guide, Populating the OCSP responder database using the CRL download service.
CAs to Check: select the imported CA (or select ANY to process all external X509 CAs with a configured external CDP)
Ignore nextUpdate and always download the CRL: select this option to force a download of the CRL whenever the service is executed instead of only downloading the CRL when the last known CRL indicates that a new one will be available.
Maximum allowed size to download (bytes): The Service will refuse to process CRLs that are larger then this limit.
Period: How often the Service should check if a new CRL needs to be downloaded.
Active: Check to activate the service.
When the service is executed, there will be log entries showing if the CRL download and processing was successful.
If the downloaded CRL from the external CDP contains the Freshest CRL extension, the service will try to download and process
any such URL that uses "http" as protocol.
Writing Customized Services
It is possible to write customized component plug-ins that can be used with
other standard (or customized plug-ins) and this section explains the steps
necessary.
Common for all the components is that it is required to create a class implementing
the components interface. Then you have to create a special jar containing the necessary
plug-in classes and meta-data (described below), and deploy it to application server so it is included in the
class-path. The next step is to create a service using the custom class
and optionally the custom properties used by the component.
The properties field have the same syntax as a regular Java property file.
The Jar must contain meta-data that describes which classes implement which
interfaces. This is necessary since EJBCA enumerates all implementations using the
ServiceLoader
facility of Java. For each implemented interface the Jar must contain a file named
META-INF/services/name.of.interface, for example
META-INF/services/org.ejbca.core.model.services.IWorker. Each such file
should contain a list of implementing classes, one per line. For example:
# Example file. Should be named META-INF/services/org.ejbca.core.model.services.IWorker
com.example.ejbca.MyWorker
com.example.ejbca.MyOtherWorker
Note
It is not possible to hot-deploy EJBCA when customized services are used.
Note
Service components made for EJBCA 5.0 and earlier do not use the ServiceLoader facility and will not
be auto-detected. To use a service component made for version 5.0 please set
web.manualclasspathsenabled to true in conf/web.properties
and specify the qualified class name manually (i.e. including package name).
CustomWorker
A Custom worker must implement the org.ejbca.core.model.services.IWorker interface.
But a simpler way is to inherit the BaseWorker class. Then you have to implement one
method 'void work()' doing the actual work every time the service framework decides
it is time. The work method can make a call to the action (optional) component by
'getAction().performAction(someActionInfo);' The action info can vary depending on
the action component but it must implement the ActionInfo interface.
If something goes wrong during the work should a ServiceExecutionFailedException be
thrown with a good error message.
See org.ejbca.core.model.services.workers.DummyWorker for an example implementation.
CustomInterval
A Custom Interval must implement the org.ejbca.core.model.services.IInterval
interface. But a simpler way is to inherit the BaseInterval class. You then have to
implement one method 'public long getTimeToExecution();' which should return the
time in seconds until the next time the service is run. Or it should return
DONT_EXECUTE if the service should stop running.
See org.ejbca.core.model.services.intervals.DummyInterval for an example implementation.
CustomAction
A Custom Action must implement the org.ejbca.core.model.services.IAction interface.
A simpler way is to inherit the BaseAction class. Then only the method 'performAction(ActionInfo actionInfo)' needs to
be implemented. The methods should perform the action according to the defined properties and the ActionInfo (all
optional). If something goes wrong during the processing of the action should a ActionException be thrown.
See org.ejbca.core.model.services.actions.DummyAction for an example implementation.
Hardware Security Modules (HSM)
EJBCA have support for several HSMs. Each HSM has it's own interface for key generation and maintenance, specific
to the HSM and independent of EJBCA. You should make sure you are familiar with how your HSM works.
HSM modules available in the Admin GUI
Since EJBCA 6.0 you can manage crypto tokens fully in the Admin GUI or CLI.
The admin GUI tries to be user friendly and automatically show you the HSMs available in your system.
When creating a new Crypto Token (Crypto Tokens->Create New) you can select between Soft and PKCS#11 crypto tokens.
The PKCS#11 option is only available if EJBCA can find any known PKCS#11 modules in the file system.
If EJBCA finds any available known PKCS#11 modules in the file system, you can select PKCS#11 as Type. As PKCS#11 Library there is a
list of the available known HSMs found in the file system.
If the PKCS#11 option is not available or your desired HSM is not in the list of available Libraries there are a few options to configure:
You can configure PKCS#11 modules that are not already known to EJBCA in conf/web.properties. See conf/web.properties.sample how to add new known modules and override existing (overriding should not be needed since you can add new locations with the same name).
The rest of this chapter will mostly be more technical and describe the underlying operations and technical features of using HSMs and PKCS#11.
Configuring HSMs
The GUI configuration of CAs is actually backed by a properties field where properties unique to a particular CAs usage of the HSM is specified. All implemented HSM modules are using the same property keywords to define the identity and the purpose of the keys to be used.
These keywords are:
certSignKey - the key to be used when signing certificates, can be RSA or ECDSA.
crlSignKey - the key to be used when signing CLSs, can be RSA or ECDSA.
keyEncryptKey - the key to be used for key encryption and decryption, this must be an RSA key.
testKey - the key to be used by HSM status checks, can be RSA or ECDSA.
hardTokenEncrypt - the key to be used for hardtoken encryption and decryption. PUK will be decrypted by this key.
defaultKey - the key to be used when no other key is defined for a purpose. If this is the only definition then this key will be used for all purposes.
pin - optional pin code used for auto-activation of CA token, see below. Not recommended for high security set-ups, but very useful in some cases.
You may omit defaultKey if you want to be sure that the right key is used, but then all the other keys must be specified. It's recommended that the certificate and CRL signing keys are linked to the same key since different keys are rarely supported by verifying applications.
When implementing support for a new HSM the 'KeyStrings' class could be used to manage the key properties described above. When it is an JCA/JCE API for the HSM it could also be wise to extend the BaseCAToken class.
The same activation code must be used for all keys used by a CA.
There are four additional key properties that can (optionally) be used when renewing CA keys and to produce roll-over certificates. Some of these (in particular the 'next' keys) are only used when using API methods (such as WS).
previousCertSignKey - this is the alias of the previous signature key, as opposed to 'certSignKey' which is the current signature key.
previousSequence - this is the sequence identifying the previous signature key, as opposed to the current sequence that is held in the CA token.
This sequence will replace the current sequence in the caRef field when signing a request with the CAs previous key.
nextCertSigningKey - this is the alias of a new generated key on the HSM. When updating a CA signed by an external CA this is used to send a request,
but the CA is still active using the old key. When the certificate response is received this key is activate and moved to certSignKey/crlSignKey.
nextSequence - this is the sequence identifying the next signature key.
Supported and tested HSMs are described below, with sample configurations and HSM specific documentation.
Since EJBCA 3.6 the recommended HSM connector is to use the PKCS#11 interface. Older JCE implementations are deprecated and removed (contact us if you need to migrate).
ant clientToolBox
cd dist/clientToolBox
./ejbcaClientToolBox.sh PKCS11HSMKeyTool test
The command will give further instructions about the parameters requires, PKCS#11 library and slot.
Auto-activation of Crypto Tokens
The 'pin' property is used to be able to automatically activate a CA token. The activation code may be specified in the property field with the keyword 'pin'.
If this property is not specified then the CA has to be manually activated after each restart or re-deployment of EJBCA.
Manual activation is done in the admin-GUI under 'Basic Functions->View Information', or using the cli 'bin/ejbca.sh ca activateca'.
The 'pin' property can use a clear text password or an encrypted one.
pin foo123
pin 6bc841b2745e2c95e042a68b4777b34c
These two properties contains the same password. The encrypted pin value can be obtained with the command 'bin/ejbca.sh encryptpwd':
$ bin/ejbca.sh encryptpwd foo123
Using JBoss JNDI provider...
Please note that this encryption does not provide absolute security, ....
Enter word to encrypt:
hidden
Encrypting pwd...
6bc841b2745e2c95e042a68b4777b34c
NOTE: This encrypted password is not high security encryption. If 'password.encryption.key' property haven't been customized
it won't provide more security than just preventing accidental viewing because an EJBCA built-in encryption key will be used.
If an attacker gets hold of the encrypted password and the 'password.encryption.key' haven't been customized,
it is easy for anyone to decrypt the password using the source code of EJBCA.
HSMs and DSA or ECDSA
Support for DSA or ECDSA in HSMs are dependant on the support for the algorithms in the HSM. You have to check if that support is available.
A PKCS#11 wrapper has been used to implement support for tokens with PKCS#11 libraries. The PKCS#11 provider have been
tested with Utimaco CryptoServer and nCipher nShield/netHSM and SafeNet ProtectServer and SafeNet Luna and AEP Keyper and ARX CoSign and Bull TrustWay.
Besides the keys previously described the Crypto Token property field (matching with user friendly values of the Crypto Token in the Administration GUI) should contain the following properties:
sharedLibrary - the path to the HSM PKCS#11 library (/etc/utimaco/libcs2_pkcs11.so, /usr/safenet/lunaclient/lib/libCryptoki2_64.so etc)
slotLabelType - the type of slot reference, see below
slotLabelValue - the value of the slot reference (1, myslot etc).
The slot label type can be one of the following
SLOT_NUMBER - Any positive integer, can be used to refer to slots in any HSM with consecutive slot numbering.
SLOT_INDEX - Any positive integer, prefaced by an 'i'.
SLOT_LABEL - The PKCS#11 standard allows for using strings for labeling slots. This label may also be an integer or an 'i' followed by an integer (like a number or an index)
SUN_FILE - The slot specified by a SUN config file. The slot label can be left blank.
Optionally a few extra properties fields can be used:
attributesFile - a file specifying PKCS#11 attributes (used mainly for key generation).
keyspec - key specification used when generating new HSM keys from within the admin GUI. Keyspec that is used as first choice when generating new keys in the GUI of form "1024" for RSA keys, "DSA1024" for DSA keys and secp256r1 for EC keys.
If keyspec is not given EJBCA tries to generate a key with the same specification as the current cert signing key.
An attributes file is in the format specified in the JavaTM PKCS#11 Reference Guide and the examples further down in this file.
Before EJBCA 3.11 there were no default attributes used when no 'attributesFile' existed. Now there is a built in default configuration used when no attributesFile is specified.
Unless you have some strange HSM not working well with the defaults(see below) you should NOT use an 'attributesFile'. Below is an example of an 'attributesFile' (that should not be used) which will give generated keys
same attribute values as the default:
The only occasion that we know of where the default is not working is when the module protected slot of a Thales/nCipher HSM is used; then the file must exist and have 'CKA_PRIVATE = false' (see below).
The default attributes that are applied to each key generated by EJBCA will assure that:
All needed operations could be done.
The private part of the key is stored in the HSM but not the public part (which is in a certificate that is stored on the HSM).
It will be impossible to read the private part of the key from the HSM.
The default configuration will also disable some signing mechanisms. The disabled mechanisms are for signing when the data to be signed is hashed by PKCS#11 before using the private key in the HSM.
When these mechanism are disabled the sun PKCS#11 wrapper provider will do the hashing instead of the of the HSM. This will speed up the signing in most cases, especially when your HSM is on another host.
This will not have any security impacts since no secret in the HSM is used for the hashing.
However it will be possible not disable these hash/signing mechanisms, see the PKCS#11 section of '$EJBCA_HOME/conf/cesecore.properties'.
You could try not to disable the mechanisms if you get the error CKR_FUNCTION_NOT_SUPPORTED (0x54) from PKCS#11 when signing.
Note
If you are using an attributesFile and have more than one CA using the same slot it is very important that BOTH CA token properties configurations contains the attributesFile.
This is because the attributes are applied when the provider is installed during startup. If one configuration does not have the attributesFile it can not be applied later on by the other configuration.
The tool "EJBCA_HOME/dist/clientToolBox/ejbcaClientToolBox.sh PKCS11HSMKeyTool" is used administrate and generate keys. Use it without parameters to get all valid options.
Keys may be generated in two ways. Examples:
The first example is using built in default and are then using specified slot and PKCS#11 library.
The second is using a configuration file.
The contents of the file is specified in the PKCS#11 wrapper documentation from Oracle.
Often it is enough to use the default but with some HSM it necessary to define some PKCS#11
attributes for the generated key.
All keys to be used has to be generated before the application server is started.
*** Generated HSM objects ***
EJBCA needs (via the Java PKCS#11 provider) two object on the HSM, which are all generated by the generate commands above:
A private key
A certificate - this is simply a holder of the public key used by java, and not the real certificate of a CA
Note
A java keystore entry has no reference to a publickey pkcs#11 object, just a
private key object and a certificate object, hence the public key object is
not needed after the certificate object has been written to the keystore.
By setting the CKA_TOKEN attribute to false for the public key its object will not be
stored on the HSM. If CKA_TOKEN is true then all public keys will be on
the HSM forever since no public key is deleted when a private key is deleted from
the keystore. So in order not to waste memory on the HSM CKA_TOKEN must be false
for the public key.
Note
When generating keys with clientToolBox each private key have the CKA_LABEL
attribute set to the 'alias' of the key prefixed with 'priv-'. But when generating
a key in ejba there will normally not be a CKA_LABEL for the private key.
If you want to have a label even when the key is generated by ejbca you got to
use an attribute file with a CKA_LABEL definition in your configuration.
The value of the attribute is a hexadecimal string starting with "0h". These labels
are normally seen only when you use the native HSM tools to list and manipulate objects.
The example above gives the label 'key1' to the private key. You can give any label by simply looking up the hex codes of characters in the ascii table.
Utimaco CryptoServer
The Utimaco PKCS11 module have a configurable timeout (AppTimeout) that clears all session information if you do not use the keys for some time.
The default time-out is 30 minutes, which may be way too short if your CA is not very very active.
We recommend that you set this timeout to a longer value, several days.
Put a configuration file in /etc/utimaco/cs2_pkcs11.ini:
The timeout in this example of 172800 seconds will allow your CA to idle for a long time.
When using a PKCS#11 token you should first create keys with the command: $EJBCA_HOME/dist/clientToolBox/ejbcaClientToolBox.sh PKCS11HSMKeyTool generate
Each CA should have its own slot.
Each slot must have been initialized before keys could be generated on the them. This includes setting a user PIN for it. The slot must also require login. Tools for doing this is not provided from EJBCA. The HSM vendor should provide this tool.
Here follows an example on how to initialize a slot and generate keys to be used by EJBCA. The password is user1:
Utimaco have an emulator for their CryptoServer LAN HSM that can be used for test and development.
If you have the emulation kit there is a howto in doc/howto/cryptoserver-lan-emulator.txt with steps to follow
in order to use it with EJBCA.
You can check the status of a CryptoServer LAN device, for example the emulator with:
./csadm Device=TCP:3001@172.16.175.128 GetState
*** Import a PKCS#12 file in Utimaco CryptoServer ***
Although not recommended it is possible to import keys from a p12 file to CryptoServer. These steps were contributed by Philipp Vogt and Helmut Edlhaimb-Rexeis.
The tools used are a combination of p11tool that ships with Utimaco HSMs and "ejbcaClientToolBox.sh PKCS11HSMKeyTool".
Import the .p12 file with p11Tool from Utimaco (into slot 20 in this example).
p11tool Slot=22 AuthRSASign=GenPKIAd,:cs2:cyb:/dev/ttyS0 Login=123456 ID=TestCA2XYID ImportP12=mycert.p12,1234
It is absolutely necessary to set an unique id (ID=...) at import time.
The key alias for the imported key is set to "X509 Certificate" (taken from the imported certificate) and cannot be change at import time.
Rename the key alias to an unique key alias with "PKCS11HSMKeyTool rename" from ejbcaClientToolbox.
ejbcaClientToolBox.sh PKCS11HSMKeyTool rename /etc/utimaco/libcs2_pkcs11.so 20 "X509 Certificate" "TestCA2Key"
The new key alias is set to the label and the id of the CKO_CERTIFICATE and the id of the CKO_PRIVATE_KEY.
Optional: Delete the public key with p11Tool using Label="RSA Public Key".
p11tool Slot=20 Login=123456 Label="RSA Public Key" DeleteObject
Test the keys, to make sure they are usable from EJBCA.
ejbcaClientToolBox.sh PKCS11HSMKeyTool test ./libcs2_pkcs11.so 20 1
Make sure no other public keys using this label are present in the HSM.
Even if more than one .p12 file needs to be imported only one at a time can be imported and renamed.
The import and the rename process are tied together and cannot be separated.
nCipher nShield/netHSM
This subsection describes how the nShield card from nCipher is used.
First the card has to be installed and admin and operator card sets has to be created. This is described in step 1.
Step 2 describes environments variables that must be set before generating keys and installing a new CA.
Step 3-5 describes PKCS#11 keys are generated and how different CAs within an installation is configured to use these keys.
In earlier versions of this manual it was also described how the nCipher JCA provider could be used by EJBCA. This has been removed since PKCS#11 keys are better in every respect.
1. Install the nShield card
Make sure you have all necessary software and drivers installed and created the user and group nfast. In Linux should the software be installed to /opt/nfast or the location environment variable NFAST_HOME is pointing to.
login as the nfast user: 'sudo su nfast'
Set the nCipher box to initialization mode by setting the switch to mode 'I'.
Clear the nCipher box by pressing the reset button on the device
Check that the mode is in 'pre-initialization mode' and not in 'operational':
nfast@donny:/home/lars/work$ /opt/nfast/bin/enquiry
Server:
 enquiry reply flags  none
 enquiry reply level  Six
 serial number        41C5-BA04-6D2C
 mode                 operational
 version              2.23.6
 speed index          147
 rec. queue           442..642
 level one flags      Hardware HasTokens
 version string       2.23.6cam5, 2.22.6cam7 built on Apr 25 2005 18:15:46
 checked in           00000000431dca98 Tue Sep  6 18:58:00 2005
 level two flags      none
 max. write size      8192
 level three flags    KeyStorage
 level four flags     OrderlyClearUnit HasRTC HasNVRAM HasNSOPermsCmd ServerHasPollCmds FastPollSlotList HasSEE HasKLF HasShareACL HasFeatureEnable HasFileOp HasLongJobs ServerHasLongJobs AESModuleKeys NTokenCmds LongJobsPreferred
 module type code     0
 product name         nFast server
 device name
 EnquirySix version   4
 impath kx groups
 feature ctrl flags   none
 features enabled     none
 version serial       0
 remote server port   9004

Module #1:
 enquiry reply flags  none
 enquiry reply level  Six
 serial number        41C5-BA04-6D2C
 mode                 pre-initialisation
 version              2.22.6
 speed index          147
 rec. queue           9..152
 level one flags      Hardware HasTokens InitialisationMode PreMaintInitMode
 version string       2.22.6cam7 built on Apr 25 2005 18:15:46
 checked in           00000000426636cd Wed Apr 20 13:02:37 2005
 level two flags      none
 max. write size      8192
 level three flags    KeyStorage
 level four flags     OrderlyClearUnit HasRTC HasNVRAM HasNSOPermsCmd ServerHasPollCmds FastPollSlotList HasSEE HasKLF HasShareACL HasFeatureEnable HasFileOp HasLongJobs ServerHasLongJobs AESModuleKeys NTokenCmds LongJobsPreferred
 module type code     6
 product name         nC1002P/nC3022P
 device name          #1 nFast PCI device, bus 0, slot 13.
 EnquirySix version   5
 impath kx groups     DHPrime1024
 feature ctrl flags   LongTerm
 features enabled     StandardKM
 version serial       24
 rec. LongJobs queue  8
 SEE machine type     gen1AIF
Create the security world with the command :
$ /opt/nfast/bin/new-world -i -Q 1/1
15:04:50 WARNING: Module #1: preemptively erasing module to see its slots!

Create Security World:
 Module 1: 0 cards of 1 written
 Module 1 slot 0: empty
 Module 1 slot 0: unknown card
 Module 1 slot 0:- passphrase specified - overwriting card
Card writing complete.

security world generated on module #0; hknso = 6807e0b031c4f797b739ec33ca7dba05279cf54f
$
The '-Q K/N' option tells how many administration cards that are created N. K of these cards will be needed to restore a module with a backup of the security world.
'1/1' is a bad choice in production but will do in this example. Choose K>=3 and N>K in production.
Change mode on the switch on the device to mode 'O'.
Press the 'Clear' button again.
Check with 'enquiry' that the mode have changed to 'Operational'
This will generate 3 cards of the card set named 'ejbca'. Any 2 of these cards will be needed when generating keys and starting ejbca. Different card sets could be used for different CAs.
Note
The preload command (see below) must always be called as the same user unless the directory /opt/nfast/kmdata/preload is removed.
If you get a "HostDataAccessDenied" error when running preload or starting JBoss, it is because the
file permissions on the directory /opt/nfast/kmdata/preload is wrong. It's probably because you (sometime) ran
preload as another user, such as root or nfast.
Load the card set so that keys protected by the card set could be generated:
Login as the user that is running the application server. This user must be a member of the nfast group.
The following environment variables should be set for this user:
JAVA_HOME (/usr/local/jdk1.6.0_16 or similar)
APPSRV_HOME (/home/jboss/jboss-5.1.0.GA or similar)
EJBCA_HOME (/home/jboss/ejbca or similar)
NFAST_HOME (/opt/nfast)
Step 3. Create PKCS#11 keys that should be used on the nShield card
Start a new window and login as the same user (jboss user).
Note
An ECC key could not be used with preload (at least not the curve secp160r1). Such a key is generated OK and could be used as long as the current preload is running. But if all preload processes are stopped and then if then preload is restarted the key could not be used. This means that ECC could only be used with a 1/n OCS.
Now 3 keys protected by the key set 'ejbca' are created like this:
To start EJBCA, preload must be running with the required key stores loaded. In this example this was done in step 2. Preload is now used to start jboss:
Properties are defined according to the "Generic PKCS#11 provider" section above.
All preloaded operator card sets (OCSs) has it's own slot. It is not possible to predict the slot ID. But the index of the slot in the slot list is predictable. "slotListIndex" must therefore be used. If only one OCS is preloaded this index is always 1.
If several CAs is sharing same OCS (and hence slot) each key (identified by a key label) may only be used for one CA but the test key. Same test key could be used for all CAs.
Example with previous generated keys where signRoot is used for CAs signing, and defaultRoot is used for everything else (encryption):
When preload is used no authentication code is needed to activate a CA. You could give any value for the authentication code when activating.
The 'pin' property could be used in the configuration to automatically activate a CA. The value of this property could be anything.
Module protected keys do not need an operator card set. Hence no PIN code is needed to active such a key. A CA could be configured to use a keystore with module protected keys.
When using PKCS#11 slot 0 is used to indicate module protection. The only other thing except using slot 0 you have to do is to use a configuration file when creating the key. The file could look like this:
If a 1/N card set is used then preload don't have to be used (but it can be used). If preload is not used then jboss could be made to start automatically
at boot time.
For PKCS#11 simple do not use the preload command. The authentication code is now needed when activating the CA.
Using more than one OCS.
It is also possible to use more than one OCS. This is needed when you want different CAs protected by different OCSs.
The key to get this working is to set the environment variable CKNFAST_LOADSHARING=1. This environment variable is also implicitly set when running with preload.
You then got to identify your OCSs with the slot index. The "label" in the list gives the name you gave to your OCS when creating it. Then you get the slot list index from the x in "slot[x]. Use this for "slotListIndex" in the CA properties.
When using a 1/n OCS one card of the OCS must be inserted when activating a CA. If the OCS is persistent then the card could be removed and you could then activate another CA by inserting its OCS.
To make the OCS persistent use the "-p" argument at "createocs" time, if this is not the case as soon as the card is removed then the cardset will unload itself.
When using k/n OCS where k>1 you got to load all OCSs to be used with preload and then start the application server also with preload. Example:
$ ~nfast/bin/preload -c 2of3_0 pause
-- follow instruction to insert cards and enter pins. --
-- then press ctr-z --
$ bg
$ ~nfast/bin/preload -c 2of3_1 exit
-- follow instruction to insert cards and enter pins. --
When the application server then is started with preload, CAs defined for slot list index 2 and 4 could be activated. When activating a CA when running preload no PIN has to be given. Also when the application server is started with preload then only CAs of preloaded slots could be activated (not preloaded 1/n slots could not be used).
nCipher load balancing
If you want to use the Loadsharing with multiple modules, be it PCI
cards of NetHSM's then you must ensure you have a 1/N OCS and the N
quorum to be able to have enough cards to be inserted in every HSM you
want to load balance the key at server/CA start up when logging in.
Same security world got to be loaded in all modules participating.
After setting up the first netHSM, do the following on the second:
Use the panel of the second netHSM to configure the rfs
Use the panel of the second netHSM to load the security world
Use the panel of the second netHSM to configure clients
on each client run: /opt/nfast/bin/nethsmenroll
With load balancing you need to have CKNFAST_LOADSHARING=1. Preload implicitly sets CKNFAST_LOADSHARING.
Note
If preload is used fail-over to the other HSM if one of the HSMs is broken is not working.
When activating a CA you need a smart card from the OCS of the corresponding slot inserted in both HSMs. The OCS got to be 1/n since preload can not be used.
Sample catoken.properties for generating the initial ManagementCA on the netHSM.
The document xxxxxxKeyperInstallation.pdf (xxxxxx is six digits) in the KeyPer UserGuides describes how the HSM is installed, the details start in section 3.5 (Configuring the Keyper HSM for the first time).
As default there is only one slot - 0. The document xxxxxxKeyperP11.pdf describes the PKCS#11 interface in details.
ARX CoSign
This HSM only works on Windows. The installation is done with an installer and the setup with a GUI.
All generated keys will be on slot 1. The PIN code used when activating the keys could be anything since the authentication is made when login on to the user that runs EJBCA.
The shared library is called C:\windows\system32\sadaptor.dll
Bull Trustway Proteccio
The "Installation and User's Guide" describes how the HSM is installed and how how PKCS#11 tokens are created and how a backup of a token is done. But it might be helpful to mention some additional things:
A virtual HSM correspond to a PKCS#11 token.
The number of the virtual HSM corresponds to the PKCS#11 slot ID of the token.
The PKCS#11 user PIN is the "PKCS#11 application authentication" in the "Personalizing a virtual HSM" step.
If "CIK startup mode" is selected for the virtual HSM personalization you must start the HSM manually before EJBCA can use it.
Make sure that backup-restore work before taken the HSM in production since the first versions did not backup the certificate of a key which is needed by the java wrapper.
Bull Trustway PCI Crypto Card
This is an old HSM. New installations will probably use Proteccio.
Do the installation of the card according to Install_and_Use_cc2000.pdf. When the card is "installed" it is ready to use with EJBCA. Only one slot (slot index 0) is available. The slot is not protected by any PIN so an undefined 'pin' (empty) property may be used in the configuration.
When using PKCS11HSMKeyTool and starting EJBCA, libcc2000_tok.so and libgpkcs11cc2000.so must be in the library path. Examples:
lars@maud:~/work/test/ca$ ls -al ../../bullInstall/linux
total 412
dr-xr-xr-x 4 lars lars   4096 28 nov 14.28 .
drwxr-xr-x 4 lars lars   4096 20 apr 21.05 ..
dr-xr-xr-x 6 lars lars   4096 20 apr 21.38 CardAdmin_java
-r-xr-xr-x 1 lars lars  35804 28 nov 14.15 cc2000_lx24.tgz
-r-xr-xr-x 1 lars lars  74955 28 nov 14.15 cc2000_src.tgz
-r-xr-xr-x 1 lars lars     14 28 nov 14.15 cc2000S_release
-r-xr-xr-x 1 lars lars    633 28 nov 14.15 desinstall
-r-xr-xr-x 1 lars lars    171 28 nov 14.15 gpkcs11cc2000.rc
dr-xr-xr-x 2 lars lars   4096 28 nov 14.28 include
-r-xr-xr-x 1 lars lars   7209 28 nov 14.15 install
-r-xr-xr-x 1 lars lars 101788 28 nov 14.15 libcc2000_tok.so
-r-xr-xr-x 1 lars lars 146820 28 nov 14.15 libgpkcs11cc2000.so
-r-xr-xr-x 1 lars lars   3843 28 nov 14.15 LisezMoi.txt
-r-xr-xr-x 1 lars lars   3410 28 nov 14.15 ReadMe.txt
lars@maud:~/work/test/ca$ LD_LIBRARY_PATH=../../bullInstall/linux ../../java/jboss/bin/run.sh
Please consult the SafeNet documentation regarding the installation of HW and SW.
*** Configuration ***
Do all steps (1-7 in the section) in "A - Configuration (Setup Appliance after Installing)" of in the html document "Luna SA Online Help -- Document # 800274-xxx" that should be found on your installation CD.
Some notes about our test setup:
Step 3: You may do nothing here. But note that changing many of the policies will reset the HSM. This means that you can't change any of these policies later on.
Step 4: Note that a new partition could be added at any time. Each partition will be represented as a PKCS#11 slot. Make sure to write the Record Partition Client Password (TP) in a text file. In the example the password is btqx-EFGH-3456-7/K9 for the first created partition (slot 1). The TP will later be used as PIN for the slot.
Step 5: A good idea is to allow partitions (p11 slots) to be "activated". If a partition is not activated you got to insert the black key in the PED and give PIN each time a resource in the HSM is used by the client. So in most cases you want to be able to activate a partition:
lunash:>partition changePolicy -partition partition1 -policy 22 -value 1
Step 6:
You don't have to be in the '/usr/LunaSA/bin' directory as the documentation says. We think it is preferable to be in a directory owned by yourself so you don't have to use sudo.
Example of running in your own directory:
Example of occasions when sudo must be used is registration of server and adding client certificates (root owned files and directories are used and updated):
Step 7:
Each partition assigned to a client will be represented by a PKCS#11 slot for this client. It seems that each new added partition will be put last in the slot list and the number of a slot will be slot list index plus 1 (list index starting with 0 and slot number starting with 1).
To get the partition slot mapping on the client do:
$ /usr/lunasa/bin/vtl verify

The following Luna SA Slots/Partitions were found:

Slot    Serial #        Label
====    ========        =====
 1      950784001       partition1
 2      950784002       partition2
Now the client may use these slot with EJBCA and it's tools
*** Activating slots ***
Before a partition (slot) could be used by a client it must be activated. This is described in 'B - Administration & Maintenance > Activating and AutoActivating Partitions'. The partition policy required do the activation must have been set (see step5 above). Example to activate a partition:
The password is from the configuration step 4. See above.
*** Generate keys on a slot ***
$ ./ejbcaClientToolBox.sh PKCS11HSMKeyTool generate /usr/lunasa/lib/libCryptoki2_64.so 2048 rsa2048_1 1
0    [main] INFO  org.ejbca.util.keystore.KeyTools  - Using SUN PKCS11 provider: sun.security.pkcs11.SunPKCS11
PKCS11 Token [SunPKCS11-Luna] Password:
Created certificate with entry rsa2048_1.
$ ./ejbcaClientToolBox.sh PKCS11HSMKeyTool generate /usr/lunasa/lib/libCryptoki2_64.so secp160r1 secp160r1_1 1
0    [main] INFO  org.ejbca.util.keystore.KeyTools  - Using SUN PKCS11 provider: sun.security.pkcs11.SunPKCS11
PKCS11 Token [SunPKCS11-Luna] Password:
Created certificate with entry secp160r1_1.
The password btqx-EFGH-3456-7/K9 (see above) is used.
*** List and test all keys that could be used by EJBCA ***
$ ./ejbcaClientToolBox.sh PKCS11HSMKeyTool test /usr/lunasa/lib/libCryptoki2_64.so 1
Test of keystore with ID 1.
0    [main] INFO  org.ejbca.util.keystore.KeyTools  - Using SUN PKCS11 provider: sun.security.pkcs11.SunPKCS11
PKCS11 Token [SunPKCS11-libCryptoki2_64.so-slot2] Password:

Testing of key: rsa2048_1
SunJCE version 1.7SunPKCS11-libCryptoki2_64.so-slot2 version 1.7; modulus length: 2048; byte length 245. The docoded byte string is equal to the original!
Signature test of key rsa2048_1: signature length 256; first byte 28; verifying true
Key statistics.
Signings per second: 369; Decryptions per second: 135

Testing of key: secp160r1_1
Signature test of key secp160r1_1: signature length 48; first byte 30; verifying true
Key statistics.
Signings per second: 68 No crypto available for this key.
*** Sample Hard Token Properties ***
This is a sample configuration of the Hard Token Properties for PKCS#11 token when creating a new CA.
./cmu list -display=index,handle,class,keyType,label
If you have created keys with native commands, or imported keys, there is probably no certificate object as required by Java PKCS#11 provider.
Create a self signed certificate referencing the private handle:
Notice that they will have to replace 87 with the handle of the private
key they found when running the list command.
SafeNet ProtectServer
*** install SW ***
Install the software according to the installation instructions for the ProtectServer.
Below are sample commands for installing the SDK rpm on an Ubuntu system, wich means first converting it to a deb.
Using the SDK you can use the SDK as a good emulator for testing and development.
If you are installing with a real ProtectServer you should install the Runtime instead of the SDK. When using the SDK you may use
/opt/ETcpsdk/lib/linux-x86_64 instead of /opt/PTK/lib
./ejbcaClientToolBox.sh PKCS11HSMKeyTool test /opt/PTK/lib/libcryptoki.so 5
...
Testing of key: test
SunJCE version 1.7SunPKCS11-libcryptoki.so-slot3 version 1.7; modulus length: 2048; byte length 53. The docoded byte string is equal to the original!
SunPKCS11-libcryptoki.so-slot3 RSA private key, 512 bits (id 4, token object, sensitive, extractable)
Signature test of key test1: signature length 64; first byte 3d; verifying true
Signings per second: 257
Decryptions per second: 260
The attributes are listed as "token object, sensitive, extractable", and here is important that is says 'sensitive' (extractable only means that the key can be backed up securely using SafeNet tools).
*** Backup and restore ***
When you have tested that all keys are working you should back them up. Read about how this is done in the ProtectServer documentation.
Then clear the slot that you has just backed up:
ctkmu -s <slot nr> t
Then restore the backup according to the ProtectServer documentation and run the clientToolBox test as above. Now when you now that the keys of the slot could be restored from the backup medium you should set the attributes of them so that they could not be extracted from the HSM by any means. Unfortunate this could not be done with the ctkmu CLI tool since the private key got no label. Use the GUI 'kmu' instead. For each key do:
Select the token and login to it.
Double click on the private key that you want to protect.
Uncheck the 'Exportable' box and press OK
Verify that the 'Exportable' and the 'Extractable' boxes are unchecked and can't be changed
Verify that the 'Private' and the 'Sensitive' boxes are checked and can't be changed
Now it should be impossible to do any backup of the key. If you got a key ceremony protocol it could be a good idea to note that keys was made "unexportable". Also note that the 'Exportable' attribute has to be unchecked each time the backup is restored.
Note
The emulator has an annoying feature (only emulator not real HSM). Each key of same length that are generated is the same, because the seed for the random number generator is static.
This means that a slot may only have one key. If a second key is generated for a slot the certificate object for the first key is deleted before writing the certificate object for the new key. This is done since the Sun p11 wrapper provider does not allow two keys that are equal to be present in a keystore.
To fix this you should set the environment variable ET_PTKC_SW_AUTOSEEDRNG=true.
*** Generating keys using ProtectServer tools ***
You can also generate keys, and the needed self signed certificate, using the SafeNet tools delivered with the HSM. This is for example suitable when you want
to generate ECC keys with curves not supported by JDK (although you may still have to patch the JDK in order to use them anyhow).
For example, the below commands generates an ECC key with curve P-256 on slot 1, storing it on the HSM with alias 'foo', assigning a selfsigned certificate to it and finally listing the object of slot 1.
cd /opt/ETCprt/bin/linux-x86-64
./ctkmu c -tec -nfoo -aPSVXxTRD -s1 -CP-256
./ctcert c -s1 -lfoo
./ctkmu l -s1
Or you can wrap it all up in a single command...
./ctcert c -k -lfoo -tec -s1 -CP-256 -d30y
If JBoss was started you have to restart JBoss before the keys becomes available in EJBCA.
SmartCard-HSM
SmartCard-HSM is a lightweight hardware security module in a Smart Card, MicroSD or USB form factor providing a remotely manageable secure key store
to protect your RSA and ECC keys.
SoftHSM2 works very well with EJBCA, and after initializing a slot you can use it nicely by creating a new Crypto Token in the Admin GUI.
The 'user PIN' is what you will use to activate the token in EJBCA.
sudo apt-get install softhsm2
In order to use it as a normal user you have to make /var/lib/softhsm/tokens available to your normal user (for writing in order to create keys), and /etc/softhsm/* readable by the user.
After setting privileges, you can use softhsm as normal user.
softhsm2-util --init-token --free --label myslot
It turns out that the Ubuntu package for SoftHSM2 is not always initializing properly (depending on Ubuntu verion you are running on) so you may have to create missing directories etc.
If you get an "ERROR: Could not initialize the library" when running the above there is a directory missing, and a token not initialized.
The above commands give write privileges to all users in the system, you may wish to tune that to your security policy. Of course, for real security a real Hardware Security Module should be used anyhow.
Now you can go on and initialize other slots as well. Note that if you provide the --slot parameter to SoftHSM2 it will most likely not actually become the slotnumber you specify.
You can list the slots with:
softhsm2-util --show-slots
PKCS11 Spy
You can debug PKCS11 sessions, all calls made, using OpenSC's P11Spy. From EJBCA 6.8.0 it is included by default in known P11 implementation in con/web.properties.
Stop JBoss, install p11spy and set a couple of environment variables that are used in the JBoss terminal.
Start JBoss, and create a new PKCS11 Crypto Token using the PKCS11Spy 'PKCS#11 Library'.
Support for new HSMs
EJBCA uses PKCS#11 so in theory can support any HSMs that provide a decent PKCS#11 implementation.
If the HSM is peculiar you may have to provide specific attribute parameters as descibed for an 'attributesFile' above.
Using SHA256WithRSAandMGF1 (RSASSA-PSS)
Out of the box in Java PKCS#11 RSASSA-PSS is not supported. The software in EJBCA supports it, but the Java PKCS#11 provider does not.
At the time of writing, Oracle Java does not have support for SHA256WithRSAandMGF1 (also known as RSASSA-PSS) in the PKCS#11 provider.
PrimeKey has made a patch which is waiting for approval in the OpenJDK.
You can get a compiled patch together with an installation script for Debian-based operating systems from PrimeKey.
This issue is registered in the EJBCA issue tracker as ECA-2014.
The patch should work on all HSMs that have support for SHA256WithRSAandMGF1.
With the patch applied you can create CAs using HSMs with the SHA256WithRSAandMGF1 (and SHA384 and SHA512) algorithm.
Extending Sun PKCS#11 to set CKA_MODIFIABLE=false
In order to change the CKA_MODIFIABLE attribute of a private key to FALSE directly
after it has been generated the Sun PKCS#11 implementation must be extended. This
extension must be done by adding classes to "Installed Extensions" classpath.
See https://docs.oracle.com/javase/tutorial/ext/basics/install.html
This is achieved by putting the '$EJBCA_HOME/dist/ext/cesecore-p11.jar' in one
of the directories that is defined by the 'java.ext.dirs' system property. You
can put the jar in '$JAVA_HOME/jre/lib/ext'. You may also change the property to
include the directory of the jar. Here is an example:
But be sure to keep '$JAVA_HOME/jre/lib/ext' in the classpath.
To enable the feature in EJBCA you have to set 'pkcs11.makeKeyUnmodifiableAfterGeneration=true' in
$EJBCA_HOME/conf/cesecore.properties
If you use '$EJBCA_HOME/dist/ejbcaClientToolBox.sh' you don't have to bother with the java.ext.dirs setting.
The script is taking care of it.
Everything will work without this jar in the classpath but if it is not in classpath
the CKA_MODIFIABLE will be TRUE for every key that is generated. A warning will
be written once to the log to notify about this.
The reason to set CKA_MODIFIABLE to FALSE is that it should not be possible
to set CKA_DERIVE to TRUE. If CKA_DERIVE is true it might be possible to extract
the private key from some HSMs (CVE-2015-5464), although most vendors have now patched this by not allowing weak key derivation schemes.
Note
We find that it is not really consistent to be able set CKA_MODIFIABLE=true and that the behavior is HSM vendor dependent.
Using the above method to change CKA_MODIFIABLE to false may not give the bahavior you want, so thorough testing is needed.
Some HSMs (for example SoftHSM2) refuses to set CKA_MODIFIABLE to FALSE (the PKCS#11 standard says that
this behavior is OK).
On some HSMs other behavior may arise.
In summary you need to test this very carefully if you want to try it. A good way to test is to use clientToolBox with a generate-test cycle:
$EJBCA_HOME/dist/ejbcaClientToolBox.sh PKCS11HSMKeyTool generate (to generate a new key)
$EJBCA_HOME/dist/ejbcaClientToolBox.sh PKCS11HSMKeyTool test (to test, in a new PKCS#11 session if it is usable)
If you also generate keys through the Admin GUI, you should test this, including restarting JBoss between generation and usage.
ECDSA keys and signatures
EJBCA support ECDSA signature keys in addition to RSA. You can create a CA using ECDSA keys both using the admin-GUI
and using the cli (bin/ejbca.sh ca init).
Generated keys and certificate
When generating a CA in EJBCA up to three keys and certificates are generated:
A CA signing keypair and certificate
An encryption keypair, used for encrypting keyrecovery information
An OCSP signer keypair and certificate
When using ECDSA keys, the CA signing keypair and the OCSP signer keypair will be the ECDSA keytype you select when creating the CA.
The CA signing and OCSP signing certificate will be signed using your selected signature algorithm.
The encryption keypair will always be RSA, using 1024 or 2048 bit key length. It uses the key length set in the admin-GUI or 2048 bit by default using the cli. A dummy encryption certificate will be created using SHA1WithRSA.
Using ECDSA with an HSM
See the section about HSM property parameters to see which keys can be of different sorts.
Note that the keyEncryptKey can not be ECDSA, but should be an RSA key. Your HSM must support both ECDSA and RSA keys.
You can use PKCS11HSMKeyTool from the clientToolBox to generate keys and certificate requests from an HSM.
PrimeKey has made a patches for the java issues with ECDSA. These patches are waiting for approval in the OpenJDK 7.
You can get a compiled patch together with an installation script for Linux operating systems (can be adapted for Windows as well) from PrimeKey.
*** Sun Java PKCS#11 ECC key issue (fixed in recent JDKs) ***
If you are using an very old version of Java/JDK, and the clientToolBox tool in EJBCA to generate ECC keys in an HSM using the PKCS#11 interface you are likely
to stumble on a bug in the JDK which prevents reading of the public key from the HSM. The clientToolBox tool needs to read the public key,
generate a "dummy" certificate and assign that to the key label, so we have a public key certificate in the keystore retrieved from
the Sun PKCS#11 provider.
This bug is present at least up to and including Oracle JDK 1.6u23. A fix has been merged though and is available in new releases of OpenJDK and Oracle JDK.
You can look at this issue in the EJBCA Jira for a solution to the problem: ECA-940
*** Using named Brainpool curves in Java PKCS#11 ***
At the time of writing, Oracle Java does not have named curve definitions for the Brainpool curves.
PrimeKey has made a patch which is waiting for approval in the OpenJDK 7.
You can get a compiled patch together with an installation script for Debian-based operating systems from PrimeKey.
This issue is registered in the EJBCA Jira as ECA-2012.
The patch should work on all HSMs that have named curve support for Brainpool. It has been tested on SafeNet Luna SA and Utimaco CryptoServer. SafeNet ProtectServer supports Brainpool but not using named curves, see below for brainpool support on ProtectServer using custom domain parameters.
With the patch applied you can create and use CAs with brainpool curves in the HSM. Example clientToolBox commands to generate a key:
At the time of writing, Oracle Java does not have support for SHA224WithECDSA in the PKCS#11 provider.
PrimeKey has made a patch which is waiting for approval in the OpenJDK 7.
You can get a compiled patch together with an installation script for Debian-based operating systems from PrimeKey.
This issue is registered in the EJBCA issue tracker as ECA-2013.
The patch should work on all HSMs that have support for SHA224WithECDSA. It has been tested on SafeNet Luna SA and Utimaco CryptoServer.
With the patch applied you can create CAs using HSMs with the SHA224WithECDSA algorithm.
*** Issue with explicit parameters in Java ***
In order to use elliptic curves with explicit parameters (as opposed to the standard named curves) you need to apply a patch to the file ECParameters.java. It is the same file as patched above for the bug.
Download the JDK source code and locate the file sun/security/ec/ECParameters.java.
Starting at line 210 there is code for handling of non named curve EC parameters. Remove the Exception thrown in line 208 and enable the code that is commented out.
Compile the class by running 'javac *.java' in the directory where the file is located.
Replace the existing sun/security/ec/ECParameters.class file in jre/lib/rt.jar with your patched and compiled version.
*** Using Brainpool ECC with SafeNet ProtectServer Gold HSM ***
Here we provide a guide for using Brainpool curves with the SafeNet ProtectServer Gold HSM. These steps were contributed by DGBK, Netherlands.
ProtectServer needs explicit parameters for the Brainpool curves. Using explicit parameters have one disadvantage, at least when using the Sun PKCS#11 provider, and that is that you can not use the EJBCA tools to generate keys, but have to use the HSM vendors tools.
First you should apply the patch for explicit parameters, above. Then you are ready to start generating domain parameters and keys.
These are the commands for ProtectServer Gold software version 3.33, firmware version 2.07.
1. Create domain parameters file brainpoolP160r1.txt from
ptk_c_administration_manual_rev-c.pdf, Appendix G, Sample EC Domain Parameter Files.
Note that you must add "cofactor=01" last in the parameters file, the cofactor is always one (in the spec document) for brainpool curves (cofactor=1 does not work, it has to be 01).
2. We have to configure the HSM to accept custom domain parameters (E flag):
Normally you want to generate requests and certificates using named curves encoded in certificates and requests, this is what IETF recommends.
In some cases you need to generate the request and certificate with explicit parameters instead, this is for instance mandated by ICAO for usage in CSCA's and DS's for ePassports.
When generating requests with clientToolBox PKCS11HSMKeyTool certreq you can specify a flag to use explicit parameters instead of named curves. Named curves is the default.
When creating CAs with ejbca.sh ca init you can specify a flag to use explicit parameters instead of named curves. Named curves is the default.
When EJBCA issues certificate with public keys from certificate requests (csr's) the key in the certificate will be the same as in the csr. If the csr uses explicit parameters, so will the issued certificate.
If you generate a CA with explicit ECC parameters in the CA certifiate you will not be able to run commands like 'ejbca.sh ca listcas' because Java only supports named curves when serializing certificates.
You can resolve this by adding the BC provider as the first provider:
$ sudo vi /etc/java-7-openjdk/security/java.security

security.provider.1=org.bouncycastle.jce.provider.BouncyCastleProvider
(renumber the ones below)
After editing this (make sure you edit the right file) you need to restart JBoss.
Named curves
EJBCA supports the curves that BouncyCastle supports, they include named curves from Nist, SEC and X9.62.
New curves may be supported without this list being updated, give it a try!
See Bouncycastle wiki for more information about ECDSA curves.
X9.62 curves:
prime192v1
prime192v2
prime192v3
prime239v1
prime239v2
prime239v3
prime256v1
SEC curves:
sect571r1
sect409r1
sect283r1
sect233r1
sect163r2
secp521r1
secp256r1
secp224r1
secp384r1
Nist curves:
P-224
P-256
P-384
P-521
B-163
B-233
B-283
B-409
B-571
Teletrust curves:
brainpoolp160r1
brainpoolp160t1
brainpoolp192r1
brainpoolp192t1
brainpoolp224r1
brainpoolp224t1
brainpoolp256r1
brainpoolp256t1
brainpoolp320r1
brainpoolp320t1
brainpoolp384r1
brainpoolp384t1
brainpoolp512r1
brainpoolp512t1
ImplicitlyCA curves
X9.62 provides 3 alternatives for the parameters that can be found in an EC public key.
One of these is named implicitlyCA and indicates that the parameters are defined else where, implicit in the name of the
certification authority (CA) that issued the key.
In this situation the actual parameters appear in the ASN.1 encoding of the key as a DER encoded NULL.
As the definition says, when the key is used, the parameters will have to come from elsewhere.
In EJBCA the parameters are configured in conf/cesecore.properties.
When creating a new CA using the implicitlyCA facility, you first configure your curve parameters in conf/cesecore.properties and issue commands:
ant clean
ant deployear
After restarting the application server you can now create a new CA using the name 'implicitlyCA' instead of a curve name as keyspec in the admin-GUI or CLI.
The CA certificate will now be created with the NULL encoding of the public key.
When issuing client certificates where the client public key uses implicitlyCA, you must allow key length 0 in the certificate profile, because EJBCA can not read the
key length, since the parameters are defined elsewhere.
See Bouncycastle wiki for more information about the implicitlyCA facility.
The curve parameters in conf/cesecore.parameters are configured in Bouncycastle using the following code:'
ECCurve curve = new ECCurve.Fp(
    new BigInteger(ecdsa.implicitlyca.q), // q
    new BigInteger(ecdsa.implicitlyca.a, 16), // a
    new BigInteger(ecdsa.implicitlyca.b, 16)); // b
org.bouncycastle.jce.spec.ECParameterSpec implicitSpec = new org.bouncycastle.jce.spec.ECParameterSpec(
    curve,
    curve.decodePoint(Hex.decode(ecdsa.implicitlyca.g)), // G
    new BigInteger(ecdsa.implicitlyca.n)); // n
ConfigurableProvider config = (ConfigurableProvider)Security.getProvider(BouncyCastleProvider.PROVIDER_NAME);
config.setParameter(ConfigurableProvider.EC_IMPLICITLY_CA, implicitSpec);
Creating client certificates
You can also issue normal requests for client certificates using ECDSA keys.
All certificates signed by an ECDSA CA will naturally use ECDSA signatures, regardless if the client keys are RSA or ECDSA.
When batch generating client keys using the cli command 'bin/ejbca.sh batch' you configure the type of client keys that will
be generated in the file conf/batchtool.properties. The possible parameters are explained there.
If using the implicitlyCA facility the same parameters as configured for the ca in conf/cesecore.properties are used.
Limitations
When using the 'implicitlyCA' mode only one set of curve parameters can be set for the whole EJBCA instance.
This means that if you have several CAs using ECDSA with 'implicitlyCA', they will all use the same curve parameters.
You can mix 'implicitlyCA' with named curves any way you like though.
Peer Systems (Enterprise only)
An EJBCA instance can be both target and initiator of remote operations from another EJBCA instance.
Connections are made using dual authenticated HTTPS.
This is similar to how you use a client certificate to authenticate to the Admin GUI and then manage an EJBCA instance,
but in this case the configured administrator is another EJBCA instace.
Normally the instance with higher security requirements (e.g. an EJBCA acting as CA) initates connections to a system with
lower security requirements (e.g. an EJBCA acting as VA or RA).
In the Peer Systems overview you can:
Modify global settings like enabling or disabling incoming connections.
See a list of configured known EJBCA Peer Systems that this instance can connect to (Peer Connectors) and their current connection status.
See a list of systems that have connected to this instance recently (Incoming Connections).
Additionally there are links to the relevant authentication settings for outgoing connections (AuthenticationKeyBinding) and incoming connections (Administrator Role).
Setting up Peer Connectors for Outgoing Connections
Outgoing connections are allowed by default and can be disabled by administrators authorized to /peer/modify recursive.
A Peer Connector is a representation of a remote EJBCA instance and can be referenced
by other components like Publishers and Services.
Each Peer Connector maintains a pool of outgoing re-usable (HTTP Keep-Alive) connections and new connections are only created when needed.
To authenticate to a peer, you need to configure an AuthenticationKeyBinding.
The AuthenticationKeyBinding is the EJBCA instance identity and consists of a client SSL X509 certificate and a key pair in
one of the instance's Crypto Tokens.
Ensure that the AuthenticationKeyBinding is configured to trust the peer's server SSL certificate or the connection
will fail.
AuthenticationKeyBinding settings are only read when a Peer Connector's connection pool is started and if the client certificate
is updated this will not take effect until a connection pool is Reset.
For each configured Peer Connector, you can see the human readable name, connection end point and current connection status.
You can Ping any of the peers to check connectivity and the result is the round-trip time from and to the
application over the secure connection (giving a more accurate view of the actual round trip time than a network ping using the ICMP protocol).
Only the first connection to a peer using the same client certificate will be subject to a full authentication check
and subsequent requests will share the same credential.
This means that an initial Ping request to a peer system will be significantly slower than the next one.
*** Adding a Peer Connector ***
Outgoing connections must be allowed to be able to add a new Peer Connector.
From the Peer Systems overview, click the Add button. Configure the following fields and click Create.
Name: Your name for the peer.
URL: The target end point where the peer is listening. Normally you only need to change the hostname of the URL.
Enabled: If a Peer Connector is enabled connections to the peer are allowed to be created when needed.
From the Peer Systems overview, click the Edit button for an existing Peer Connector.
In the view of the Peer Connector you can modify and save the existing name, URL or state.
In the Edit view, you additionally have buttons for cloning (Clone) or deleting (Delete) the current object.
Incoming connections
Incoming connections are not allowed by default and can be enabled by administrators authorized to /peer/modify recursive.
In the list of incoming connections, you can see systems that have successfully connected to the EJBCA instance with a client
certificate trusted by the application server's SSL configuration.
If the client certificate presented by the connecting system is already part of an Administrator Role, the name of this role
will be shown.
*** Authorization of incoming connections ***
By default EJBCA requires Admin TLS certificate to be present in the database.
If you are setting up an external VA or RA, you probably want to be able to connect a Peer from the CA to the VA/RA without having to import the CAs
TLS client certificate (from an Authenication Key Binding) into the VA/RA. This is done by setting "web.reqcertindb=false" in conf/web.properties.
See Building and configuring the OCSP Responder.
If no Administrator Role exists for the connecting system's client certificate,
you are presented with a Create new role button.
Clicking this button will allow you to quickly setup a new Administrator Role with for the incoming client certificate
and a relevant set of access rules or add the incoming client certificate to an existing Administrator Role.
If an Administrator Role already exists for the connecting system's client certificate, you are presented with a
Modify role button where you can change the relevant set of access rules for the Administrator Role.
Note that this is just a simplified view of EJBCA's normal authentication and authorization management and
the created Administrator Role can be edited just like any other Administrator Role.
Management operations for an EJBCA Peer System
Once an EJBCA instance has been authorized to connect and manage another EJBCA instance, operations on the peer
can be performed through the Admin GUI of the authorized instance.
The administrator initiating these operations needs to be authorized to the /peer/view /peer/manage
access rules and additionally any relevant CA.
*** Publishing using Peer Connectors ***
Publishers are used to propagate certificate or CRL information to a peer system.
The PeerPublisher implementation allows this information to be pushed to a configured Peer Connector.
The connecting system needs to be authorized to the /peerincoming /peerpublish/writecert /peerpublish/writecrl /ca/[CAName]
access rules to be able to push both certificate and CRL data.
*** Certificate data synchronization ***
In a setup where an EJBCA CA instance (or a cluster) uses external EJBCA VA/OCSP responders, revocation information needs to be
propagated from CA to VA.
Information about newly issued certificates and revocation updates are normally sent using a (Peer)Publisher, but the first time
a new VA is connected the current state of all previously issued certificates needs to be pushed to the VA.
In the overview of peer connectors, click Manage for the peer connector representing the VA and select the
Certificate Data Synchronization tab.
Configure the relevant subset of information to synchronize and click Start to initiate the synchronization as a background task.
The progress can be followed either in this view or in the Peer Systems overview.
Note that the subset of revocation information to send affects how database queries are performed.
Depending on your database it might be faster to only synchronize everything or only one subset of data at the time.
The connecting system needs to be authorized to the /peerincoming /peerpublish/readcert /peerpublish/writecert /ca/[CAName]
access rules to be able to check synchronzation data and push missing or outdated certificate entries.
*** Renewal of remote Internal Key Bindings ***
In a setup where an EJBCA CA instance (or a cluster) uses external EJBCA VA/OCSP responders, a CA delegates signing of OCSP responses
to an OCSP signing certificate (configured as a OcspKeyBinding) at the VA.
The OCSP signing certificate should be short-lived and to make renewal easier, this is available as a remote management operation on
the CA.
In the overview of peer connectors, click Manage for the peer connector representing the VA and select the
Remote Key Bindings tab.
Click Renew to generate a new certificate.
Optionally you can also select to generate a new key pair for the next OCSP signing certificate.
Renewal of remote Internal Key Bindings can be automated using a Remote Internal Key Binding UpdaterService.
The connecting system needs to be authorized to the
/peerincoming /internalkeybinding/view/[IKB] /internalkeybinding/modify/[IKBName] /cryptotoken/view/[CTName]
access rules to be able to renew an Internal Key Binding certificate.
Additionally /cryptotoken/keys/generate/[CTName] is required if key renewal should be allowed.
Serving Registration Authority requests via Peer Connections
The Registration Authority (RA) added in EJBCA 6.6.0 can be run either locally or remotely using long-hanging Peer Connections from CA to RA.
The CA will connect to the RA and listen for requests, grab either the first pending or wait for one, and return the request to the CA.
Once the CA is done processing the request, it will reconnect to the same RA and deliver the result and then wait for a new request.
*** Configuring the Peer Connector to fetch requests from the RA ***
When setting up an outgoing Peer Connector on the CA, pay attention to the "Incoming requests" options.
Process Incoming requests: Enabling this option will make the CA establish long hanging connections to the RA and fetch requests.
Minimum parallel requests: Minimum number of long hanging connections that will wait for the requests on the RA when the RA is idle.
Maximum parallel requests: Maximum number of long hanging connections that will process requests from the RA when the RA is fully utilized.
The CA will automatically throttle up and down the number of long hanging connections to each RA based on utilization.
If you want rapid responses to bursts of requests after a long period of idle time, you should increase the minimum.
If you want to limit the load the an RA can inflict on a CA when the RA is fully utilized, you should lower the maximum.
*** Authorizing which types of requests from the RA to serve ***
Once the CA is able to connect to the RA, there is an option in the outgoing Peer Connector list to Authorize requests.
The RA authenticates to the CA with its server side TLS certificate and using Authorize requests will allow you to create a new role
(suitable action for first RA) or assign this certificate to an existing administrator role (suitable action for the rest of the RAs).
Once the server side TLS certificate belongs to a role, you are shown a simplified view of access rules relevant to RA requests processing.
Since requests from the RA over the long hanging Peer Connections are authorized with a common subset of access rules from an adminstrator
authenticated to the RA and the RA itself, this will limit the maximum access any administrator can have when performing requests over the RA.
Think of it as context aware authorization.
*** Authorizing the CA to fetch requests from the RA ***
Similar to Authorization of incoming connections, you need to grant
the CA rights on the RA to fetch pending requests.
Modify the matching role and ensure that "Accept long hanging connections (External RA)" is checked.
Validators
Validators are applied to CA's to validate the issuance of certificates, based on key strength, origin och on other values inherent to the
certificate issued. To apply a Validator to a certificate it's chosen in the CA, where it will be called prior to issuance. Additionally,
validators are restricted to only run for certain Certificate Profiles.
To explore Validators, look under the Validators menu item under the CA Functions header.
Audit Logging
All validation results are audit logged and also logged in the server logs for more detail.
Key Validators
Key Validators are rather intuitively meant to validate the quality of keys, foremost as a result of incoming CSRs. There are currently
three types of Key Validators:
*** RSA Key Validator ***
The RSA Key Validator inspects RSA key parameters and validates key quality beyond key length and size. This key validator can
enforce the CA/B-Forum requirements on public keys, and will also perform the following tests on the RSA exponent and modulus:
That the value of the public exponent is an odd number equal to 3 or more
That the public exponent is in the range between 2^16+1 and 2^256-1
That the modulus is an odd number, not the power of a prime, and have no factors smaller than 752
*** ECC Key Validator ***
The ECC Key validator inspects performs the full public key validation (NIST SP 56A) routine on ECC keys.
*** Blacklist Key Validator ***
This validator compares public keys agains a blacklist of known bad public keys, such as the Debian bad keys.
Note
The list is empty by default and must be filled.
The public key blacklisted entries can be added using the CLI:
bin/ejbca.sh ca updatepublickeyblacklist --command add --dir <directory of blacklisted public keys>
where the directory contains public key files in PEM format. If you have a list of PEM formatted private keys, you can create the
public key entries, and CSRs to test with using these commands:
You can import a blacklist fingerprint file (a files with one blacklist fingerprint per line) with:
bin/ejbca.sh ca updatepublickeyblacklist --command add --mode fingerprint --keyspecs RSA2048 --dir <directory where blacklist fingerprint file resides>
You can also remove fingerprints using the fingerprint file:
bin/ejbca.sh ca updatepublickeyblacklist --command remove --mode fingerprint --dir <directory where blacklist fingerprint file resides>
*** Common Key Validator Settings ***
Certificate Validity Not Before
Only perform validation if certificate validity NotBefore matches the condition, i.e. is less than or greater
than the given date. If no date is set, this condition is not used. Date is on the form 2017-02-28 to for example validate only certificates that are
valid from the 28th of February 2017.
Certificate Validity Not After
Only perform validation if certificate validity NotAfter matches the condition.
The format of the date entered is 'yyyy-MM-dd [HH:mm:ss]', for example 2022-08-25 for the 25th of August 2022, or if you want to specify a time '2022-08-25 14:50:55'.
The displayed date will be converted to the server's timezone, and you can specify timezone as well '2022-08-25 14:50:55-0000' for UTC.
Certificate Field Validators
One may also wish to validate issuance based on other values which can't be evaluated during end entity creation. Currently, only one
such validator has been implemented, the CAA Validator.
*** CAA Validator ***
The Certificate Authority Authorization (CAA) validator is based on RFC 6844 and the
CA/B-Forum guidelines. These specify that for complying
CAs issuing certificates containing DNSName values in the subjectAltName extension, the CA must perform a lookup check to the DNS(s) of
all specified names and check that the CAA records allow issuance for the given issuer.
Note
The result of all CAA lookups are written to the server logs on the INFO level.
A typical CAA record has the following format:
example.com. 243 IN CAA 0 issue "ca.org"
This record says that the issuer known as "ca.org" is permitted to issue certificates (including wildcards) all domains and subdomains
to the domain "example.com". In the EJBCA case, this means that according to CAA an end entity that includes the field DNSNAME=example.com
in the subjectAltName (SAN) extension must pass a CAA Validator check before having a certificate issued to it. To set up such a CAA Validator,
there are three specific settings which may/should be set:
Issuer
This value should match up to the value field in the CAA record of the DNS, i.e "ca.org" in the above example.
DNS Resolver
Non-mandatory field where you may specify a DNS Resolver (such as 8.8.8.8 or 8.8.4.4). Should be an IP adress. If left
blank, the system default responder will be used
Lookup DNAMEs
Check this box if you want to lookup and follow any DNAME records found during CAA processing. To comply with RFC 6844, it is recommended
to keep this option enabled.
Validate DNSSEC
Check this box if you want DNSSEC to be validated. If this box is checked, your DNS is signed with DNSSEC and your DNS presents a faulty set of records
(suggesting a possible MitM attack), CAA validation will fail. It is strongly recommended to enable DNSSEC checks to ensure the authenticity of DNS responses.
Trust Anchor
In order to obtain secure answers from the root zone of the DNS using DNSSEC, a trust anchor must be configured. By default IANA
root anchor is used. This value may be modified but should remain unchanged unless the records is signed by another trust anchor.
Use IODEF E-mail
Checking this box enables sending e-mails to any mailto-links registered on the DNA as CAA IODEF records. Doing so enables the
following additional settings:
From:
The From field in the resulting e-mail.
Subject:
The Subject line in the resulting e-mail.
Additional Information:
Any additonal information required, in addition to the default message which will be appended last:
A faulty Certificate Request was made for the domain 'example.com' for the issuer ca.com which was
rejected by the CA due to the issuer not having a CAA record on the domain's DNS.
A few notes in regards to CAA validation:
CAA validation will pass if the DNS lacks CAA records entirely
According to the guidelines, a faulty CAA check should always lead to certificate issuance being canceled.
EJBCA currently doesn't validate parameters in CAA records, but such records will still be evaluated correctly. Parameter handling is planned in future versions.
EJBCA currently only supports e-mail IODEF records. WebService IODEF calls (RFC 5070) are not yet supported.
CAA Validator Logging
The CAA validator will log both success and failure. Since success can be considered a security event, to be shown as evidence, this is logged in the security audit log.
Failures are not security events per se and logged to the standard server log at info level.
Example failure:
15:49:07,017 INFO  [org.cesecore.keys.validation.KeyValidatorSessionBean] (default task-24) VALIDATOR_VALIDATION_FAILED;FAILURE;VALIDATOR;CORE;msg=CAA Validator 'CAA Validator' failed issuance of certificates
to issuer primekey.com, with messages:
[Not allowed to issue certificate for dnsName *.allow.klaan.nu. Result type was: Issuance of wildcard certificates for this domain is prohibited. Parameters: {} Message:
, Allowed to issue certificate for dnsName *.klaan.nu. Result type was: May issue, no CAA results for domain. Parameters: {} Message:
, Not allowed to issue certificate for dnsName allow.klaan.nu. Result type was: Rejected due to issuer not having a CAA record at domain's DNS, or issuance being prohibited. Parameters: {} Message: ].
Example success:
15:50:58,930 INFO  [org.cesecore.audit.impl.log4j.Log4jDevice] (default task-8) 2017-09-20 15:50:58+02:00;VALIDATOR_VALIDATION_SUCCESS;SUCCESS;VALIDATOR;CORE;ejbca;1865017768;;caaklaan1;msg=CAA Validator 'CAA Validator'
has permitted issuance of certificates to issuer primekey.com, with messages:
[Allowed to issue certificate for dnsName *.klaan.nu. Result type was: May issue, no CAA results for domain. Parameters: {} Message:
, Allowed to issue certificate for dnsName a.allow.klaan.nu. Result type was: May issue. Parameters: {} Message: primekey.com
, Allowed to issue certificate for dnsName b.allow.klaan.nu. Result type was: May issue. Parameters: {} Message: primekey.com].
There is also debug logging available, debug logging DNS lookup results. This can amount to large volumes however and is therefore set at debug level which is disabled by default.
If you want to have a separate DNS lookup log, you can send the DEBUG log for the class CaaDnsLookup to a separate log, similar to how you can do that for OCSP Transaction and Audit logging. See the Logging section for more information.
Common Validator Settings
To control the behaviour while certificate issuance, for every validator the following base restrictions can be applied:
Description - a general decription of the Validator, not used for any validation purposes.
Apply for Certificate Profiles - Validate keys for these certificate profiles only. If nothing is selected in this list, no validation will be performed.
Apply for all Certificate Profiles - Validate keys for all certificate profiles, the list above will be ignored.
If Validation failed - Define behaviour if key validation fails (i.e. abort issuance, log error message to trigger monitoring systems, etc.).
All failed issuance also adds a record in the security audit log.
If Validator was not applicable: - Define behaviour if the input is not applicable for the selected validator (i.e. abort issuance, log error
message to trigger monitoring systems, etc.). This handles the case when for example a CSR with ECC keys is passed to an RSA key validator.
LDAP and Publishers
EJBCA has a modular support for something we call Publishers. A publisher
can be any external source where you want to send issued certificates and
CRLs to be stored. The most common cases of Publishers, which are
implemented by default in EJBCA are LDAP directories and Active Directory
(which is a special case of LDAP directory).
The Publisher architecture is modular and it's possible to implement custom
publishers that can also be easily integrated and set up in the Admin GUI.
Publisher Access Rules
The presumed administrator of publishers is the built in CA Administrator role, or more specifically a role with access to /ca_functionality/edit_publishers. Besided that, only
the following publishers will be available for a given role:
Publishers assigned to a CA that the role has access to.
Publishers not assigned to any CA.
EJBCA Enterprise only: Validation Authority Peer Publishers, given that the role has access to /peer/view
Now we will look at the built-in publishers.
LDAP Naming
A good book to understand LDAP naming is "Understanding and Deploying LDAP
Directory Services". The recommended method of choosing a naming suffix is
the one described in RFC2247 that maps a DNS domain to a DN. If my DNS
domain is bigcorp.com it will map to the DN "dc=bigcorp,dc=com". The top
node in my LDAP directory will then be "dc=bigcorp,dc=com".
The dc component support is mandated by all of the X.509 RFCs now.
For example, if I have this directory:
dc=bigcorp,dc=com
    |
    +-dc=fi
    |
    |
    +-dc=se
        |
        +-cn=Mike Jackson
The most understandable method is taking the subject name in
forward order, like:
cn=Mike Jackson,dc=se,dc=bigcorp,dc=com
If the DN is ordered like this it should be published to the correct object
in the tree.
If the DN is ordered reverse, like:
dc=bigcorp,dc=com,dc=se,cn=Mike Jackson
EJBCA will reorder it incorrectly to forward order, so the publishing will
be wrong.
Therefore...
Use forward order like this:
'cn=Mike Jackson,dc=se,dc=bigcorp,dc=com' if using the dc model or
'cn=Mike Jackson,o=bigcorp,c=se' if using the o,c model.
An example image of an LDAP structure can be seen below in HOWTO-LDAP-tree.png.
Making unique LDAP DNs is the next challenge. If you are in a small
organization having the CN will probably work fine, but in a larger
organization there are probably several people with the same name. Somehow
the names must be made unique, and one way is to introduce numbers, initials
etc in the CN. Another way that we recommend is to use uid in the LDAP DN
instead. LDAP DNs will then looks like "uid=tomas,dc=bigcorp,dc=com". Uid is
the users username, normally used for login etc, and you probably already
have some procedure to create unique usernames already.
LDAP Basics
LDAP has an unusual structure, if you are not used to X.500 style naming.
Things are either branches, or leaf nodes. You can't just drop an object
anywhere you like; You need to create the framework to support it.
Sort of like if you wanted to put entries in /etc/hosts, if the directory
/etc did not exist.
First you mkdir /etc, Then you create the file. Then you start putting
things in the file. The difference with LDAP and x.500 is that instead of paths
separate by slashes, you have paths separated by commas and '=' signs.
For example, if you want to make an object
"cn=ldaphost,ou=hosts,dc=yourdom,dc=com",
you first have to make sure "dc=yourdom,dc=com" exists.
Then make sure
"ou=hosts,dc=yourdom,dc=com" exists.
THEN you can try
"cn=ldaphost,ou=hosts,dc=yourdom,dc=com"
EJBCA does not create branches in LDAP.
You have to put them there with other means, before you start publishing.
*** Using LDAP ***
In Firefox you can for example enter a URL like:
ldap://ip-address-of-ldap-server:389/cn=Tomas Gustavsson,dc=se,dc=bigcorp,dc=com
and it will fetch an address book entry with the information about the user,
including the certificate.
Examples of using LDAP with Firefox can be found in the
howto-section of this web page.
To use LDAP top fetch user certificates and use them for encrypting email
there seems to be a requirement to use SSL connection to the LDAP server
(Account Options->Compositions & Addressing->Edit directories->Edit->Use
Secure Connection), see also below how to configure OpenLDAP for SSL.
Note: When fetching certificates from LDAP with Firefox for example with
URL:
ldap://ldap-server-host/dc=bigcorp,dc=com??sub?(cn=MyName)?(objectclass=*)
To get a checkbox at the fetched certificate, the CA certificate must be
installed in the Windows truststore, not only in Firefox's.
To use SSL against an LDAP server with MS Outlook you must make sure the CN
in the LDAP servers certificate is the same as the hostname.
An example of adding a user for the LDAP server with the CLI interface is:
bin/ejbca.sh ra addendentity ldap password "C=SE,O=Foo,CN=ldap.foo.se" MyCA 1 PEM SERVER
where ldap.foo.se is the hostname of the LDAP server that Outlook should use.
The CA certificate must also be imported into Windows properly.
Configure LDAP publishers
A Publisher is a session bean that implements the IPublishSession interface
and is used to store certificates and CRLs for entities.
EJBCA have support for endless number of publishers simply by defining
publishers in the Admin GUI. The user of EJBCA can implement own publishers, but EJBCA
already comes with a publisher for LDAP.
EJBCA uses a notion of base DN to publish to different LDAP structures. The
DN used in the certificate can be different from the LDAP structure.
*** Configuring EJBCA ***
To configure the publisher for LDAP:
Choose 'Edit Publishers' in the Admin GUI.
Add a new publisher with a name you define yourself. Edit the publisher and
fill in all the necessary fields.
Generic parameters to LDAP Publisher:
'Hostnames' is ';'-separated list of the hosts where the LDAP servers are
located. E.g. "ldap.company.com" or "ldap1.company.com;ldap2.company.com".
Only the first available of the listed hosts will be used.
'Port' is the port on which the LDAP server listens, default non-SSL is
389. There are three choices:
Plaintext Connection: unencrypted connection, the easiest to get started with, and the mosts robust if network is secure.
STARTTLS Extension: this gives the server and client a chance to negotiate a TLS (encrypted) connection, if the server supports encrypted connections. It starts with a plaintext connection, and upgrades to a TLS connection using the same port as plaintext connection. Requires configuration both on the server (TLS server key and certificate) and on the client (CA certificate in truststore).
TLS Connection: this always uses an encrypted TLS connection and fails if it is not available. Requires TLS configuration both on the server (TLS server key and certificate) and on the client (CA certificate in truststore).
'Login DN' is the DN of a user on the LDAP server with permissions to add
and update entities.
'Login Password' is the password for the user above.
'Connection timeout' is number of milliseconds a server has to respond before it is
considered unavailable and the next server in the list of hostnames (if any)
is used instead. This timeout is used to probe LDAP servers, to create connections, to bind and to disconnect.
'Read timeout' is number of milliseconds a server has to complete a LDAP search or read operation before it times out and fails.
'Store timeout' is number of milliseconds a server has to complete a LDAP store operation before it times out and fails. This can take a little longer if you store very large CRLs in LDAP.
'Create Nonexisting Users' defines if an LDAP object should be created by EJBCA if it is no existing object
when EJBCA publishes the certificate.
'Modify Existing Users' defines if attributes (such as email) in existing LDAP objects are replaced with new values and/or added
when an entry is updated with a new certificate. If this option is not activated, existing users will not be touched at all, even not updated with a new certificate.
'Overwrite Existing Attributes' When 'Modify Existing Users' is set to true this value determines whether to change values of attributes when
they already exist.
'Add Nonexisting Attributes' When 'Modify Existing Users' is set to true this value determines whether to add attributes when
they do not already exist.
'Add multiple certificates per user' defines if we should use multiple certificate entries for each user or only one.
Default only one certificate is added to a user entry in LDAP and if the user gets a new certificate the old one is deleted and replaced with the new one.
If this checkbox is checked certificates are instead appended in LDAP so each user can have multiple certificate entries in LDAP.
Make sure your applications can handle this before enabling this option. Revoking a user will remove all certificates entries for the user.
'Remove certificates when revoked' if checked causes the publisher to remove a certificate from LDAP when the certificate is revoked or suspended.
'Remove ldap user when certificate revoked' if checked causes the publisher to remove the whole LDAP user entry when a certificate is revoked or suspended.
'Set userPassword attribute' specifies if the LDAP publisher should set the userPassword attribute in the LDAP object. If a user entry with a non-null password is published,
and this checkbox is checked, the userPassword attribute will be populated with the user's password.
'User Object Class' is the objectclass for the LDAP entries for users,
where user certificates are published. The entry is hierarchical separated by ';' to
build a structure like:
objectclass: top
objectclass: person
objectclass: organizationalPerson
objectclass: inetOrgPerson
This objectclass must allow the attribute 'userCertificate;binary'.
Default 'top;person;organizationalPerson;inetOrgPerson'
'CA Object Class' is the objectclass for the LDAP entries for CAs, where
CA certificates and CRLs are published. The entry is hierarchical separated by
';' to build a structure. This objectclass must allow the attributes
'cACertificate;binary', 'certificateRevocationList;binary' and
'authorityRevocationList;binary'.
Default 'top;applicationProcess;certificationAuthority'
'User Certificate Attribute' is the attribute name, in the
userObjectClass, for the users certificate.
Default 'userCertificate;binary'.
'CA Certificate Attribute' is the attribute name, in the cAObjectClass,
for the CAs certificate.
Default 'cACertificate;binary'.
'CRL Attribute' is the attribute name, in the cAObjectClass, for CRLs
(user CRLs) publisher by the CA.
Default 'certificateRevocationList;binary'.
'ARL Attribute' is the attribute name, in the cAObjectClass, for ARLs (CA
CRLs) publisher by the CA.
Default 'authorityRevocationList;binary'
(note that pure ARLs are not implemented yet in EJBCA).
'LDAP location fields from cert DN'
When configuring the LDAP publisher the BaseDN will be used as the base for
the DN published in LDAP,
and it will be appended to the LDAP location fields selected to be used.
example: If the user DN in EJBCA is "cn=tomas gustavsson, uid=tomasg,
O=PrimeKey Solutions AB, C=SE"
and the BaseDN is "dc=PrimeKey,dc=SE" and the selected LDAP location fields
are "CN".
The LDAP DN used for publishing will be "cn=tomas gustavsson, dc=PrimeKey,
dc=SE", and the "uid=tomasg"
will be added as an attribute in LDAP. The certificate stored under
"cn=tomas gustavsson, dc=PrimeKey, dc=SE"
will have the subjectDN "cn=tomas gustavsson, uid=tomasg, O=PrimeKey
Solutions AB, C=SE".
*** Setting up certificate profiles ***
You MUST make a custom certificate profile to publish to LDAP!
To publish in LDAP you must create a Certificate profile in EJBCA that
publishes to LDAP. If the above is configured, there will be a section for
'Publishers' available when creating/editing a certificate profile (with 'Edit Certificate
Profiles').
Choose this, and then when adding end-entities, make sure they use the new
certificate profile and voila, the certs will be published.
*** Different LDAP publishers ***
LDAP Publisher
The regular LDAP Publisher works by searching the DN in LDAP.
When ejbca creates an object to publish a certificate to LDAP it firsts builds the DN from the
baseDN and 'LDAP location fields for cert DN'. It checks if the entry exists in the
ldap and either creates or modifies the entry.
Example: The certificate DN is "CN=Tomas Gustavsson,O=Foo,C=SE",
the BaseDN in the publisher is "DC=primekey,DC=se" and the CN is selected in "LDAP location fields from cert DN".
The resulting DN that EJBCA will search for in the LDAP and create if it does not already exist is
"CN=Tomas Gustavsson,DC=primekey,DC=se".
Using this publisher, if you have multiple trees in your LDAP (for example "ou=foo,dc=primekey,dc=se" and "ou=bar,dc=primekey,dc=se")
you can either:
Include both CN and OU in 'LDAP location fields from cert DN' and have your cert DNs like "CN=Tomas,OU=foo,O=MyOrg,C=SE.
Use different publishers for ou=foo and ou=bar and issue certificates for the different OUs with different certificate profiles.
LDAP Search Publisher
The LDAP Search Publisher works by searching the LDAP for existing entries using a user defined search filter.
If no entries exist in the LDAP when searching for an entry, one is created just like in the regular LDAP Publisher.
The search filter is defined in the two fields under "LDAP search settings":
Suffix base DN of LDAP Search - the base for your search filter.
LDAP filter of the search - your LDAP filter.
If you build your search filter on DN components, you also have to select thos components as 'LDAP location fields'.
The best example of such a search filter is if base is "dc=primekey,dc=se" and filter is "uid=$USERNAME".
The search done by ejbca will be equal to the search:
ldapsearch -x -b "dc=primekey,dc=se" "(uid=$USERNAME)"
$USERNAME is replaced by the EJBCA username of the user that has had a new certificate just generated.
Other variables apart from $USERNAME is $EMAIL, $UID, $CN, $O, $OU and $C where these values are taken from the certificate DN.
When a certificate is generated for say user "ldap" EJBCA will perform the search:
ldapsearch -x -b "dc=primekey,dc=se" "(uid=ldap)"
The certificate generated for ldap will be published in the object returned by the search.
This is very useful if you want to publish certificates to an LDAP directory where your users already exists, such as an email directory.
The DN in the LDAP does not have to match the DN in the certificates at all.
If more than one entry matches the search, the first returned search result will be used.
*** Publishing to Active Directory ***
When configuring Active Directory LDAP, Bind DN for the users are usually,
cn=user,cn=Users,dc=domain-component1,dc=domain-component2.
For example: cn=User Usersson,cn=Users,dc=primekey,dc=com for the domain
primekey.com
If your DN is like "cn=Ejbca1,0=MyOrg,c=SE"
and your base DN is like "DC=Security,DC=Software,DC=MyOrg".
The publisher for AD should have base DN like
"cn=Users,dc=Security,dc=Software,dc=MyOrg"
For Login DN you should use the full ldap name, for example:
"CN=Administrator,CN=Users,dc=primekey,dc=se"
In order to connect to AD though SSL you should issue a LDAP SSL P12
to the domain controller. According to
MS Article ID 321051
The same certificate is used for both the AD and global catalogue (GC).
Remember to add the CA certificate to the machine that stores trusted root
certificates.
To publish a CRL to Active Directory use a Base DN similar to
*** Constructing the DN for an entity to be published ***
The DN to be published is constructed from the certificate DN of the entity to be published.
But if the publisher requires a DN object that is not a part of the certificate DN then the DN defined for entity might be used instead.
The DN of the entity (user or CA) could have more objects than the certificate if "Use a Subset of Subject DN" is defined in the used certificate profile.
The "LDAP Publisher" and the "LDAP Search Publisher" tries the DN of the entity when the certificate DN is missing an object needed in the publishing DN
*** What EJBCA stores/creates/modifies ***
Apart from the DN in the entry a number of attributes are also stored, some
are required by schema, some are optional. EJBCA find attributes in the certificate, if it is an
OU (organizational unit) in the certificate EJBCA uses that to populate the OU attribute in the LDAP
entry.
When updating an entry that already exists EJBCA uses replace on the
existing attributes, so if an email attributes already exists and EJBCA finds an email address in
the certificate, the email attribute in ldap is replaced with the email address from the certificate.
Note that attributes are only replaced/updated if the flag "Modify Existing Users" in the Publisher is active.
The certificate attribute is always updated though.
Attributes that are part of the DN, i.e. that reflects the location of the entry in LDAP is not modified, since this
is usually not allowed.
The attributes that EJBCA creates or replaces are:
cn (common name)
l (locality)
ou (organizational unit)
sn (surname)
gn (givenname)
st (state)
o (organization)
uid (user id)
initials
title
serialnumber - If we have selected to use the SN (serialNUmber DN field) in 'Ldap Location fields', we will also add it as an attribute.
Configure OpenLDAP
The objectclass 'inetOrgPerson' is used by default to store certificates.
Example:
dn: cn=Mike Jackson,ou=people,dc=company,dc=com
objectclass: top
objectclass: person
objectclass: organizationalPerson
objectclass: inetOrgPerson
cn: Mike Jackson
sn: Jackson
userCertificate;binary::
To configure OpenLDAP (version 2.2.5) to include the 'inetOrgPerson' you
must add the following lines to slapd.conf. This is already the default in recent releases:
include         /etc/ldap/schema/cosine.schema
include         /etc/ldap/schema/inetorgperson.schema
Don't forget to add the top object by creating an LDIF file (org.ldif):
Create a user in ejbca (this example is for adding a user with the cli
interface, adding a user with the admin-GUI works just as fine).
In the mail ejbca directory type (use simply 'ra' on windows):
bin/ejbca.sh ra addendentity ldap foo123 "C=SE,O=Foo,CN=ldap" null ManagementCA null 1 PEM SERVER
bin/ejbca.sh ra setclearpwd ldap foo123
Where foo123 is the ldap users password, C=SE... is the users DN and
ManagementCA is the name you chose for your CA. The user type is end-user (1), keystore type is PEM, and
if using the admin-GUI check 'use batch').
Batch generate the PEM keystore:
bin/ejbca.sh batch
Copy the resulting files p12/pem/ldap.pem, p12/pem/ldap-CA.pem and
p12/pem/ldap-Key.pem to your LDAP server. In this example the slapd.conf is located in
/etc/ldap so we copy the files to that directory.
Protect theses files so they are only readable by the LDAP server.
Add the following to your slapd.conf:
and check that it is running with 'ps -ef|grep slapd'.
On SuSE, if using the builtin OpenLDAP you have to enable ldaps in
/etc/sysconfig/openldap:
OPENLDAP_START_LDAPS="yes"
and then run
SuSEconfig
and then
rcldap start
Configure your LDAP publisher in EJBCA to use SSL by checking the checkbox
'Use SSL', the port should change to port 636.
Note! The CA certificate of the (root)CA used to sign the ldap server
certificate must be present in the java trust cert store
($JAVA_HOME/jre/lib/security/cacerts).
Otherwise you will have to add it using something like:
First get the CA cert:
You have to re-start JBoss after adding anything to the java trust store.
A guide for configuring OpenLDAP on Solaris can be found at
bolthole.com
*** Sample Ubuntu installation ***
- sudo apt-get install slapd ldap-utils
- sudo dpkg-reconfigure slapd
  Configure slapd with your domain and admin password (primekey.com in this case).
- sudo /etc/init.d/slapd restart
- 'ps -ef|grep slap'
  should show a slapd running
- ldapsearch -x -b 'dc=primekey,dc=se' '(objectclass=*)'
  To look at the results
- slapcat -l backup.ldif
  Make backup
- slapadd -l backup.ldif
- /etc/init.d/slapd restart
  Restore backup
Command to add new LDAP nodes:
- ldapadd -x -D "cn=admin,dc=PrimeKey,dc=com" -W -f primekey.ldif
  where primekey.ldif is:

dn: dc=PrimeKey,dc=com
dc: PrimeKey
objectclass: dcObject
objectclass: organization
o: PrimeKey Solutions AB
description: Parent Object for PrimeKey LDAP Directory

dn: ou=Standard,dc=PrimeKey,dc=com
ou: Standard
objectClass: top
objectClass: organizationalUnit
description: Parent Object for all Standard Certificates

dn: ou=High,dc=PrimeKey,dc=com
ou: High
objectClass: top
objectClass: organizationalUnit
description: Parent Object for all High Certificates
OpenDJ
OpenDJ is a modern, standards compliant, java based, LDAP server that is easy to set up and use. It also comes with GUI tools to manage and query.
*** Installing OpenDJ ***
This install guide uses OpenDJ 2.5.0 as an example, but other versions should worksimilarly.
unzip OpenDJ-2.5.0-Xpress1.zip
cd OpenDJ-2.5.0-Xpress1
./setup
This launches graphical setup, you can run 'setup --cli' to install without GUI.
Use default Root User DN: cn=Directory Manager
Directory Base DN: dc=example,dc=com)
If you want to be able to run OpenDJ on the same server as JBoss/EJBCA, choose another port for management, i.e. 5555 instead of 4444.
You can end by starting Launch Control Panel, or you can start it later with bin/control-panel.
A EJBCA publisher for a default installation is then configured with:
Base DN: dc=example,dc=com
Administrator: cn=Directory Manager
The graphical LDAP browser is accessible from the Control Panel->Manage Entries.
You can start/stop OpenDJ from within the Control Panel or with bin/start-ds and stop-ds.
Management tasks such as creating new attributes and object types are easy to do in the Control Panel GUI.
OpenDJ listens to port 1389 by default, but it also occupies other ports stopping it from running on the same server as JBoss.
If you want to change the management port (default 4444) after installation you can edit confif/config.ldif and config/tools.properties.
*** Configure SSL/TLS ***
How to configure SSL/TLS with OpenDJ is well described in the OpenDJ documentation.
If you run setup using the command line (--cli) you will be prompted with TLS questions, having the possibility to set up TLS directly.
Custom schemas
See doc/ldapschema for files with custom schemas and attribute types to add to your LDAP schema.
*** Certificate serial number ***
This is an attribute and a schema extension to allow storage of certificate serial number in the inetOrgPerson LDAP object, for end user entries.
This is done by adding an extension to inetOrgPerson called inetOrgPersonWithCertSerno with a new optional attribute called certificateSerialNumber.
Once you have installed the new schema in the LDAP server you use it by configuring the LDAP publisher with:
User Object Class: top;person;organizationalPerson;inetOrgPerson;inetOrgPersonWithCertSerno
instead of the befault value:
User Object Class: top;person;organizationalPerson;inetOrgPerson
The certificateSerialNumber attribute will then automatically be added/modified when publishing to LDAP.
*** Extra device schema ***
To store certificates for devices (e.g. routers, toasters etc) in LDAP it
is no really suitable standard object class. inetOrgPerson requires surnames
etc, and the device objectclass does not include a certificate attribute.
Mike Jackson has kindly contributed additional objects that extend the
standard device class with a certificate attribute.
The ejbcaDevice uses object ids from PrimeKey Solutions AB.
*** Installation ***
For the Netscape/SUN servers, on UNIX, copy the 85ejbca.ldif file into:
For OpenLDAP, copy the ejbca.schema file into, e.g.:
/etc/ldap/schema/
and edit slapd.conf to add the following line:
include /etc/ldap/schema/ejbca.schema
then restart the server.
Custom publishers
*** Developing a custom publisher ***
If your setup makes it very complex to configure multiple certificate
profiles and multiple publishers you might consider writing a custom publisher that
handles things directly according to your needs.
Look in the directory modules/ejbca-common/src/org/ejbca/core/model/ca/publishers for more
information about writing your own solution. There is an empty custom publisher called
DummyCustomPublisher.java that can be extended. Custom publishers are deployed
in the same way as custom services, i.e.
in a Jar with a special meta-data file. For example:
# Example file. Should be named META-INF/services/org.ejbca.core.model.ca.publisher.ICustomPublisher
com.example.ejbca.MyCustomPublisher
com.example.ejbca.AnotherCustomPublisher
Additionally you can have your publisher implement org.ejbca.core.model.ca.publisher.CustomPublisherUiSupport
to make the configuration more user-friendly in the AdminGUI.
*** Publishing with an external application ***
A lightweight alternative to developing a new custom publisher for exporting CRLs,
certificates and revokations is to use the General Purpose Custom Publisher (GPCP).
This makes it possible to export DER-encoded CRLs, certificates and/or revokations with
a simple script (using scp or similar). The GPCP creates a temporary file and
executes the script with the full pathname to the temporary file as an argument.
It's possible to let the publisher ignore an error in the execution of a script by
altering the publishers properties. By default, the publisher detects both output to
standard error and a non-zero errorlevel set by the script.
To start using the GPCP, select "Edit Publishers" in the Administration GUI. Add a
publisher "GPCP" and then "Edit" the same. Choose
Publisher type: General Purpose Custom Publisher
Properties:
Full pathname of X publishing script: For example "/fullpathname/exportscript.sh"
Fail X publishing on script error code: Will treat the publishing as unsuccessful if the script returns with a non-zero error code.
Fail X publishing on output to stderr: Will treat the publishing as unsuccessful if the script writes anything to standard error.
Calculate Delta CRL locally: Described below.
and click "Save and Test Connection" to save the entered information and validate
that the specified applications exist. Select "Certificate Authorities" in
the Administration GUI and select "GPCP" as your new CRL publisher. Click "Save".
Test CRL publishing by selecting "Basic Functions" in the Administration GUI and
click "Create CRL".
Test certificate publishing by selecting "Certificate Authorities" in the
Administration GUI, select a CA, click "Edit" and then "Republish CA Certificates".
More advanced scripts or applications have the ability to use the additional argument
Depending on application, the GeneralPurposeCustomPublisher can calculate whether a CRL is a delta CRL.
Set the parameter crl.calclulateDeltaCrlLocally to true in order to do this, or false if you wish to check this in an external script (or not at all).
The result of this check, if run, will be last in the argument list to the script.
An example linux script for certificate publishing could look like:
*** Publisher for sampling of issued certificates ***
One custom publisher called CertificateSamplerCustomerPublisher can be used to
store published certificates to a configured directory. Different sampling methods
can be specified per certificate profile, either storing every certificate, no
certificate or randomly with a configured probability.
To use the CertificateSamplerCustomerPublisher, select "Edit Publishers" in the Administration GUI, create a new publisher and edit it.
Publisher type: Custom Publisher
Class Path: org.ejbca.core.model.ca.publisher.CertificateSamplerCustomPublisher
and click "Save and Test Connection" to save the entered information and validate
that the entered configuration is correct. Select the publisher in the relevant
certificate profiles.
In the example above the certificate profile with id 2234644354 will not have any certificates stored. The profile with id 1645141026 will have about 25% of the certificates stored and for all other profiles all certificates will be sampled.
*** Customer specific publisher for a PKD-like catalog ***
The CustomerLdapPublisher1 publishes end entity (Document Signer) certificates
and (CSCA) CRLs according to a customer specific schema based on the schema
defined by ICAO for uploading to the PKD but with some customer-specific
extensions added.
Extra attributes are added including checksums of the uploaded objects as well
as a feature for putting some log entries in the catalog.
To use the CustomerLdapPublisher1 select "Edit Publishers" in the Administration GUI, create a new publisher and edit it.
Publisher type: Custom Publisher
Class Path: - Specify class path manually -
org.ejbca.core.model.ca.publisher.custpubl1.CustomerLdapPublisher1
Click "Save and Test Connection" to save the entered information and validate
that the entered configuration is correct. Select the publisher in the
DS certificate profiles and the CSCA.
In the example above logconnectiontests equals true which means that a click on
the "Save and test connection" button will cause an log entry to be added to the
catalog. Notice that in this case if health check checks the publishers an log
entry will also be inserted for every health check run.
*** Cert Safe publisher for a HTTPS server (Enterprise only) ***
The CertSafePublisher publishes certificate issuance and life cycle events
(revoke and unrevoke) to a HTTPS server. The HTTPS request body is a JSON
object with the fields: "status", "revocationReason" and "pem".
An Authentication Key Binding token should be created to specify the parameters used to establish connection
with the HTTPS server. For instructions on how to create an Authentication Key Binding, see
Managing Internal Key Bindings
Click "Save and Test Connection" to save the entered information and validate
that the entered configuration is correct. Select the publisher in the
certificate profiles.
If an error occures in the server, EJBCA can expect an error message sent inside a JSON object with the
keyword "error". The error message will be visible in the log file.
Example of the error JSON object:
{
	"error": "An error message from the server.",
}
In order to avoid that certificates go missing in the CertSafe server if publishing fails (network down etc), it's recommended to configure a Publish Queue process service, as described below.
You can find more information and full specifications in ECA-3437.
Publisher Queue and failures
To achieve robust publishing there is a publisher queue. When a publisher fails the published data is stored in a
separate table in the database, the PublisherQueueData. This queue can then be processed by a service (see Publisher Queue Process Service in the Services section).
Publishers can also be configured not to publish directly at all, but to store everything in the queue, which is later processed.
The benefit of this approach is that publishing is instant. When issuing certificates the CA does not have to wait for all publishers to
finish. If there are many publishers this might delay the issuing process slightly.
Publisher Settings:
'Current length' - displays the number of new entries in the queue in the intervals <1 min, 1-10 min, 10-60 min and >60 min.
'No direct publishing, only use queue' - when enabled, the publisher does not try to publish directly but instead pushes the
update to the queue for later processing by a Publish Queue Process Service.
'Keep successfully published items in database' - when enabled items stored in the publisher queue will not be removed when real
publishing has been done, status will merely be changed from PENDING to SUCCESS.
'Use queue for CRLs' - determines if the publisher queue should handle CRLs or not for this publisher.
'Use queue for certificates' - determines if the publisher queue should handle certificates or not for this publisher.
Internationalization
To customize EJBCA admin GUI for your languages special characters you will probably have to
change the default page encoding in 'web.contentencoding' (in conf/web.properties file)
to for example ISO-8859-1 instead of the default UTF-8.
Displaying, receiving, decoding and storing different char sets is rather complicated and the
architecture is multilayered. There are the web browser, application server, database and
operating system, all working together.
If you change to UFT-8 to handle your char set, you must probably also specify that the database
connection should use UTF-8.
For MySQL this can be done in the connection-url in your datasource description
(APPSRV_HOME/server/default/deploy/ejbca-ds.xml):
jdbc:mysql://yourhost/ejbca?characterEncoding=UTF-8
You will also want to configure the database, for example in my.cnf, to use UTF-8.
You also want to configure your machine to use the locale you are using, otherwise some encoding/decoding to the database
may get mixed up and throw a lot of errors (java XML decoding).
For example in SUSE this is done with 'yast' and in Debian it is done with 'dpkg-reconfigure locales'.
For some languages (for example Chinese) the java scripts in the admin GUI will fail to recognize
the characters when doing checks for allowed characters in DN etc.
The easiest way to resolve this is to go into the file:
src/adminweb/ejbcajslib.js
And change all methods 'checkfield*()' to always return true directly.
If you can't get you national characters to work with the Admin GUI, you can try using the CLI instead
(bin/ejbca.sh ra addendentity ...). That usually works.
To make everything work perfect you MAY have to also configure the encoding of URIs according to your settings in
the application server. This is done automatically for JBoss using the 'web.contentencoding' in conf/web.properties.
Adding a new language to the admin GUI
Java uses unicode internally, so the things that needs to be taken care of are:
Make sure your system locale is set correctly, so Java will recognize input of your nations language.
If Java does not automatically recognize your locale you might need to specify it as options to Java during
startup (i.e. in JBoss and cmd line commands such as ejbca.sh).
java -Duser.language=2-char-language-code -Duser.region=2-char-country-code
example for Swedish: java -Duser.language=sv -Duser.region=SE
Your database must also recognize the locale so it does not strip down to plain ascii.
This is database and JDBC-driver dependent.
The Admin GUI is meant to support multiple languages through language files
in modules/admin-gui/resources/languages. In order to add a language you should do the following:
Rename the language file you have created to
languagefile.languagecode.properties, where languagecode is the 2-letter language code (ISO 639-1),
e.g. 'zh' for Chinese, and place it in the 'modules/admin-gui/resources/languages' directory.
Edit conf/web.properties (create with conf/web.properties.sample as template if you don't have one).
Change 'web.availablelanguages' and add your language code to the value. i.e.:
web.availablelanguages=en,bs,de,es,fr,it,ja,pt,sv,uk,zh,vi
You may have to change the default page encoding in 'web.contentencoding' to for example ISO-8859-1
instead of the default UTF-8.
Clean and re-deploy ejbca with 'ant clean' followed by 'ant deploy'.
Restart JBoss and your browser after this.
Now it should be possible to select 'zh' in the system configuration as default language
and in the administrator preferences page.
The language will be changed when the administrator go to a web page.
Internal Internationalization
It's also possible to translate internal log comments, some exception messages and approval notifications.
This is done separately in it's own resource files since this is done internally in the core application
and not in the web-layer.
The language used internally is configured in the conf/cesecore.properties file by setting the properties
intresources.preferredlanguage and intresources.secondarylanguage to the language you want to use.
The letters should be the same as the xx name in the intresources.xx.properties files in the src/intresources
directory. The secondary resource file is used if the resource isn't found in the preferred language.
This is a global setting that cannot be overridden by administrators own settings in the web-layer.
Custom DN and altName oids
EJBCA supports custom (your own) OIDs in DN components.
In order to add such a DN you can simply call the DN for example: CN=MyCommonName,1.1.1.1=MyCustomOid,C=SE
Where 1.1.1.1 is your custom OID.
Custom OIDs are always encoded as UTF8String in the DN.
To get support for custom OIDs in the Admin GUI you must edit the file src/java/profilemappings.properties and add your new
OID in the end. Just follow the example in the file, and you will get the possibility to add you oid in the End Entity Profile,
and following that also when adding new users.
If you edit profilemappings.properties, you should also add an entry in src/adminweb/languages/languagefile.XX.properties (where XX is you language).
Otherwise your new field will be displayed as the key that you entered (which is probably ok also) in the admin-GUI. The new field you must add in the language file is
the last field in profilemappings.properties, i.e. the LanguageConstant.
EJBCA will by default put unknown OIDs in the end so the DN will probably be displayed as: CN=MyCommonName,C=SE,1.1.1.1=MyCustomOid
(if looking at the asn1 coding, different application display in a different order regardless of the asn1 coding).
If you need a particular order of DN components, you can add a file 'dncomponents.properties' in the directory ejbca/src/java.
There is a file called dncomponents.properties.sample in the distribution as a starting point (it shows the default ordering in EJBCA).
You custom oid must be placed in the right place in that file, and all components from the sample file should be included, or you will get
strange behaviour.
Using the dncomponents.properties file is only needed if you need to control the ASN.1 ordering of DN elements.
After updating dncomponents.properties you need to run 'ant clean' before re-deploying EJBCA.
A word of caution:
If you use custom OIDs, they better not become standard ones later on, because if the underlying ASN.1 library in EJBCA starts to
know the OIDs as standard ones, things will be renamed in the database and you will have to do a database migration.
Also you must keep track of dncomponents.properties when upgrading EJBCA.
Stick to the standard is my advice!
Having all these customizations off-course requires some maintenance on your part, so don't forget your customizations when upgrading EJBCA to a new version.
Check RELEASE_NOTES for important changes!
altNames
Adding custom OIDs in altNames works the same way as for DN.
When a custom OID is used the altName string in the database will be for example "rfc822Name=foo@bar.com, 1.1.1.1=foobar".
A Custom OID is always added as OtherName using a simple UTF8String. See RFC3280 for definition of the OtherName altName.
The OtherName consists of:
The custom oid
An UTF8String with the value
Custom Certificate Extensions
Customized extensions can be added and removed in the 'Custom Certificate Extensions' tab in the 'System Configuration' page in the Admin web.
A simple extension only containing a static value can be added using the already implemented class "BasicCertificateExtension", but more advanced
custom extensions can be made available by implementing the CustomCertificateExtension interface and making the implementation available on the classpath
using Java's ServiceLoader (see the BasicCertificateExtension for how to do so). By implementing the marker interface and setting property fields and default values,
EJBCA can autogenerate a properties table for the extension.
Configuring Custom Certificate Extensions
Certificate extensions are configured in the 'Custom Certificate Extensions' tab in the 'System Configuration' page in the Admin web. Only
administrators who are granted the access rule '/system_functionality/edit_available_custom_certificate_extensions' are allowed to add and remove
custom certificate extensions.
The following properties are available for each extension:
OID : The unique Object Identifier (OID) of the extension (Required)
Display Name : Display name of the extension in the 'Edit Certificate Profile' page. (Required)
Class Path : Full class name of the CertificateExtension implementation class. (Required)
Critical : Defines if the extension should be marked as critical in the certificate.
Properties : Properties are inherent to each extension implementation.
When adding a new Custom Certificate Extension, the OID and the Display Name are specified and a new Extension with the following default values is created:
Class Path : org.cesecore.certificates.certificate.certextensions.BasicCertificateExtension
Critical : False
Properties : Empty list of properties
Click on the newly created extension to edit these values
After extensions have been added, it is possible to select them for a certificate profile
in the 'Edit Certificate Profile' page.
Removing a Custom Certificate Extension
When removing a custom certificate extension from the list of available extensions in the 'Custom Certificate Extensions' tab
in the 'System Configuration' page, if that extension is actually in use in a certificate profile, it is not automatically removed form
that certificate profile. However, the removed extension will not be usable or be a part of any certificate issued after the removal
and will be displayed as 'OID (No longer used. Please unselect this option)' in the 'Edit Certificate Profile' page. To remove the extension
from the certificate profile, it has to be manually unselected from the list of 'Used Custom Certificate Extensions' in the
'Edit Certificate Profile' page.
Also when removing an extension that is in use, a warning message will be displayed listing the certificate profiles that are still using
this extension.
Basic Certificate Extension
In order to create a Basic Certificate Extension, you set the 'Class Path' to 'org.cesecore.certificates.certificate.certextensions.BasicCertificateExtension'
(default setting) and specify the properties 'encoding' and 'value' ('value' is optional if there is a property 'dynamic=true').
See the following table for the available encodings and how their value is interpreted:
DERBITSTRING : A String containing the characters '0' and '1'.
DERINTEGER : A String containing digits only in decimal digits.
DEROCTETSTRING : A String containing hex data representation.
DEROBJECT : The hex encoded DER value of the extensions. You can use this to create any extension with sequences etc.
RAW : The hex encoded byte array value of the extensions. You can supply any data hex encoded to be used as the extension value bytes.
Examples of certificate extensions that you can configure with the BasicCertificateExtension are given in 'src/java/certextensions.properties'.
MS application policies
NetscapeCertType
NetscapeComment
NetscapeCARevocationURL
NetscapeRevocationURL
...
If the the property 'dynamic' is configured to 'true', the extension value may be taken from extension data supplied with the end entity.
See Custom certificate extension data for how this can be added from admin web.
Implementing an Advanced Certificate Extension
To create an advanced extension, it is required to create a Java class extending
the CertificateExtension abstract class. The method 'getValue' is required and
the current user data, CA and certificate profile are sent to the extension in order
to generate dynamic extensions.
If your advanced extension needs to return a byte array that is not necessarly
an ASN.1 structure, it is possible to override the 'getValueEncoded' method as this
is the method EJBCA will call when adding the extension to the certificate. See
BasicCertificateExtension.java for an example of this special case.
In addition to static values defined in the 'Custom Certificate Extensions' tab in the 'System Configuration' page in the Admin web,
it is also possible to get values from the extension data in the end entity's
extended information store. A good choice is to use the extension oid as a
prefix to the key of the property to associate the value with this extension.
Here is an example of a simple advanced extension. To add this extension to EJBCA
create a new Extension in the 'Custom Certificate Extensions' tab in the 'System Configuration' page and make sure the full class
name is set in the 'Class Path' property, also make sure the class is accessible on
the classpath.
public class SomeAdvancedCertificateExtension extends CertificateExtension {

    private static String PROPERTY_SOMEPROPERTY = "someproperty";

    /**
     * The main method that should return a byte[] with the ASN.1 encoded data to be put in the extension valud
     * using the input data (optional) or defined properties (optional)
     *
     * @see org.cesecore.certificates.certificate.certextensions.CertificateExtension#getValueEncoded
     */
    @Override
    public byte[] getValueEncoded(EndEntityInformation userData, CA ca, CertificateProfile certProfile, PublicKey userPublicKey,
        PublicKey caPublicKey, CertificateValidity val )
        throws CertificateExtentionConfigurationException, CertificateExtensionException {
        try {
            // Optionally get dynamic values for this extension
            //String dynamicValue = userData.getExtendedinformation().getExtensionData(getOID() + ".someotherproperty");
            String value = getProperties().getProperty("FOO");
            DERPrintableString asn1value = new DERPrintableString(value);
            return asn1value.toASN1Primitive().getEncoded();
        } catch (IOException e) {
            throw new CertificateExtensionException("Error constructing certificate extension SomeAdvancedCertificateExtension.", e);
        }
    }

    /**
     * @deprecated use getValueEncoded instead.
     */
    public ASN1Encodable getValue(EndEntityInformation userData, CA ca, CertificateProfile certProfile, PublicKey userPublicKey, PublicKey caPublicKey, CertificateValidity val)
    throws CertificateExtensionException, CertificateExtentionConfigurationException {
        throw new UnsupportedOperationException("Use getValueEncoded instead");
    }
}
Extended Key Usages
Extended Key Usages can be added and removed in the 'Extended Key Usages' tab in the 'System Configuration' page in the Admin web. Only administrators who are
granted the access rule '/system_functionality/edit_available_extended_key_usages' are allowed to add and remove extended key usages.
Every extended key usage consists of an Object Identifier (OID) and a label to be displayed in the 'Edit Certificate Profile' page. After an
extended key usage has been added, it is possible to select it for a certificate profile in the 'Edit Certificate Profile' page.
There are no restrictions on how many extended key usages can be added other than database-related limitations.
Removing an Extended Key Usage
When removing an extended key usage from the list of available usages in the 'Extended Key Usages' tab
in the 'System Configuration' page, if that usage is actually in use in a certificate profile, it is not automatically removed from
that certificate profile and has to be removed manually by unselecting it from the list of 'Extended Key Usage' in the
'Edit Certificate Profile' page. If not unselected in the certificate profile, the removed extension will still be a part of any
certificate issued after the removal but will only be displayed as an OID in the 'Edit Certificate Profile' page.
Also when removing an extended key usage that is in use, a warning message will be displayed listing the certificate profiles that are still using
it.
Logging
Security Audit log vs System log
A PKI system have three different type of log:
Security Audit Log - Use for PKI auditors to audit important security PKI events that the system performed.
System Log - Used to monitor daily operations in the system, debug and track down errors etc.
Transaction Log - Used for accounting of specific functions, mainly validation (OCSP).
The Security Audit Log is specified in detail what it does log, and it does not log other things.
The Security Audit log logs important events such as "Certificate issued", "Certificate Profile edited", "Administrator accessed resource".
One of the most important aspects to consider is that the Security Audit log does not log things that do not happen.
Things that do not happen are for example invalid requests that the system rejects, becuase the PKI system did not perform any important
auditable event.
The System Log logs all events that are interesting to monitor, such as rejecting invalid requests, reading profiles etc.
The main purpose of the Security Audit Log is to provide information to an auditor, and the auditor wants to know what the system has done, what certificates were issued etc,
but is not so interested in what the system did not do.
The Security Audit Log is stored in the database and the System Log is stored in log files. By default the System Log also contains the Security Audit Log, but this can be configured.
The are two different logging devices available for official security audit events (creation of certificate etc).
What log devices to use, can be configured in conf/cesecore.properties.
These devices should not be confused with the info/debug output that is sent to Log4J directly.
You can find more information on how to configure Log4J in doc/howto/log4j.txt.
It is recommended to only allow new log-posts to the database-tables. More information on this can be found in doc/howto/HOWTO-database.txt.
*** Services, Modules, Events and Status ***
The security audit events are divided into Services, Modules, Events according to from where it originates.
The full list of the different Service, Module and Event types and a short explanation for each type can be found in
JavaDoc format of the API.
Since EJBCA is build around the CESeCore project, to see all possible event types that EJBCA can generate both
EventTypes and
EjbcaEventTypes in the API doc needs to be considered.
An example of how such an event would look like in the server log using the Log4jDevice is the event that the application is starting:
... INFO [Log4jDevice] 2015-03-20 12:47:51+01:00;EJBCA_STARTING;SUCCESS;SERVICE;EJBCA;StartServicesServlet.init;;hostname;;msg=Init, EJBCA 6.3.1Alpha (working copy) startup.
and the same kind of event using IntegrityProtectedDevice that writes the log entry to the database:
Service is EJBCA (not shown in the Admin GUI) : the event originates from the part of the application that not part of the core shared with other projects.
Module is SERVICE: this event was generated from a module in EJBCA that is responsible for background services.
Event is EJBCA_STARTING: the application EJBCA is starting up.
Status (named "Outcome" in the Admin GUI) is SUCCESS: in the context of the event, this should be interpreted as no error were detected during the EJBCA startup.
Additionally there is an event specific message with additional information telling us (in this case) the version of EJBCA that was started.
Also note that the time in the log entry itself is the time of the event and might differ from the time when this was written to the server log.
See the Security documentation for information about the security features and possibilities to repair gaps.
*** Log4JLogDevice ***
Appends the information from the offical event to the console or file. This is
the same target where all the other info/debug output is sent to. There are no
protection from alteration and events sent to this device cannot be fetched
back to EJBCA for display in the Admin GUI.
The integrity protected log device stores audit record in the AuditRecordData table in the database.
The record can be protected using either HMAC or digital signatures. See conf/cesecore.properties for configuration options.
See Database integrity protection for more information.
*** OldLogDevice ***
The old log device, as it was called in EJBCA 4.0 is no longer available.
From EJBCA 5.0 the LogEntryData table is no longer used for audit log. The existing log entries can be exported
using by using a small export CLI. Configure conf/database.properties with (if not done already)
database.url=...
database.username=...
database.password=...
then build with
$ ant oldlogexport-cli
This will create the CLI in "dist/oldlogexport-cli/". Referr the README file in this directory
for further instructions on how to run it.
OldLogDevice stores log-events in the database. Viewed events can
be exported from the Admin GUI.
System Log
The system log is logged using Log4J, and has several different levels of log. You can configure which log level is actually logged.
ERROR - Errors that should cause the IT staff to look into the system. It could be fatal so the system stopped working.
WARNING - Warnings about misconfiguration. The system is still working, but functionality could be degraded.
INFO - Informational messages that are interesting for monitoring purposes and statistic purposes.
DEBUG - Debug information useful to see details of what is happening in the system.
TRACE - Trace information that can be useful to track down bugs or small missconfigurations. Very rich output showing detailed trace of what happpens in the system code.
Configuration of the System log depends on what application server you are using. See the installation section for information about your application server.
The recommended place to configure logging is in the application server, i.e. JBoss. You can configure logging very advanced.
In JBoss you can easily enable and disable DEBUG logging, and switch back to INFO logging at runtime. The first time you want to configure DEBUG log level you can run the following JBoss CLI commands:
In JBoss 7/EAP6/WildFly10, if you configure the logging section of standalone.xml.
For example, you can make a more advanced logger, logging EJBCA events to a separate ejbca.log log file that rotates by size every 32MB, and keep maximum 31 rotated log files
Sign logs with external tools as they are being rotated.
Exporting Audit Logs
All installations have their specific requirements how audit logs should be handled. There are several ways to Export Audit Logs.
Rotate system log files (including the audit log) and archive/process the rotated log files
Use a SYSLOG appended to send the System log (including the Audit log) to a central log server that performs monitoring functions
Export the database audit log using the Local Database CLI
Export the database audit log using database tools
Export a specific view from the View Log page in Admin GUI to an XML file
Export a specific view from the View Log page in Admin GUI to a signed CMS (Cryptographic Message Syntax)
Log Monitoring
When monitoring logs from EJBCA the common trigger to monitor for are ERROR events in the System Log.
Example where there is a error to initialize an (this is a specific example and not applicable to all HSMs) HSM during startup:
10:46:53,099 ERROR [org.cesecore.keys.token.p11.Pkcs11Wrapper] (default task-9) Wrong arguments were passed to sun.security.pkcs11.wrapper.PKCS11.CK_C_INITIALIZE_ARGS.getInstance threw an exception
An error event like this should trigger an operator to take a look at the system to gauge what is wrong.
Command Line Interfaces
There are four types of command line interfaces (CLI) in EJBCA.
The Local CLI that can only be run on the CA machine.
ClientToolBox with commands that can be run remotely, for example the Web Service CLI.
The Local Database CLI , which provides direct access to a local database.
The Validation/Conformance Check Tool
Client Toolbox
ClientToolBox is a set of tools that are built as a stand alone package, which can be put on any machine and run independently of EJBCA.
If contains among other things a very rich Web Service CLI.
Local Command line interface
The local CLI can be run directly on the CA machine, and contains many functions that can be used in scripts, or come to rescue when your admin certificate has expired or you have
accidentally revoked your admin privileges for the admin GUI.
EJBCA have command line interfaces (CLI) to both the CA and RA, and some other operations.
The best documentation for the cli can be found by running it.
bin/ejbca.sh
bin/ejbca.sh ca
bin/ejbca.sh ra
...
this will give a list of all available cli commands. To find out which options are available for a specific command, simply run
the command with no options:
bin/ejbca.sh ra addendentity
This will give documentation about available options.
To access the usage information for some commands, that does not take parameters, the option '-?' can normally be provided.
*** Return Codes ***
Since EJBCA 6.2.0 the local CLI uses return codes, to faciliate scripting. Currently, these are:
0 - Normal exit
1 - Functional failure, command was inputed correctly but failed for some other reason
2 - Authentication failure
3 - CLI failure, command failed due to incorrect parameter use.
*** Local CLI Authentication ***
By default, the CLI authenticates using a standard user defined in ejbca.properties. Disabling this user on the server will lead
to all CLI operations demanding authentication in the form of the following flags appended to the argument list:
-u <username> -p
which will cause the console to prompt for the password. If instead the password should be included in the command line (such as)
from a script, it can be specified using the following flags:
-u <username> --clipassword=<password>
You can also specify that the password is provided as the first line in a file, which can be useful for scripting. It can be specified prepending 'file:' to the password:
-u <username> --clipassword=file:<filename>
Where filename is a file, for example /tmp/pwd.txt, containing the password as a single line.
An example CLI command to list CAs can look like:
bin/ejbca.sh ca listcas -u ejbca --clipassword=file:/tmp/pwd.txt
Command line users are authenticated from the existing list of End Entities, and are granted the same rights.
You can find the default CLI user in the 'Super Administrator Role' under 'Administrator Roles' after a default install or upgrade.
Warning: Deleting this user or revoking all it's privileges makes it impossible to use the CLI for any operation that requires administrator rights including
renewing the Super Administrator certificate! Please, make sure to renew the administrator certificates using the Admin Web
before they expire!
*** Disabling the Command Line Interface ***
It is possible to completely disable the command line interface to prevent someone from running the operations that require authorization.
The setting is located in the admin web under System Functions > System Configuration and the checkbox
"Enable Command Line Interface Access". By unchecking it operations requiring authorization can not be performed from the command
line interface.
Using this option, in contrast to disabling the CLI users privileges in 'Administrator Roles', makes it possible to easily switch having the CLI enabled or disabled as
long as you have access to the Admin GUI.
Warning: Disabling this makes it impossible to use the CLI for any operation that requires administrator rights including
renewing the Super Administrator certificate! Please, make sure to renew the administrator certificates using the Admin Web
before they expire!
Note: After changing this property you may need to click the Clear All Caches button or run the CLI command:
bin/ejbca.sh clearcache -all
Local Database CLI (EJBCA Enterprise only)
You can build and run the local database CLI with the commands:
ant ejbca-db-cli
cd dist/ejbca-db-cli
./run.sh
The cli contains command that directly accesses a database, export, import, copy, verify audit log and OCSP monitoring.
Run the command to get a description about all available commands.
To verify database protection just make sure that you have conf/databaseprotection.properties configured. If you are using database protection for your CA, you can use the same file.
For verification, you can also use a verification token, without the private key, so you can do verification on another host from the CA. The file conf/databaseprotection.properties.sample
provide example configuration and documentation for the various options.
You can also use the DB tool to create databaseprotection in case you started off not enabling it, and want to enable it later.
Shut down EJBCA
Configure databaseprotection.properties and build ejbca-db-cli (so the propereties file is included in dist/ejbca-db-cli/conf)
The Validation/Conformance Tool is a tool for running tests on issued certificates or OCSP responses to see that they match the configured criteria.
Backup and Restore
EJBCA is an enterprise software designed to operate in a high avaialbility and high performance environment.
Backup of EJBCA is essential for most organizations, and EJBCA is designed to make backup easy.
Backing up of EJBCA consists of static and dynamic data. Static data does not change during normal operations, and only needs to be backed up when changed.
Dynamic data is the data that is changed during daily operations. All dynamic data is stored in the database.
Dynamic data that needs to be backed up regularly:
Database contents.
Static data that only needs to be backed up when changed:
EJBCA program files.
EJBCA configuration (ejbca/conf).
Admin and SSL keystores (ejbca/p12).
High Availability (HA), a.k.a Clustering
EJBCA is designed to work well in a clustered, high availability configuration. The key to EJBCA high availability is to have a HA database, since all EJBCA nodes shares the same database.
The process of setting up EJBCA in a HA setup is:
Install a HA database. The process for this differs between databases, consult your database documentation/vendor.
Install EJBCA on one EJBCA application node and perform all needed configuration.
Deploy EJBCA with the exact same configuration on other application nodes.
If you are using HSMs, connect one HSM with the same (duplicated) keys on all EJBCA application nodes. Alternatively set up a HA HSM configuration according to your vendors instructions.
When setup you can connect to any of the EJBCA application nodes, and use load balancers to failover and/or spread the load between the different EJBCA application nodes.
A note of caution. Setting up and managing a fully HA database can be very difficult and/or expensive. You may consider different variants of HA databases, such as replication with manual or automatic failover.
The possibilities are virtually unlimited, only your requirements and imagination can decide what type of configuration works best for you.
The upgrade EJBCA without downtime, you can make use of a few properties to enforce backwards compatibility during node upgrades. See doc/UPGRADE for all version you upgrade between for details.
Monitoring and healthcheck
In EJBCA there exists a health check service that can be used for health monitoring.
It is also useful for cluster, as it can be checked by load balancers to determine if a node should be active in the cluster (healthy)
or taken out of the cluster (unhealthy).
The servlet is located in the URL: http://localhost:8080/ejbca/publicweb/healthcheck/ejbcahealth
and is configured using conf/ejbca.properties.
The following configuration parameters may be set to configure authorization and what the service checks:
healthcheck.amountfreemem, default: '1' - The number of Mb of memory that must be free.
healthcheck.dbquery, default: 'select 1' - Parameter indicating the string that should be used to do a minimal check that the database is working.
healthcheck.authorizedips, default: '127.0.0.1' - Specifies which remote IPs that may call this healthcheck servlet. Use ';' between multiple IPs.
healthcheck.catokensigntest; default: 'false' - if the check of CA tokens should actually perform a signature test on the CA token, or it should only see if the token status is active.
healthcheck.publisherconnections, default: 'false' - Defines if a connections test to all configured publisers should be performed.
By editing a maintenance file on the server, you can make the service return an error message stating that the server is down for mainenance.
This is very useful in a cluster when you can take cluster nodes in and out of rotation by editing a simple text file.
healthcheck.maintenancefile, default: not set - location of file containing information about maintenance.
healthcheck.maintenancepropertyname, default: DOWN_FOR_MAINTENANCE - the healthcheck.maintenancefile should contain a single line like this 'DOWN_FOR_MAINTENANCE=true'.
The following parameters configure what message or HTTP error code the health service returns.
healthcheck.okmessage, default: 'ALLOK' - Text string used to say that every thing is ok with this node.
healthcheck.sendservererror, default: 'true' - if a HTTP errorcode 500 should be sent in case of error.
healthcheck.customerrormessage, default: null - Set this parameter if you want a static error message instead of one generated by the HealthChecker.
If an error is detected one or several of the following error messages is reported.
"MEM: Error Virtual Memory is about to run out, currently free memory : number" - The JVM is about to run out of memory.
"DB: Error creating connection to database" - JDBC Connection to the database failed, this might occur if DB craches or network is down.
"CA: Error CA Token is disconnected: CAName" - This is a sign of hardware problems with one or several of the hard ca tokens in the node.
"MAINT: DOWN_FOR_MAINTENANCE" - This is reported when the healthcheck.maintenancefile is used and the node is set to be off line.
"Error when testing the connection with publisher: PublisherName" - This is reported when a test connection to one of the publishers failed.
Which CAs that are checked by the health check service can be configured in the admin web on the CA Activation page as well as in the Edit CA page.
Note
To be fully Common Criteria compliant, a different key for signature tests than certificate signing should be used in the CA's HSM token
configuration (the "testKey" alias should point to a key with no other uses).
Reference manual
All configuration options, JNDI names etc is configured through the use of properties files in conf/*.properties file.
You can copy the .sample files to respective .properties files and configures. Most options are documented in the .samples files.
Other Configuration
To change ports (default public http=8080, public https=8442, private https=8443) you must edit
conf/web.properties. Change the properties httpserver.pubhttp, httpserver.pubhttps and httpserver.privhttps.
After making the change, run 'ant deploy', 'ant web-configure', and re-start the application server.
Asn1Dump
You can make an asn1 dump of a certificate in order to study the asn1 produced:
bin/ejbca.sh asn1dump <filename-of-pem-encoded-certs or filename-of-der-encoded-asn1>
Ex: bin/ejbca.sh asn1dump managementca.pem
Batch creation of certificates
Certificates can be created batch-wise with EJBCA. The class
org.ejbca.ui.cli.batch.BatchMakeP12 creates keystore files for
all users designated as NEW or FAILED in the local RA database.
To be able to batch generate certificates, the users must be registered
with clear text passwords. To set a clear text password for a user use
bin/ejbca.sh ra setclearpwd username password
bin/ejbca.sh ra setendentitystatus username 10
The same is accomplished in the Admin-GUI by checking the checkbox 'Batch generation' when adding the user.
To generate keystore files for all users with status NEW or FAILED, run
bin/ejbca.sh batch
This will generate files for users if their clear text passwords are NOT null.
Without arguments 'batch' generates keystore files for all NEW or FAILED users.
To generate a keystore file for a specific user, enter command
bin/ejbca.sh batch username
Generated keystore files are stored in a subdirectory (to the
current directory) called 'p12'. If the directory does not exist,
it will be created.
Make sure this directory is WELL protected, since the
information contained in keystore files are secret (private keys).
The format of keystores generated, PKCS12, JKS or PEM, is defined when adding the
user in the database (using 'bin/ejbca.sh ra addendentity' or the admin-GUI).
Fetching certificates and CRLs
Certificates and CRLs can be fetched through the public web-interface.
They can also be fetched directly from
the 'CertificateStoreSession' session bean or using the command
'bin/ejbca.sh ca getcrl'
Other deployment scenarios
EJBCA can be run with servlets and EJBs or only with EJBs. The
servlets are only a publicly available front-end to the beans.
If the CA is deployed integrated in another JEE application,
this front-end may not be needed.
Customizing EJBCA
You can change any part of EJBCA to better suit your specific needs.
Handling changes in a separate tree (EJBCA >= 3.5)
You can keep your personal modifications of EJBCA in a separate tree. Set the location
of your personal modifications in conf/custom.properties or use the default location
'$EJBCA_HOME/../ejbca-custom'. Your modifications will automatically overwrite any
existing file(s) found in the EJBCA_HOME-directory or its subdirectories before
executing an 'ant'-command. A sample, conf/custom.properties.sample, is provided.
Example usage:
You have a working set of configuration files and database from the latest
stable release, and want to try the latest trunk snapshot.
Backup your database
Copy $EJBCA_HOME/conf/ to $EJBCA_HOME/../ejbca-custom/conf/
Copy $EJBCA_HOME/p12/ to $EJBCA_HOME/../ejbca-custom/p12/
Copy $EJBCA_HOME/src/java/*.properties and modules/ejbca-common/src/*.properties to $EJBCA_HOME/../ejbca-custom/src/java/ and ../ejbca-custom/modules/ejbca-common/src/
You can now remove the entire $EJBCA_HOME-directory and replace it with the a fresh snapshot from
the trunk. Restore the database and all the config and generated keys will be restored to $EJBCA_HOME
next time you run "ant deploy" etc.
Please note that
there is no way to recover overwritten files, so you have to manually restore
files if needed.
ant will not be able to detect if your changes are incompatible with newer
versions of EJBCA. Always use 'diff' on the different versions to see if any file
you override is affected.
contributed new features or improvements that many would benefit from is greatly
appreciated by the community and makes your maintenance easier
Adding your own public web-pages
The public web-pages are written in JSP and can be found under modules/publicweb-gui/resources/.
Modify the pages (directly or by using a separate tree), rebuild and redeploy. The
changes should show on http://ejbcahost:8080/ejbca.
Plug-in interfaces
There are several plug-in interfaces where you can extend functionality using your own classes:
And of course, since it is open source you can modify anything you like, or use any of the interfaces and create your own add-ons.
See below for how to easily manage such add-ons and plugins.
EJBCA plugin build system
In case you (for example) want to extend the RA functionality considerably, possibly including additional
database tables as well, you may consider using the EJBCA plugin scheme which provides custom
applications with the core EJBCA environment data. In the directory src/samples/plugins you will find
a couple of complete demo plugins that can be added to an existing EJBCA installation
without any configuration. See the src/samples/plugins/README file for details.
Also see conf/plugins/plugin.properties.sample for instructions how to layout and configure your plugins.
Plugins are built and packaged together with the rest of the EJBCA components into the "ejbca.ear" file.
Adding your own rules to regulate the values of End Entity Fields
It is possible to define a set of rules to control the format of the End Entity fields. For example, it is possible to ensure that
the subject DN serial number is always a number of six digits, or should always end with the letter 'N'.
Setting such rules is done by implementing the static function org.ejbca.core.model.ra.FieldValidator.validate(). In this function,
you can define a rule that is applicable to a specific field in a specific End Entity profile. Should the field value not match
the rule, a CustomFieldException should be thrown and the error message you set in the exception will be shown as the error message
in the GUI. This rule will be checked each time an end entity is added or changed, whether is was added or changed by the GUI or otherwise.
To avoid losing these rules when updating the EJBCA version, the new FieldValidator class should be stored in a ejbca-custom folder.
Please see the "Handling changes in a separate tree" section above.
Using the demo servlet
It is a demo servlet that will accept any incoming post, create a user with a unique username, and instantly
send back a certificate. The entity- and certificate profiles used are sent as parameters in the post.
To set up the demo servlet:
Find out the CA id of the CA you want to use for signing of the demo certificates. Use the Admin GUI or 'bin/ejbca.sh ca listcas' to find the integer value that is the CA id.
Configure the CA id in modules/publicweb-gui/src/org/ejbca/ui/web/pub/DemoCertReqServlet.java, it's the parameter DEFAULT_DEMOCAID.
Edit src/publicweb/publicweb/WEB-INF/web.xml and uncomment the two sections for the demo servlet.
If using UTF-8 to display the web-page containing the demo form to the users, change ISO-8859-1 to UTF-8 for the env-entry 'contentEncoding'. Otherwise national characters in names will be encoded/displayed incorrectly in the certificates.
Deploy with 'ant deploy'.
Create an end entity profile and a certificate profile that should be used for the demo certificates.
Create a demo apply page containing something similar to the sample form below for Firefox. There are some sample scripts under modules/publicweb-gui/resources/.
<form name="demoreq" action="http://127.0.0.1:8080/ejbca/democertreq" method="post">
  Please fill out the form and click <b>Enroll</b> to receive your certificate.
  Read our <a href="https://www.primekey.se/primekey/en/Demo.html">privacy policy</a>.<br>
  <input name="certificateprofile" value="DemoCertProfile" type="hidden">
  <input name="entityprofile" value="DemoEntityProfile" type="hidden"><br>
  <br>
  Full name:
  <input name="user" value="C=SE,O=PrimeKey Solutions AB,OU=Demo,CN=" size="25" maxlength="60" class="input" type="text">
  <p align="left"> E-mail:
  <input name="email" size="25" maxlength="60" class="input" type="text">
  <input name="includeemail" value="true" type="hidden">
  </p>
  <p align="left"> Choose key length from the list below. The default is recommended in most cases. <br>
  <br>
  <keygen type="hidden" name="keygen" value="challenge">
  </p><p align="left">
  <input value="Enroll" name="submit" type="submit">
</form>
You can use some hidden fields and some java script to for example only ask for a name, and concatenate it with a hidden partial DN to produce
a full dn for the 'user' parameter. Use your imagination!
Samples
A collection of samples are available in the directory modules/ejbca-ejb/src/org/ejbca/samples/ and doc/samples/. You can also look for classes with "Dummy" in the name.
Troubleshooting
To find cause and description of errors look in the JBoss server log. For JBoss 5 this is located in server/default/log/server.log. For JBoss 7/EAP 6 it is located in standalone/log.
If this does not display enough information, enable DEBUG logging according to the Log4J configuration described above and check the log file.
Don't get intimidated by long stack-traces. Try to look for the message text and additional clues on lines starting with "Casued by:"
Check the documentation. Double-check so everything really is configured the way it should and that you did not skip any step that didn't seem important.
Try to reproduce this in a test environment with full DEBUG logging.
Find out under what circumstances this occurs: seemingly spontanious or as a response to a certain set of actions or input
Search for a solution. Perhaps someone else has had this problem and discussed it somewhere?
Use support forums or mailing list to get help (provide full context, environment, the relevant logs, steps taken and what you are trying to accomplish)
File a bug report in the issue tracker
Information about professional support can be found here
Character limitations
Since the Admin GUI still uses some JSP and EJBCA at some occasions uses string concatenation
to build SQL querys, we have to ban some characters to avoid XSS-attacks and SQL-injections:
\" \n \r \\ ; ! \0 % ` < > ? $ ~
(\n is newline, \r is carriage return, \\ is backslash, \0 is null)
These characters will be replaced by /. ',' can be escaped ,'\,'.
The current JavaScrips used in Admin GUI might also limit you ability to use any UTF-8 character.
org.cesecore.util.StringTools contains the full list of characters banned for different purposes.
Code signing
Being able to verify the integrity of a release or deployed EAR-archive might be
required for some setups. Currently both ant targets "ziprelease" and "ca.ear"
(invoked from "deploy" and the default target) supports jar-signing
with the "jarsigner" command included with Java. Note that you still could remove
files from a signed archive without anyone noticing since the files are signed
individually. To create a signed ziprelease of EJBCA:
ant ziprelease -Dejbca.zipversion=x_y_z -Dsignjar.keystore=p12/releasesigner.jks -Dsignjar.keystorealias=releasesigner -Dsignjar.keystorepass=foo123
The certificate used for the signature must have key usage "Digital Signature"
and extended key usage "Code Signing". The signed archive can be verified using
the "jarsigner" command and the CA-certificate. This example will output any
unsigned file or file with a bad signature:
$ jarsigner -verify -keystore p12/truststore.jks -verbose ../ejbca_x_y_z.zip | grep -v "^smk" | grep -v "^ *0"

      246809 Tue Oct 21 13:28:48 CEST 2008 META-INF/MANIFEST.MF
      246930 Tue Oct 21 13:28:48 CEST 2008 META-INF/RELEASES.SF
        1859 Tue Oct 21 13:28:48 CEST 2008 META-INF/RELEASES.RSA

  s = signature was verified
  m = entry is listed in manifest
  k = at least one certificate was found in keystore
  i = at least one certificate was found in identity scope

jar verified.
OpenSSL can be used to sign and verify an entire archive, but requires the
public key from the signing certificate:
This button is located under System Configuration and is used to clear the cache on all the nodes in this cluster. In order for this to work,
the operation system should be configured to map the names of the nodes to their IP addresses (i.e. DNS or hosts file). The configuration should be done on all
the nodes in the cluster. See also maximizing performance for information about caching.
Pressing this button sends a http request to the ClearCacheServlet on all the nodes in the "Nodes in Cluster" list and clears the following caches:
Global Configuration Cache, CMP Configurations Cache, SCEP Configuration Cache, End Entity Profile Cache, Certificate Profile Cache, Authorization Cache, CA Cache,
CryptoToken Cache, Publisher Cache, Internal KeyBinding Cache, OCSP Signer Cache, OCSP Extensions Cache, CT Caches and Certificate Store Cache.
Note
After clearing the cache, if not excluded, all CryptoTokens that are manually activated will go off-line
Only other nodes that are in the "Nodes in Cluster" list are allowed to call the ClearCacheServlet. Authorization is based on caller's IP address. On startup of
EJBCA each node adds its hostname to the "Nodes in Cluster" list. The list can also be manually edited on the System Configuration page.
Maximizing performance
General Performance Tips
Normally in a PKI extreme performance is not really an issue. A default installation of EJBCA can easily issue tenths of certificates per second,
which is more than enough even for very large installations.
For OCSP it is more important, but OCSP is also more light weight so the default performance there is hundreds of requests per second.
In more specialized PKI installations there can however be the need to issue hundreds of certificates per second. Therefore we provide a small list of
configuration items that can maximize performance of EJBCA to issue more than 100 certificates per second (depending on hardware etc).
Enable database indexes, see doc/sql-scripts.
Disable logging to database in cesecore.properties, only use Log4jLogDevice. This removes a database insert and gives a big boost.
Configure Log4j to log only to file, not console, and use only INFO or ERROR logging, not DEBUG. This can give a small improvement.
Disable use of CertReqHistory in CA configuration. This removes a database insert and gives a big boost.
Disable finishUser in CA configuration. Verify that this is ok first by reading the documentation for this feature. This can save a database read and update.
Enable all caches in cache.properties. If you cache indefinately you can use the cli command 'bin/ejbca.sh clearcache' if configuration changes are made. This can give a small improvement. See also info about the clear all caches button.
Do not enforce any uniqueness (keys, DN, Subject DN SerialNumber) in CA configuration. This will ensure no extra selects are made and can give a small improvement.
Minimize the number of indexes in the database, only use the ones that are absolutely needed. This makes inserts in the database a bit faster and can give additonal 10%.
Use the native JBoss connectors for http and https. This can give an additional 10%.
If you have a lot of certificates (>100M) it might be a good idea to use a separate table for the storage of the encoded certificates. See the database.useSeparateCertificateTable property in ./conf/database.properties.sample
Throw away CA
EJBCA can be configured to function as a Throw Away CA. In this mode EJBCA simply functions as a high speed certificate factory, issuing certificates but not storing
any trace of them in the local database.
Using EJBCA in Throw Away CA-mode curtails some functionality, foremost the following:
You can not search for issued certificates.
You can not revoke certificates, and thus not use CRLs or OCSP.
If these limitations are acceptable you can gain some benefits by using Throw Away CA-mode:
Maximum performance since no database queries are done. Enable to maximum caching and EJBCA will not make a single call to the database.
Minimal storage requirements. Since no issued certificates are stored in the database only EJBCA configuration needs storage.
Limiting Database Query Size
Certain types of queries can, whether intentionally or not, generate massive amounts of results. In order to not clog up the database driver, EJBCA has a default maximum value of
500 results for certain tables, which affects the following data sets:
Certificates
End Entities
Hard Token Usernames
Should one want to lower or raise the query limit, one may do so under System Configuration. For safety, there is still a hard upper limit of 25,000 entries.
Limiting Database Query Timeout
Certain types of searches can, whether intentionally or not, generate database heavy queries (even full table scans).
In order to not overload the database, EJBCA will try to limit for how long a query is allowed to run for certain searches before aborting.
For such limitations to work, both you database and Java DataBase Connector (JDBC) driver must support this.
This setting currently affects the following searches:
RA GUI Search for certificates
RA GUI Search for end entities
Should one want to lower or raise the default of 10000 ms (10 seconds) in the query timeout, one may do so under System Configuration.
Setting the value to 0 mean that EJBCA will not try to enforce any query timeout and it will default to you appliaction server and database configuration.